.svg)


Nytt utseende, samme flotte produkt! HelloSign er nå Dropbox Sign.
One of the most popular features in our core
It’s little wonder why!
Templates eliminate the need to format the same documents over and over again, saving you precious time and resources.
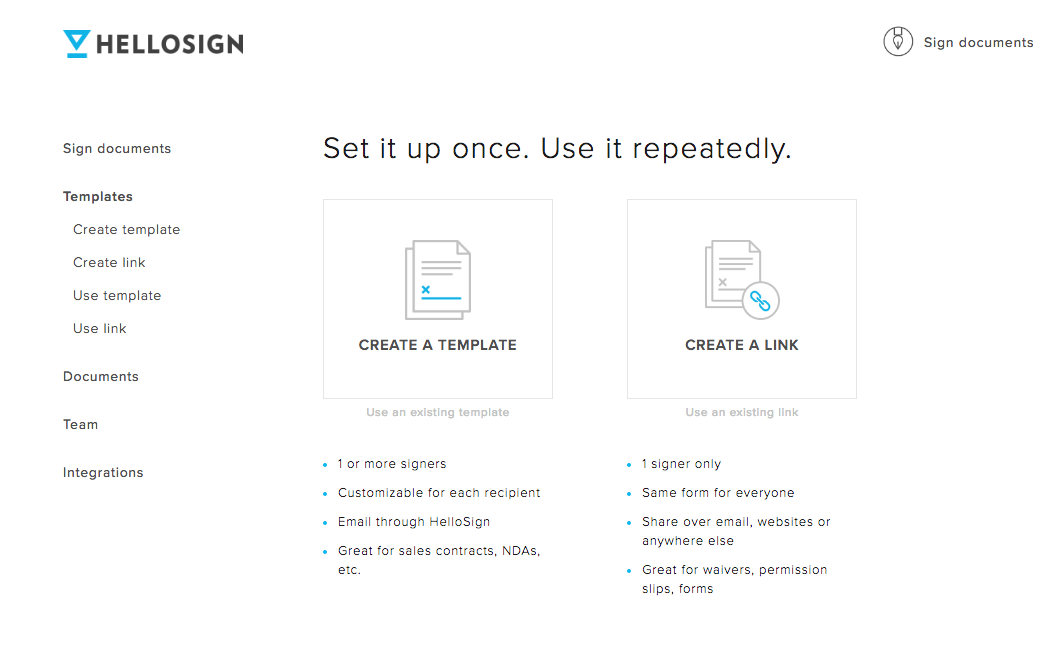
What Are Templates?
Dropbox Sign templates allow users to format a document once and then save the prepared document to a Dropbox Sign account. When the template is opened for use, the previously saved formatting holds, and the signing flow can be initiated without having to drag and drop fields again.
Templates are perfect for high volume documents (like sales contracts, tax forms, investment agreements, HR paperwork, rental leases, and more).
Templates are easily accessible from your Dropbox Sign dashboard.
How To Create a Template
Creating a template is easy! You’ll be finished in just a few minutes depending on the complexity of the document.
Let’s take a look at how to do it. We’ll use a standard residential lease agreement as an example. It’s a medium level complexity document, as it consists of five pages, will require formatting for over a dozen fields, and requires signatures from several signers.
It’s the perfect candidate to show you how beneficial templates are. We’ll just need to spend a few minutes formatting it and then we won’t have to worry about formatting it in the future.
To Begin
To begin the process of creating a template, first navigate to the templates menu in your Dropbox Sign account.
Select the option “Create a Template.”
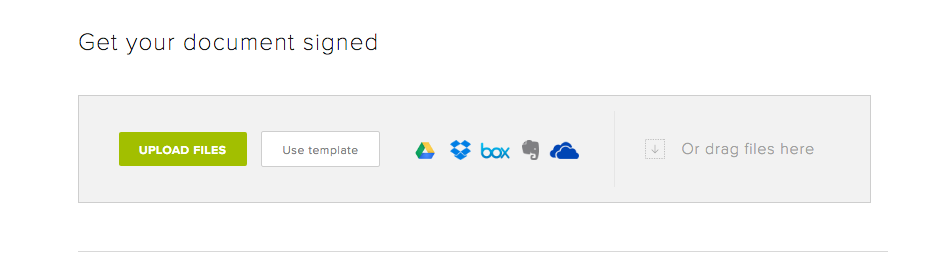
Step 1. Upload Your Document
Next you'll need to upload the document you’d like to turn into a template. You can do so by uploading documents saved to your desktop, pulling in the document from an outside application using one of our many integrations, or dragging and dropping the document file onto your screen.
Step 2. Assign Signing Roles
Now it's time to assign signing roles. Roles represent who needs to sign and/or fill out parts of the document.
Different agreements will require different roles. We've used a Residential Lease Agreement as our example document, so “Landlord” and “Tenant(s)” are the appropriate roles.
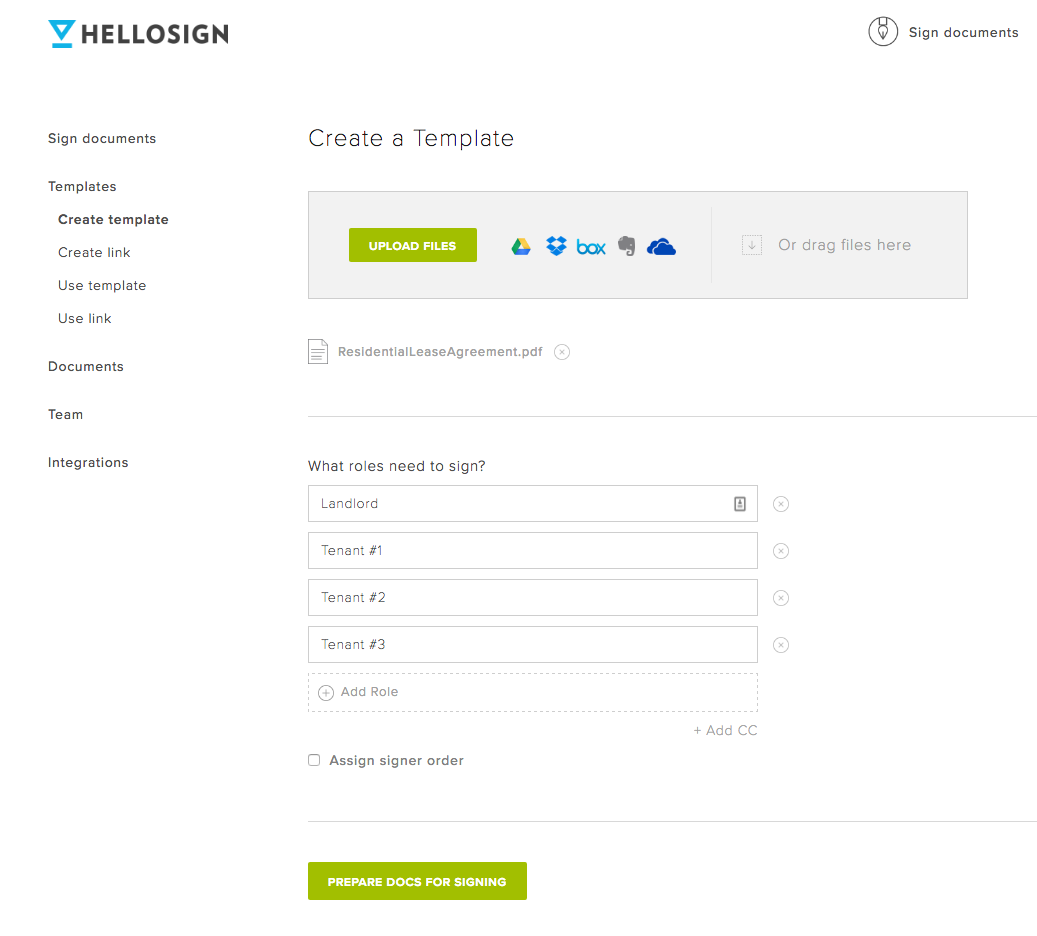
You can also assign a signing order or indicate if there should be any email addresses cc’d this time at this time. Both are excellent options for improving the flow of your document signing process. Signing order ensures that the right people get the document at the right time. Adding cc emails makes it easy to keep stakeholders in the loop.
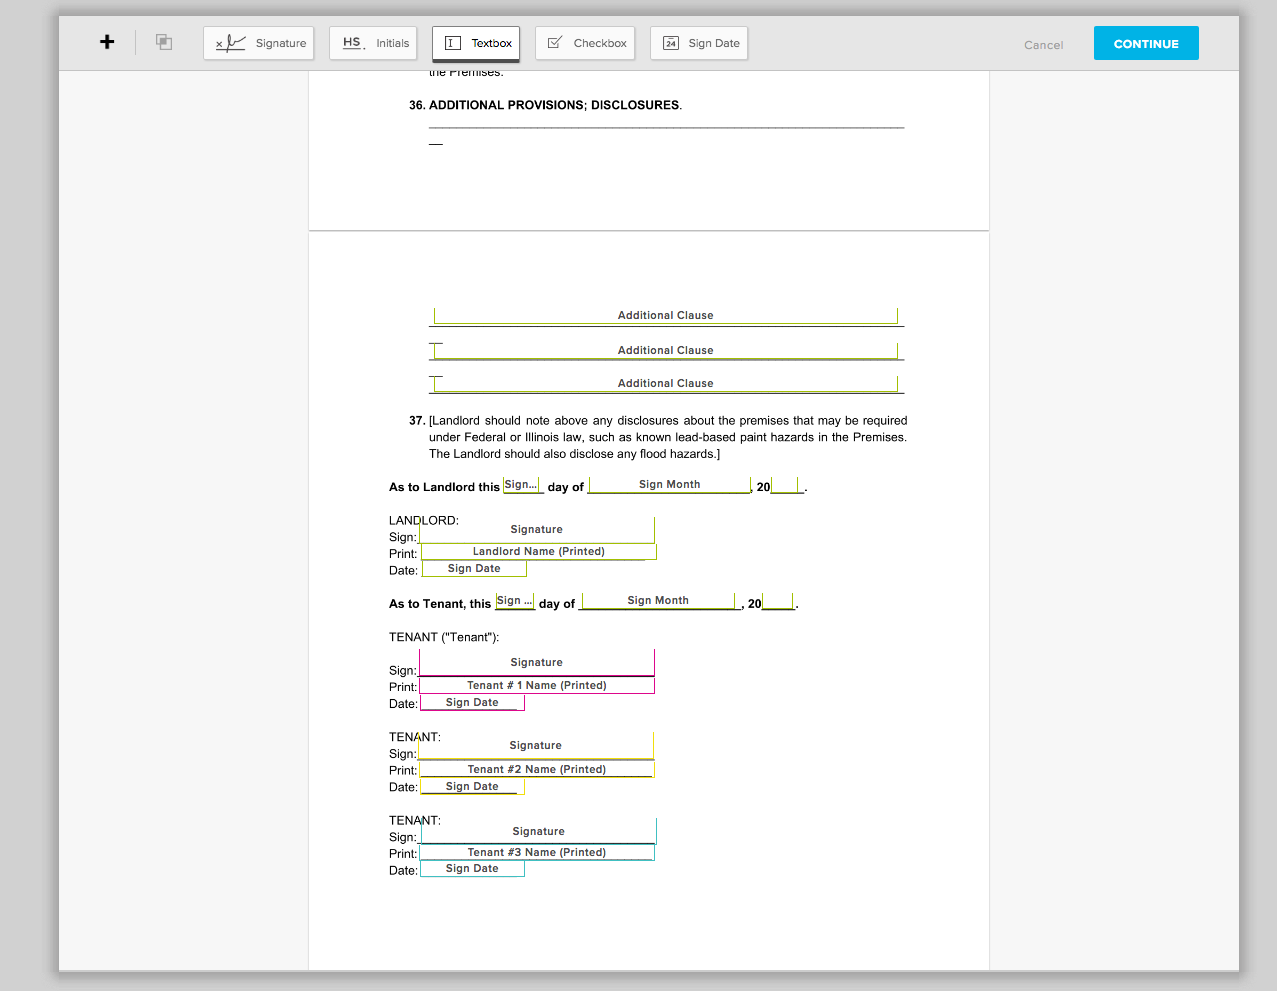
Step 3. Format the document
You have several options when formatting your document. You can use signature fields, initial fields, text box fields, checkbox fields, and/or sign date fields to prepare your document.
You also have the opportunity to assign data validation to individual fields. Data validation helps to reduce errors by protecting against incorrectly formatted information. For example, if you select “Numbers Only” an error message will appear if any letters are entered into the field.

Step 4. Name and Save Your Template
You’re almost there! Once the document has been formatted you’ll just need to name your template and add a default message for recipients. Don’t worry, this message can be changed when sending the document out.

Step 5. Use your template immediately or share with your team
Once the template has been generated and saved, it’s now ready for use! It can be accessed immediately.
You also have the ability to share your template with team members. This is particularly beneficial if multiple team members use the same document(s). For example, say you’re a property management company that employs twenty property managers. You can create a template for your standard agency lease and share with your team.
You’ll only have to format once and they’ll never have to worry about it.

Extreme Automation for Templates: The “Me (when sending)” Option
There’s an additional layer to templates that allows you to streamline your workflow even more: the “Me (when sending)” trick. You'll most definitely want to take advantage of this if you're serious about saving time!
Me (when sending) allows you to automatically fill information into your document when sending. It helps speed up your document flow and saves time for anyone using templates.
The best part about this trick is that it doesn’t take any extra time. You’ll simply need to choose different rules for your document fields when formatting the template.
Let’s take a look at how to do it.
Setting Up “Me (when sending)” for Your Template
The initial steps of formatting the template remain the same, so let’s assume you’ve gone through the motions of uploading your document, adding roles, and are now formatting your document with text fields.
Here’s where the flow changes slightly.
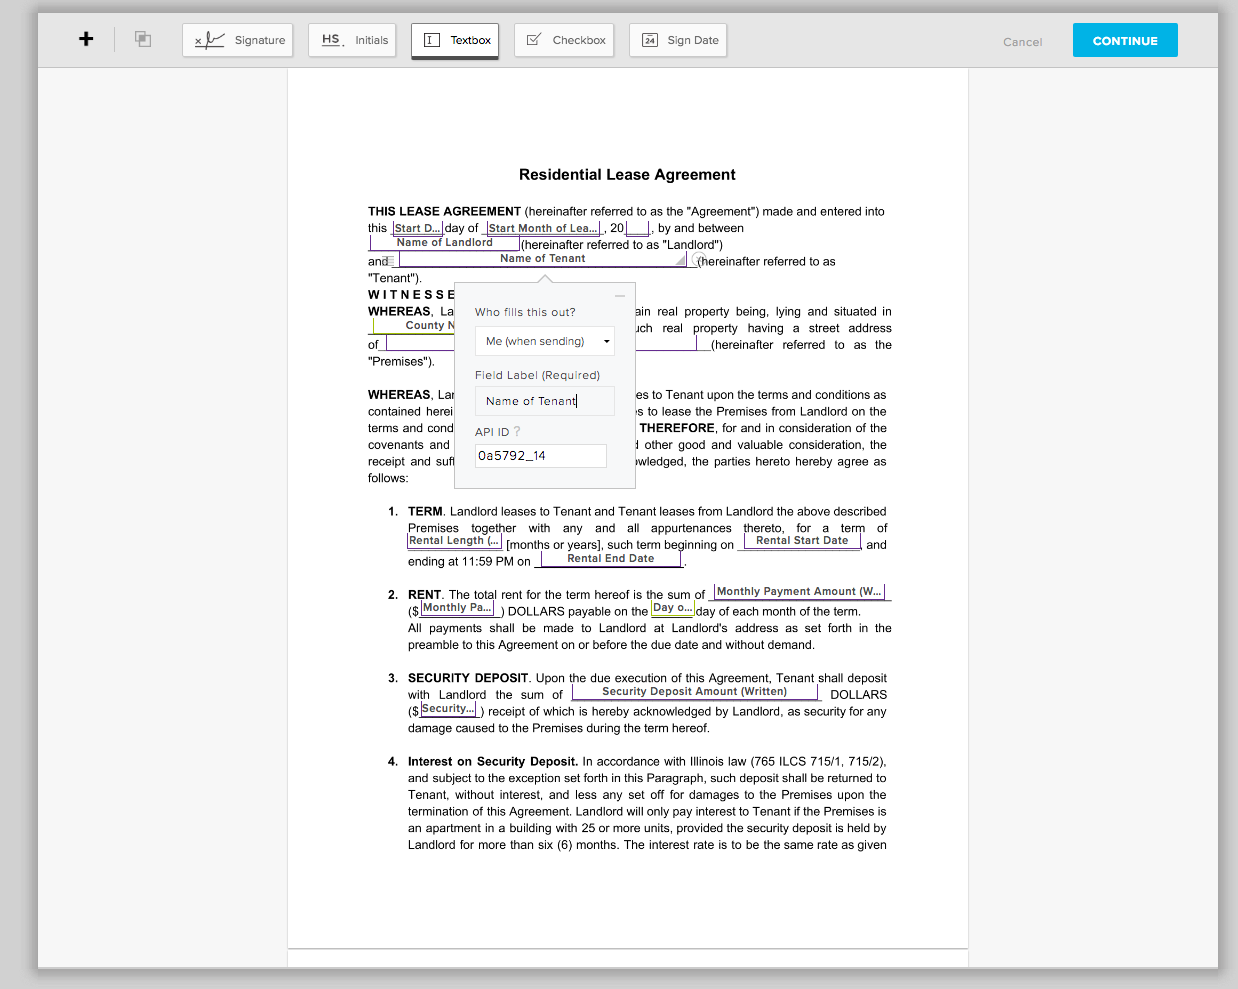
Instead of selecting a role when determining “Who Fills This Out,” select “Me (when sending).” Any field that you format with this parameter will be filled out by you when sending the document for signature, hence the “Me (when sending)” title.
Once you select “Me (when sending), you’ll be required to create a specific label for the field. This label will indicate what information needs to be filled into the document, so be as specific as possible.
In this example below we named the field “Name of Tenant.”
Repeat the step for any other field that you’d like to easily fill out when sending your document.
Next comes the exciting part.
When you next use your template, you’ll be met with a series of labeled fields matching those you set when you formatted the document.
You can see an example below:
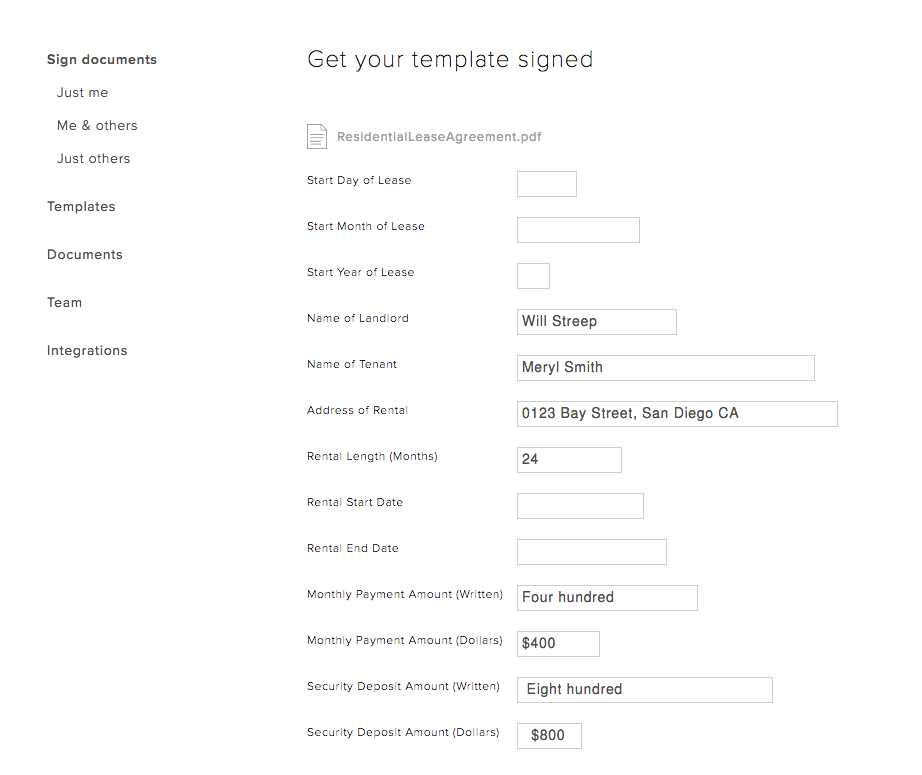
Entering information into those fields will automatically fill the data into document fields with the corresponding label.
Like so:

Who Benefits From Using Templates?
Templates are an excellent way to speed up the signing process and to streamline data entry.
Here's who benefits:
- Preparer(s) of the Template. The experience of setting up a template is incredibly quick and easy. Formatting the document is the lengthiest part of the process, and you’ll only have to do it once. Seeing that most documents can be set up under five minutes, that’s really saying something! The set-up flow also uses the same intuitive designs you see in all our exceptional Dropbox Sign workflows.
- User(s) of the Template. Anyone who uses the template (whether that be you, a teammate, or an entire department) will experience the luxury of sending out online documents that are fully ready to go. Users never have to worry about redundant formatting and can regain precious hours of their day.
- Signer(s). Those receiving the document for signature are prepped for success. They’ll see exactly which fields they need to fill out and benefit for guidance from Dropbox Sign. The signer’s experience is mobile responsive and equally as pleasant for someone signing on their desktop to someone signing on their mobile device.
Try Templates Out for Yourself!
Just because you use a document frequently doesn't mean you need to format it frequently. Sign in to your Dropbox Sign account (or create one here) to prepare your first template.
Vær synkronisert
Thank you!
Thank you for subscribing!


