Now more than ever, it’s important to be uninterrupted during workflows to keep your daily tasks streamlined and frictionless. Whether it’s signing off on budget, completing sensitive HR documentation, or closing a deal, efficiency is key. Dropbox Sign and Dropbox’s commitment to our customers is continuously shown by building and improving tools that enhance workflow optimization and allow users to work faster and easier. Not too long ago, we announced Dropbox Sign bringing eSignature natively in Dropbox. Today, we’re excited to announce that we’re collaborating with Microsoft to bring the ease and simplicity of Dropbox Sign eSignatures to any Microsoft Word document. This integration streamlines the ability to sign and send documents you’re working on directly from Word allowing users to focus on work uninterrupted. Learn more about the benefits of using Dropbox Sign for Word, how it works, and quick tips on how to get started.
Benefits of the Dropbox Sign for Word Integration
With this collaboration comes a suite of benefits to promote a seamless and frictionless workflow. The first benefit is efficiency. Say goodbye to juggling multiple systems just to get an important document signed. Dropbox Sign for Word lets you save time and stay organized with the ability to easily send signature requests for your documents without ever leaving Word.
The second is how quickly you can access Dropbox Sign for Word to get your documents signed. Simply start the eSignature flow with just a click in the Microsoft ribbon to “Self-Sign” or “Request a Signature.” Getting a signature on a document is now as fast and seamless as it can be.
The third benefit is it’s simple and easy to use. With Dropbox Sign for Word, you can be assured we’re bringing a user-friendly and intuitive signing experience. Get eSignatures for any document in only a few clicks—simply assign signers, prep your document with signature fields, and easily send it off for signature.
Lastly, you can trust and work safely with Dropbox Sign. Our commitment to security stays true with this new integration. There’s an Audit Trail that is affixed to each signed document to ensure every action is thoroughly tracked and time-stamped. This provides proof of document access, review, the final signature.
Dropbox Sign for Word helps you create a seamless document and eSignature workflow, here’s how it works:
Installing Dropbox Sign for Word
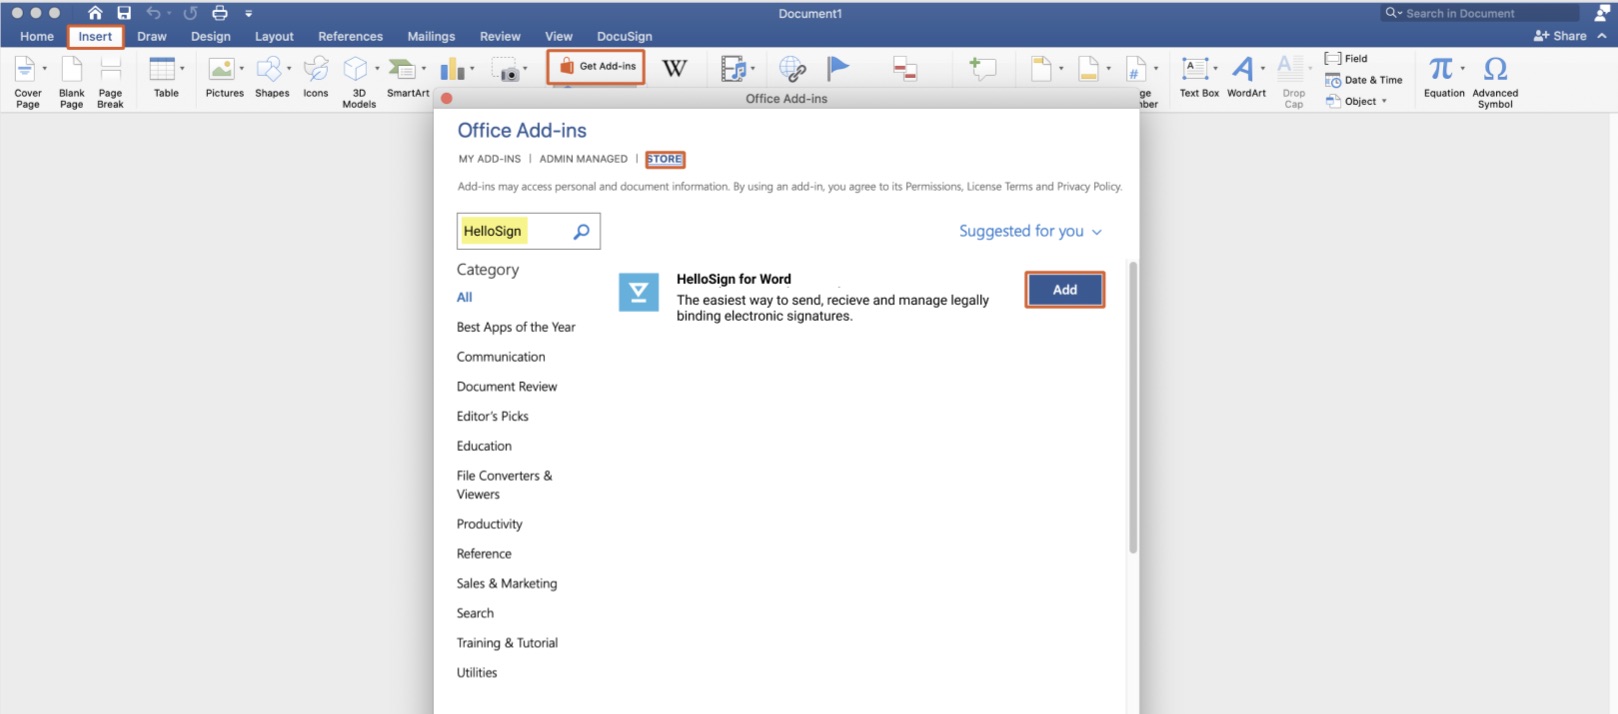
To install Dropbox Sign to Word complete the following steps:

Using Dropbox Sign for Word
Our Dropbox Sign for Word integration supports signing and requesting signatures as well as access to your Dropbox Sign account information.
Self-Sign - For documents you need to sign and fill out
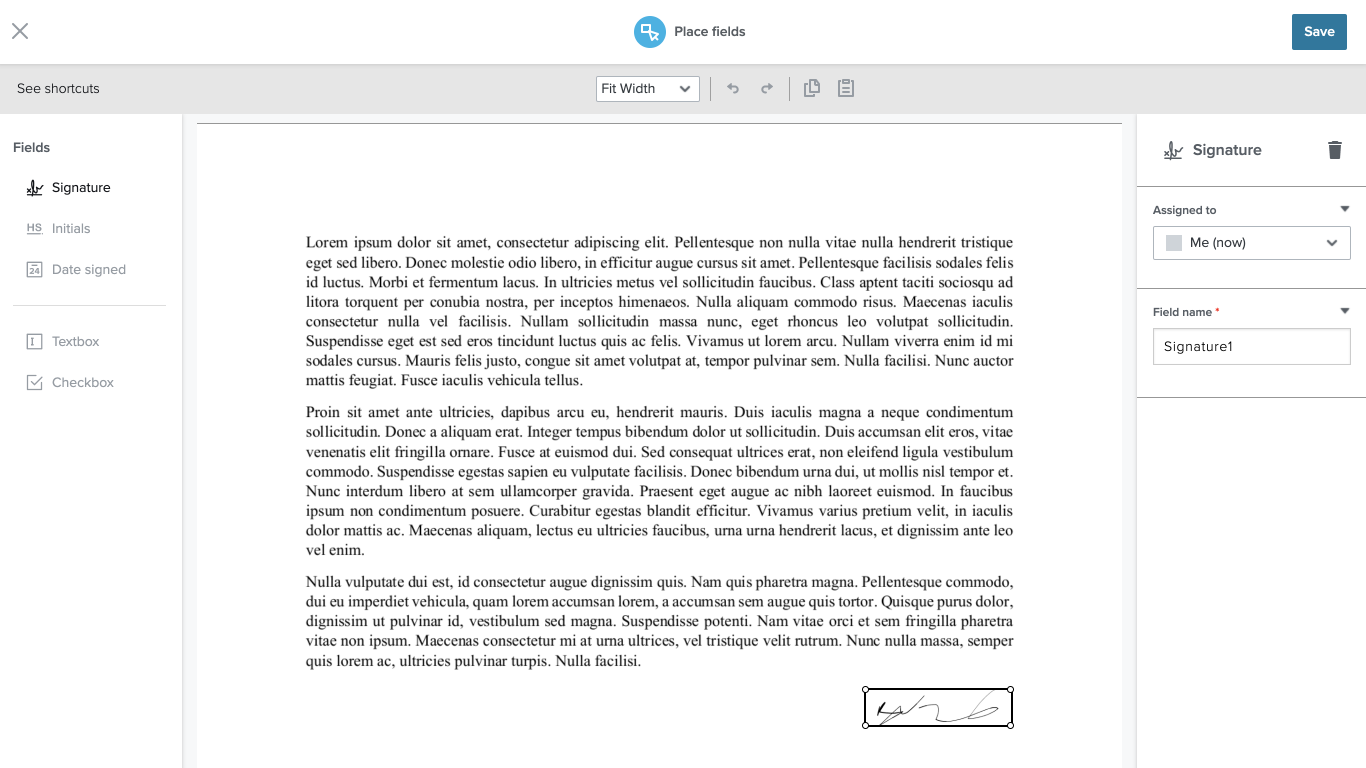
Clicking the Self-Sign option will begin the process of uploading your document to Dropbox Sign for signing. Once uploaded you will see a window popup with your document in the Dropbox Sign signing editor.
To sign the document follow these steps:
- From the left panel drag and drop the Signature field onto the document
- You will be prompted to enter your signature
- You can adjust the location and size of your signature field as necessary
- You may also add additional fields to your document such as Initials, Date Signed, Textbox, and Checkbox
- Once all your fields are on the document click Save on the top right
- Document is now officially signed and in the right task panel in Word you will receive a confirmation message with the option to view and download your signed document

Send for Signature - Documents in which you are requesting others to sign
Clicking the Send for Signature option will begin the process of uploading your document to Dropbox Sign for signing. Once uploaded you will see a window popup with Dropbox Sign's add signers page.
To request signatures on the document follow these steps:
- Enter the name and email for all those that need to sign the document
- Click the Next button on the top right to be taken to the Place fields step
- From the left panel drag and drop the Signature fields for all signers onto the document
- You can adjust the location and size of your signature fields as necessary
- You may also add additional fields onto your document such as Initials, Date Signed, Textbox, and Checkbox
- You can assign fields to different signers using the Assigned To option in the left panel
- Once all your fields are assigned click the Next button to be taken to the final Review and send step
- On the Review and Send step you can add individuals to be CC'd on the request as well as give the request a Title (subject of the email) and Message
- When everything looks right click the Send for signature button to complete the request
- Your document has now been sent and in the right task panel in Word you will receive a confirmation message with the option to view the status of your request in Dropbox Sign
Start streamlining your work today
If you have any questions on how this integration works, don’t hesitate to reach out to our team. For additional information on how to use the Dropbox Sign for Word integration, check out our Help Article to learn more about getting started and how to get your first document signed directly in Microsoft Word.
Fique por dentro
Thank you!
Thank you for subscribing!


