.svg)


新しい名前でも変わらぬ高品質!HelloSign の名称が Dropbox Sign になりました。
Optical character recognition (OCR) is a technique that's used to convert images of texts into machine-encoded text. OCR is commonly used to extract textual data from images and convert handwritten, typed, or scanned text into editable and searchable text.
When it comes to data extraction, OCR is commonplace. It can be used to convert scanned or photographed documents into digital texts, enabling you to extract specific information, such as names, addresses, or numbers, for further processing. OCR can also be integrated with various tools and services. For example, with the help of OCR and a machine learning model, you can extract text from a resume and parse its contents. You can also combine OCR with computer vision to process real estate documents, such as mortgages and loan documents.
If you're interested in OCR, you've come to the right place. In this article, you'll learn how to use PDF.js and Tesseract.js to extract text from a PDF in JavaScript.
What is OCR
OCR is a process that extracts textual data from images or documents. Early OCR systems read only one character at a time and could work with only one language, one font, and clean, high-resolution images. In contrast, modern OCRs typically have multilanguage, multifont support and can handle a variety of images, including blurry, distorted, noisy, and low-resolution images, with reasonable accuracy.
OCR is useful in many different contexts. For instance, you can extract items and prices from a receipt or invoice for data entry, or you can convert a scanned book into digital text for archiving. Additionally, you can use OCR to extract data from a user-uploaded document, such as a CV, certificate, or medical document.
Prerequisites
To follow along with this tutorial, you need the following:
* The latest version of your favorite web browser, such as Firefox, Chrome, or Safari.
* A static file server to serve the HTML files. You can also use other servers, such as Nginx or Apache. This article uses Node.js.
* Your favorite code editor, such as Visual Studio Code or WebStorm.
Extract text from a PDF in JavaScript using Tesseract.js
In this scenario, you're part of a company that wants to digitize its old invoices. Your job is to develop an OCR application to extract all text from a given PDF invoice.
To perform the OCR in JavaScript, you'll use the Tesseract.js library. This library is a pure JavaScript port of the famous Tesseract OCR engine using WebAssembly. With support for over one hundred languages, text orientation and script detection, and an interface for reading paragraph, word, and character bounding boxes, Tesseract.js is one of the best OCR libraries for JavaScript.
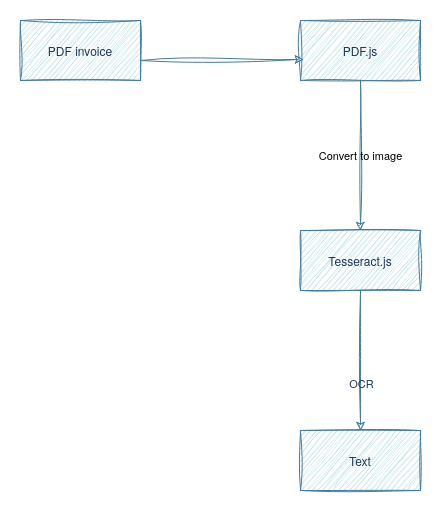
However, Tesseract.js only supports extracting text from an image. That means you need to convert the PDF pages into images first, which is what you'll use PDF.js for. PDF.js not only converts the pages to images but also displays the PDF on the screen simultaneously for a better user experience:
To get started, you need to create a new directory for the project:
In this directory, create an HTML file named `index.html` with the following code:
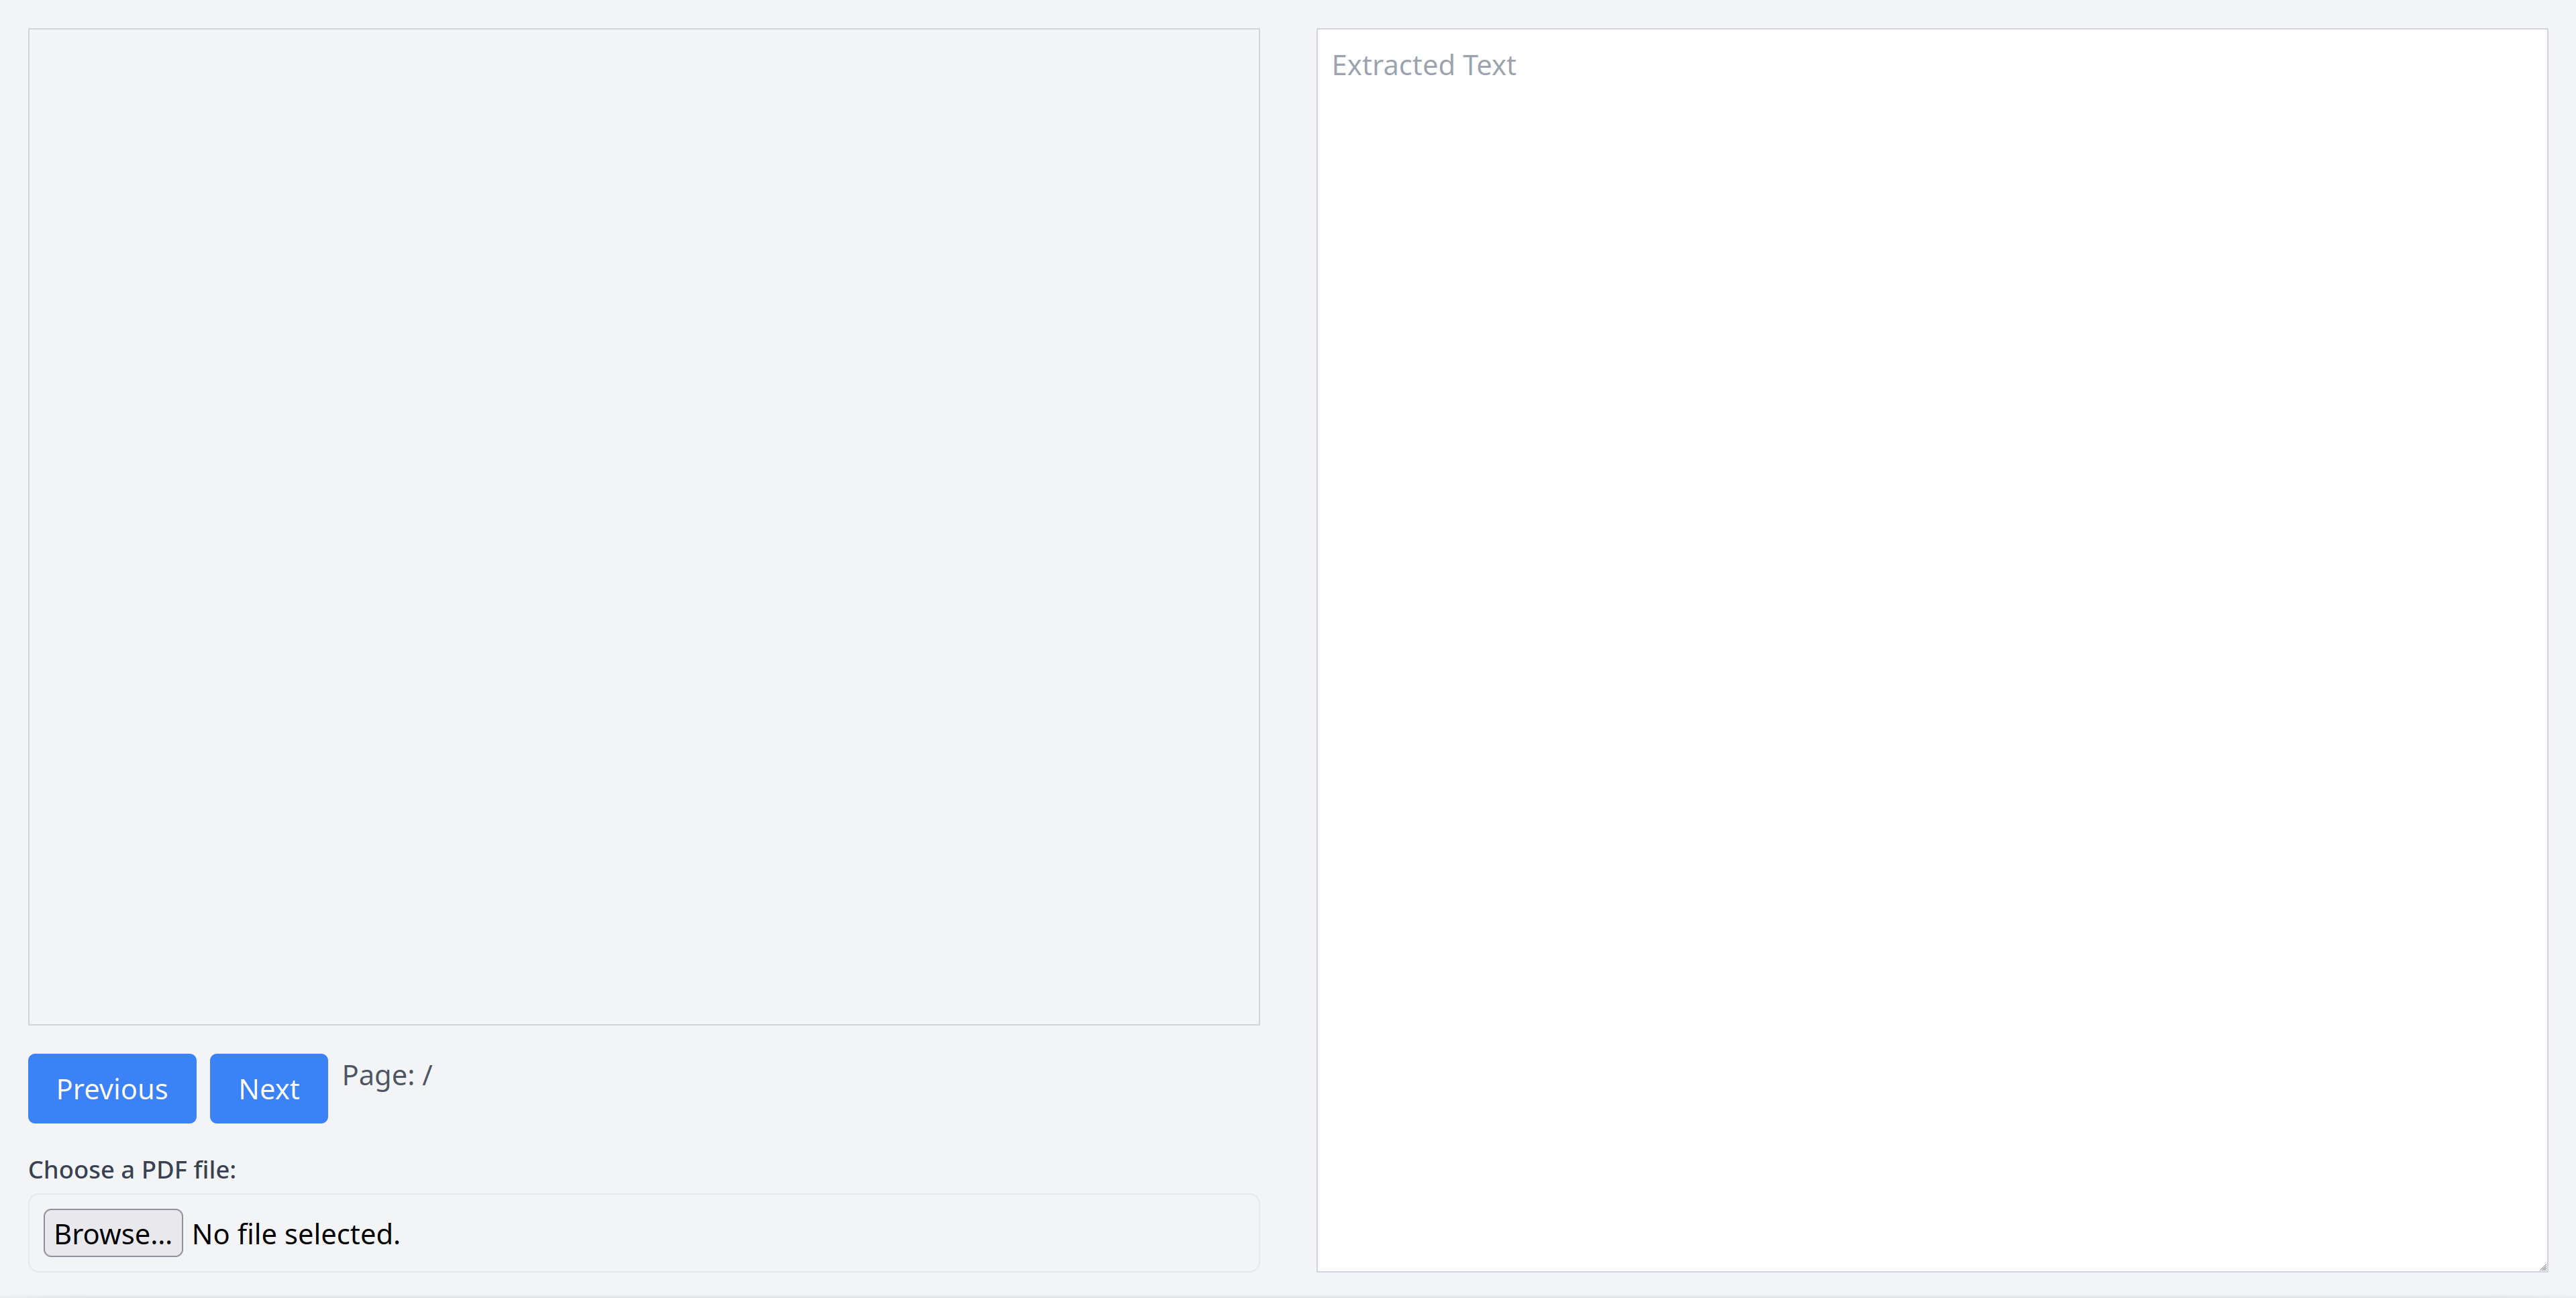
This code sets up the basic structure of the web page by dividing it into two columns. The left column contains the PDF viewer (the `canvas` element within the `div` with ID `pdfviewer`), a file upload input, two buttons to navigate to the next or previous page, and a page counter. The right column contains a `textarea` where the extracted text is displayed.
The HTML file includes some Tailwind CSS for creating a cleaner UI. You can open this file in your favorite web browser, and you should be able to see the following structure:
Add PDF.js
To include the PDF.js JavaScript and CSS files, add the following snippets to `index.html`:
Note: These URLs correspond to the latest version of PDF.js as of the time of writing this article. If you change these URLs, the code in this article may not work.
Then create a new directory named `js` inside the project root and create a file named `main.js` inside it. This is where the heart of the code will go.
Build the PDF viewer
In this section, you'll build the PDF viewer before you perform the OCR.
Start by declaring some global variables:
The last two variables are needed to implement the next/previous functionality. You can't render two pages on the same canvas simultaneously, so you have to wait for the previous render to finish. When the user presses the next or previous button, the new page is rendered if `pageRendering` is `false` (ie the previous render is complete). Otherwise, the new page is queued to be rendered by putting the new page number in the `pageNumPending` variable.
Next, create an `async` function named `showPDF`, which loads and renders the PDF:
This function loads a worker from the PDF.js content delivery network (CDN) and uses `getDocument` to load a PDF. The argument `pdfData` that is passed to this function is a Base64-encoded data URL.
After the PDF is loaded, the total page count is set on the `page_count` span, and the `renderPage` function is called with `pageNum` as an argument. The initial value of `pageNum` is `1`, which means the first page is rendered first.
Create another async function named `renderPage`:
This function fetches the page as referenced by the `num` variable using the `getPage` function. Then it prepares the `canvas` by setting an appropriate height and width by fetching the viewport from the PDF page. Using the `render` function, the page is then rendered.
If the rendering is complete, the function sets `pageRendering` to `false`. Then if `pageNumPending` is not `null`, the pending page is rendered. Finally, the current page number is set.
In the same file, create a new function called `queueRenderPage` that renders a new page if the previous render has finished. Otherwise, it queues the new page:
Then create the event listeners for the next and previous buttons:
Create a new function named `readFileAsDataURL` that takes the uploaded PDF file and converts it into a data URL:
Add the event listener to the file upload input that calls `readFileAsDataURL` and then calls `showPDF` to render the PDF:
In `index.html`, add the `main.js` file as a script:
Because `main.js` is linked as a `module`, you'll run into cross-origin resource sharing (CORS) issues if you try to open `index.html` in your browser. Instead, you should use a static file server to serve the HTML and JavaScript files. To do so, use the `serve` package in Node.js. Install it with `npm install -g serve` and run the following command from the root of the project directory:
Visit `localhost:3000` in your web browser, and you should be able to open the web page.
Then you can try out the PDF viewer by uploading a PDF file. If you want, you can use this sample PDF file. You should see the first page being rendered:
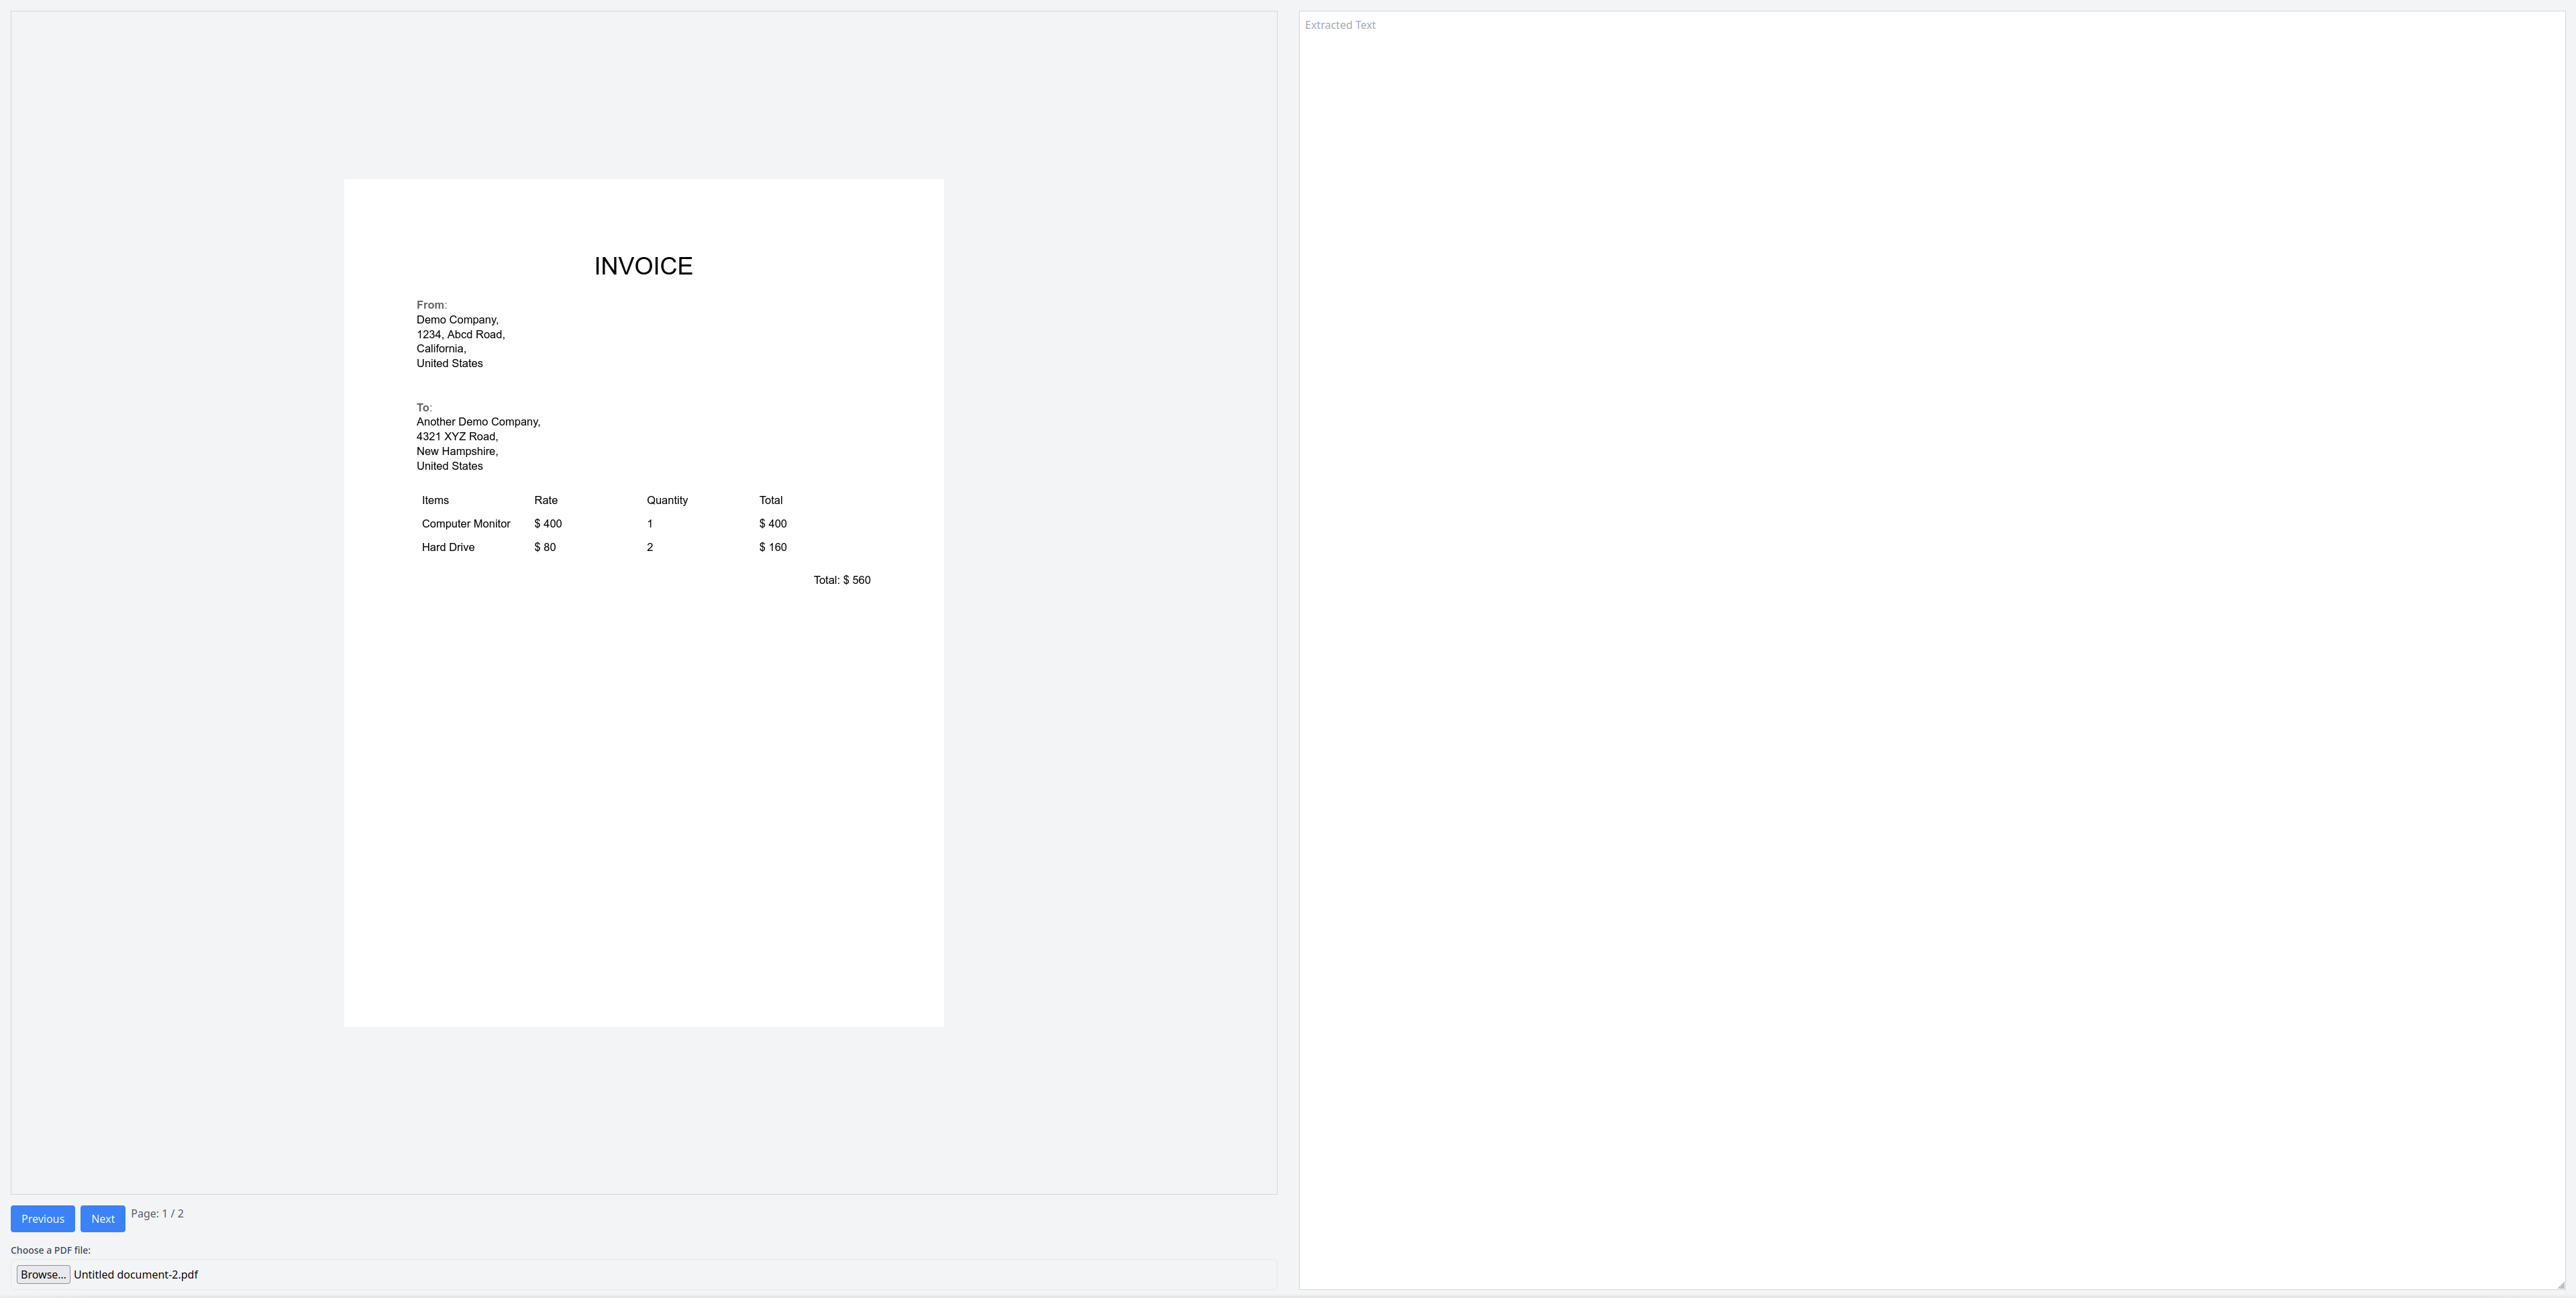
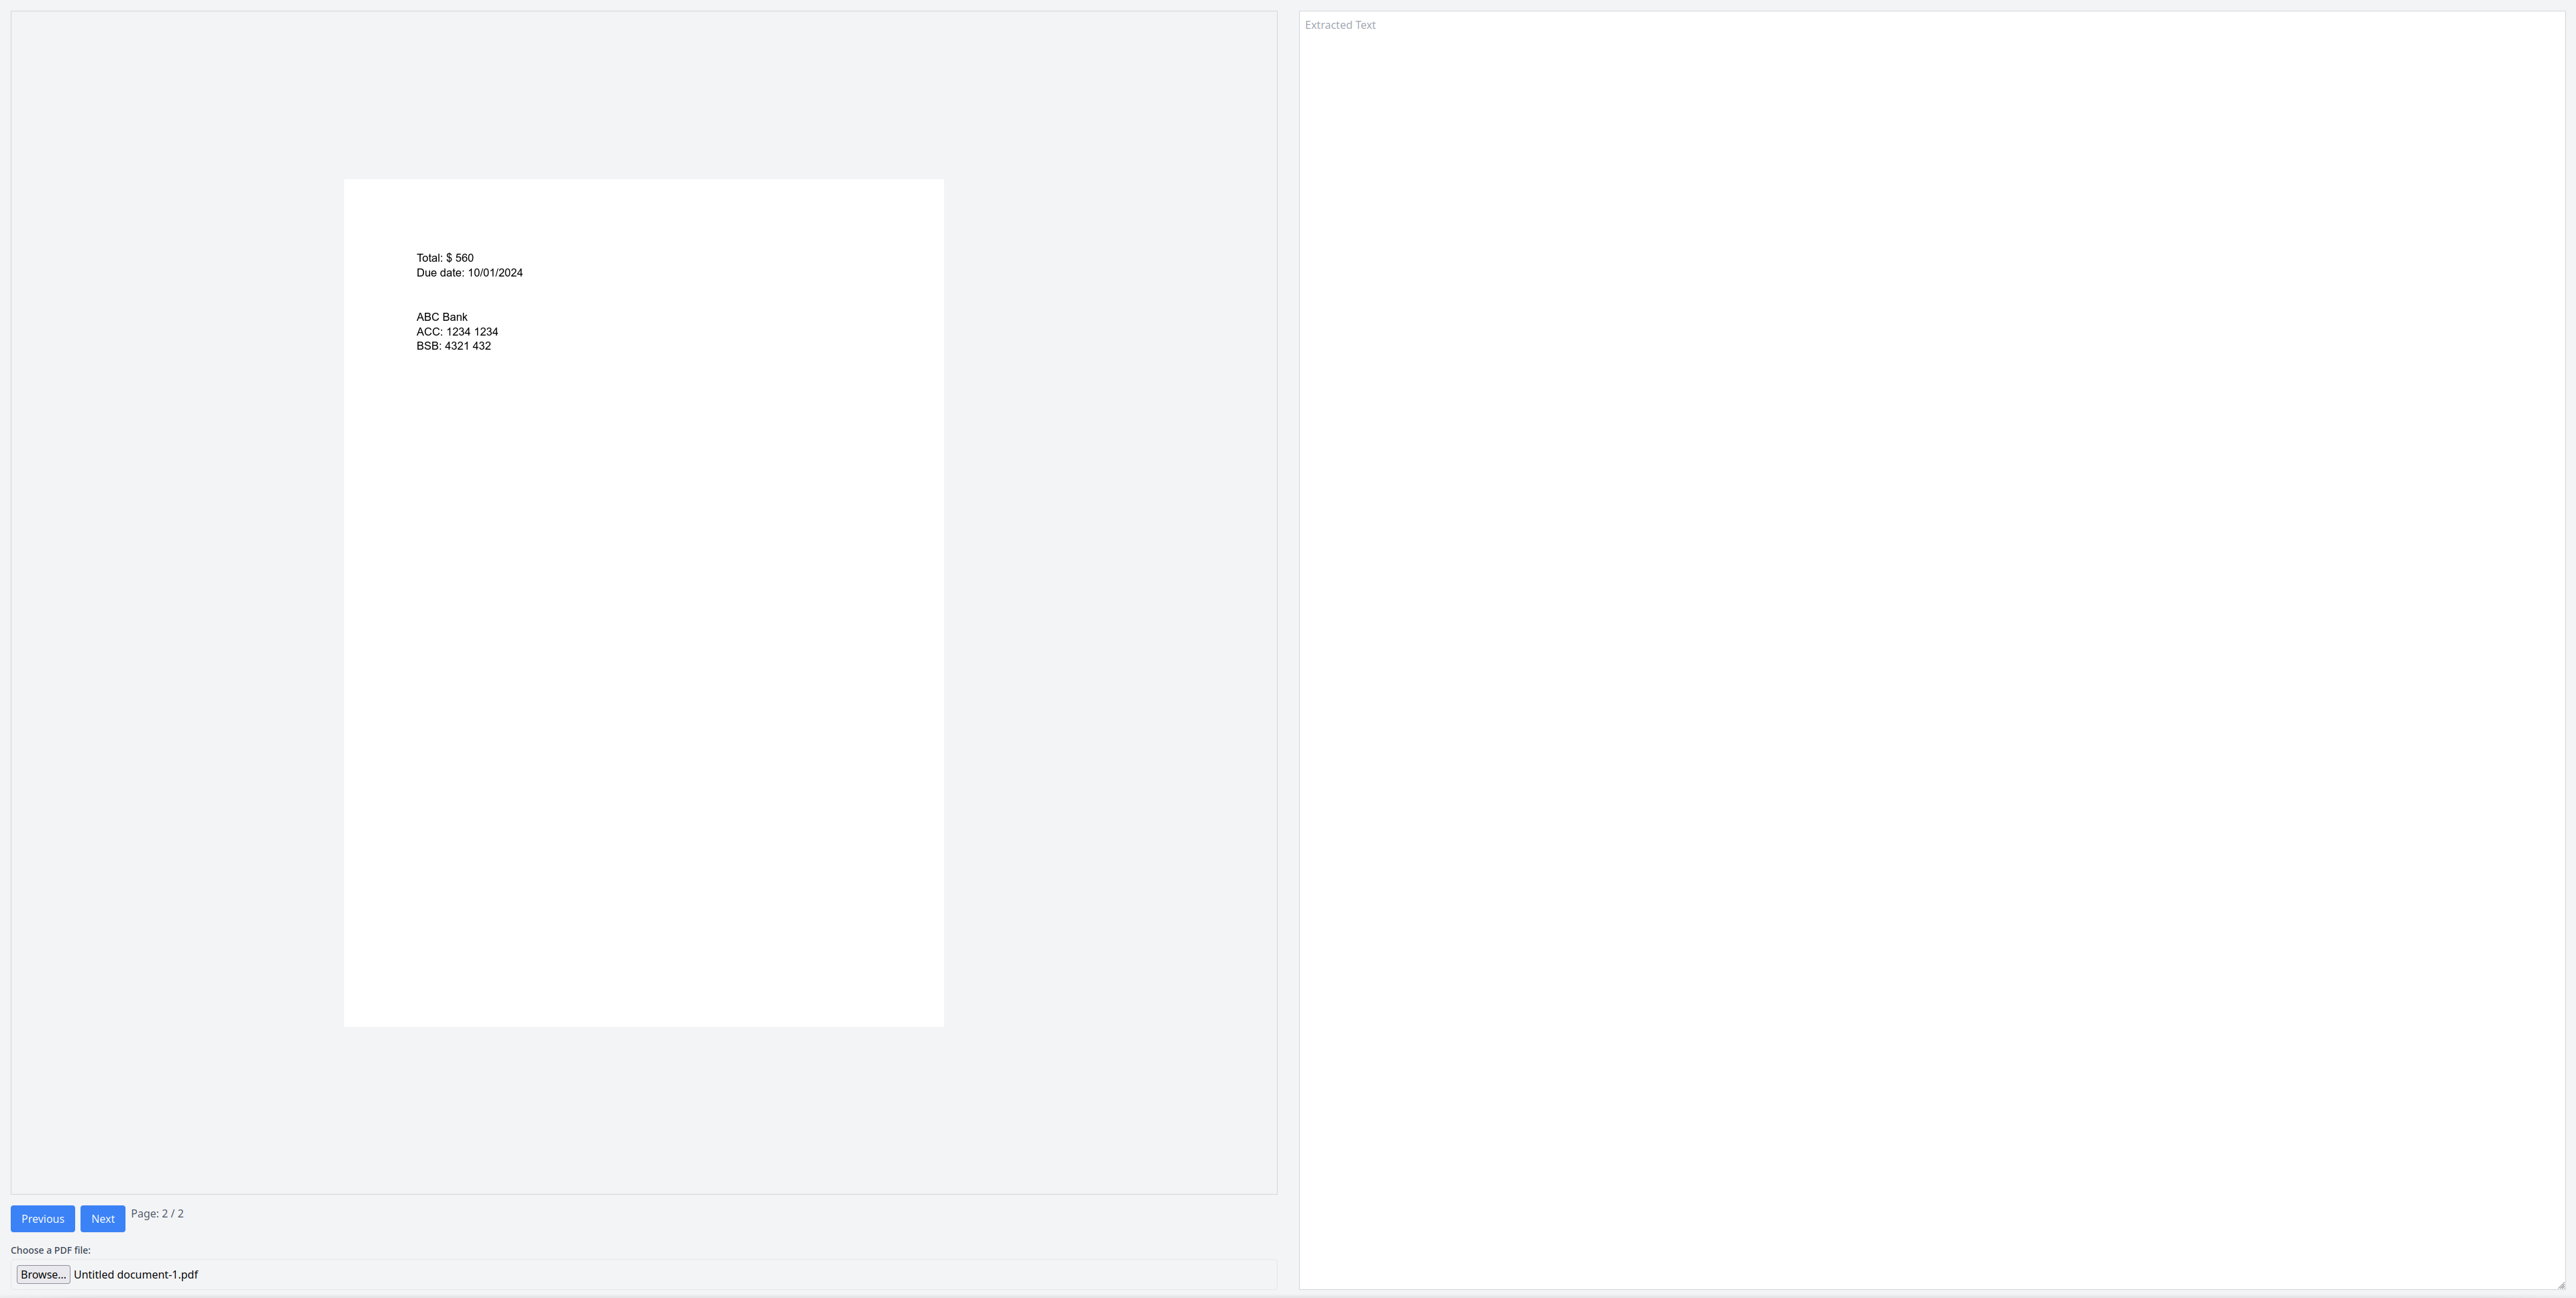
When you press the Next button, the next page should render:
Perform OCR with Tesseract.js
To perform OCR with Tesseract.js, start by adding the Tesseract.js JavaScript file from the CDN:
Note: These URLs correspond to the latest version of Tesseract.js as of the time of writing this article. If you change these URLs, the code in this article may not work.
Then in `main.js`, add a global variable to hold the `TesseractWorker`:
Create a new function called `initTesseract` that initializes the worker:
The worker is loaded from the Tesseract.js CDN, and English is chosen as the language.
Create a function called `loadImage` that takes the rendered page in the canvas and converts it into an `Image` object:
Then create a function `extractText` that performs the OCR on the image by calling the `recognize` function from Tesseract.js:
Finally, call `extractText` in the `renderPage` function right after the page rendering is complete:
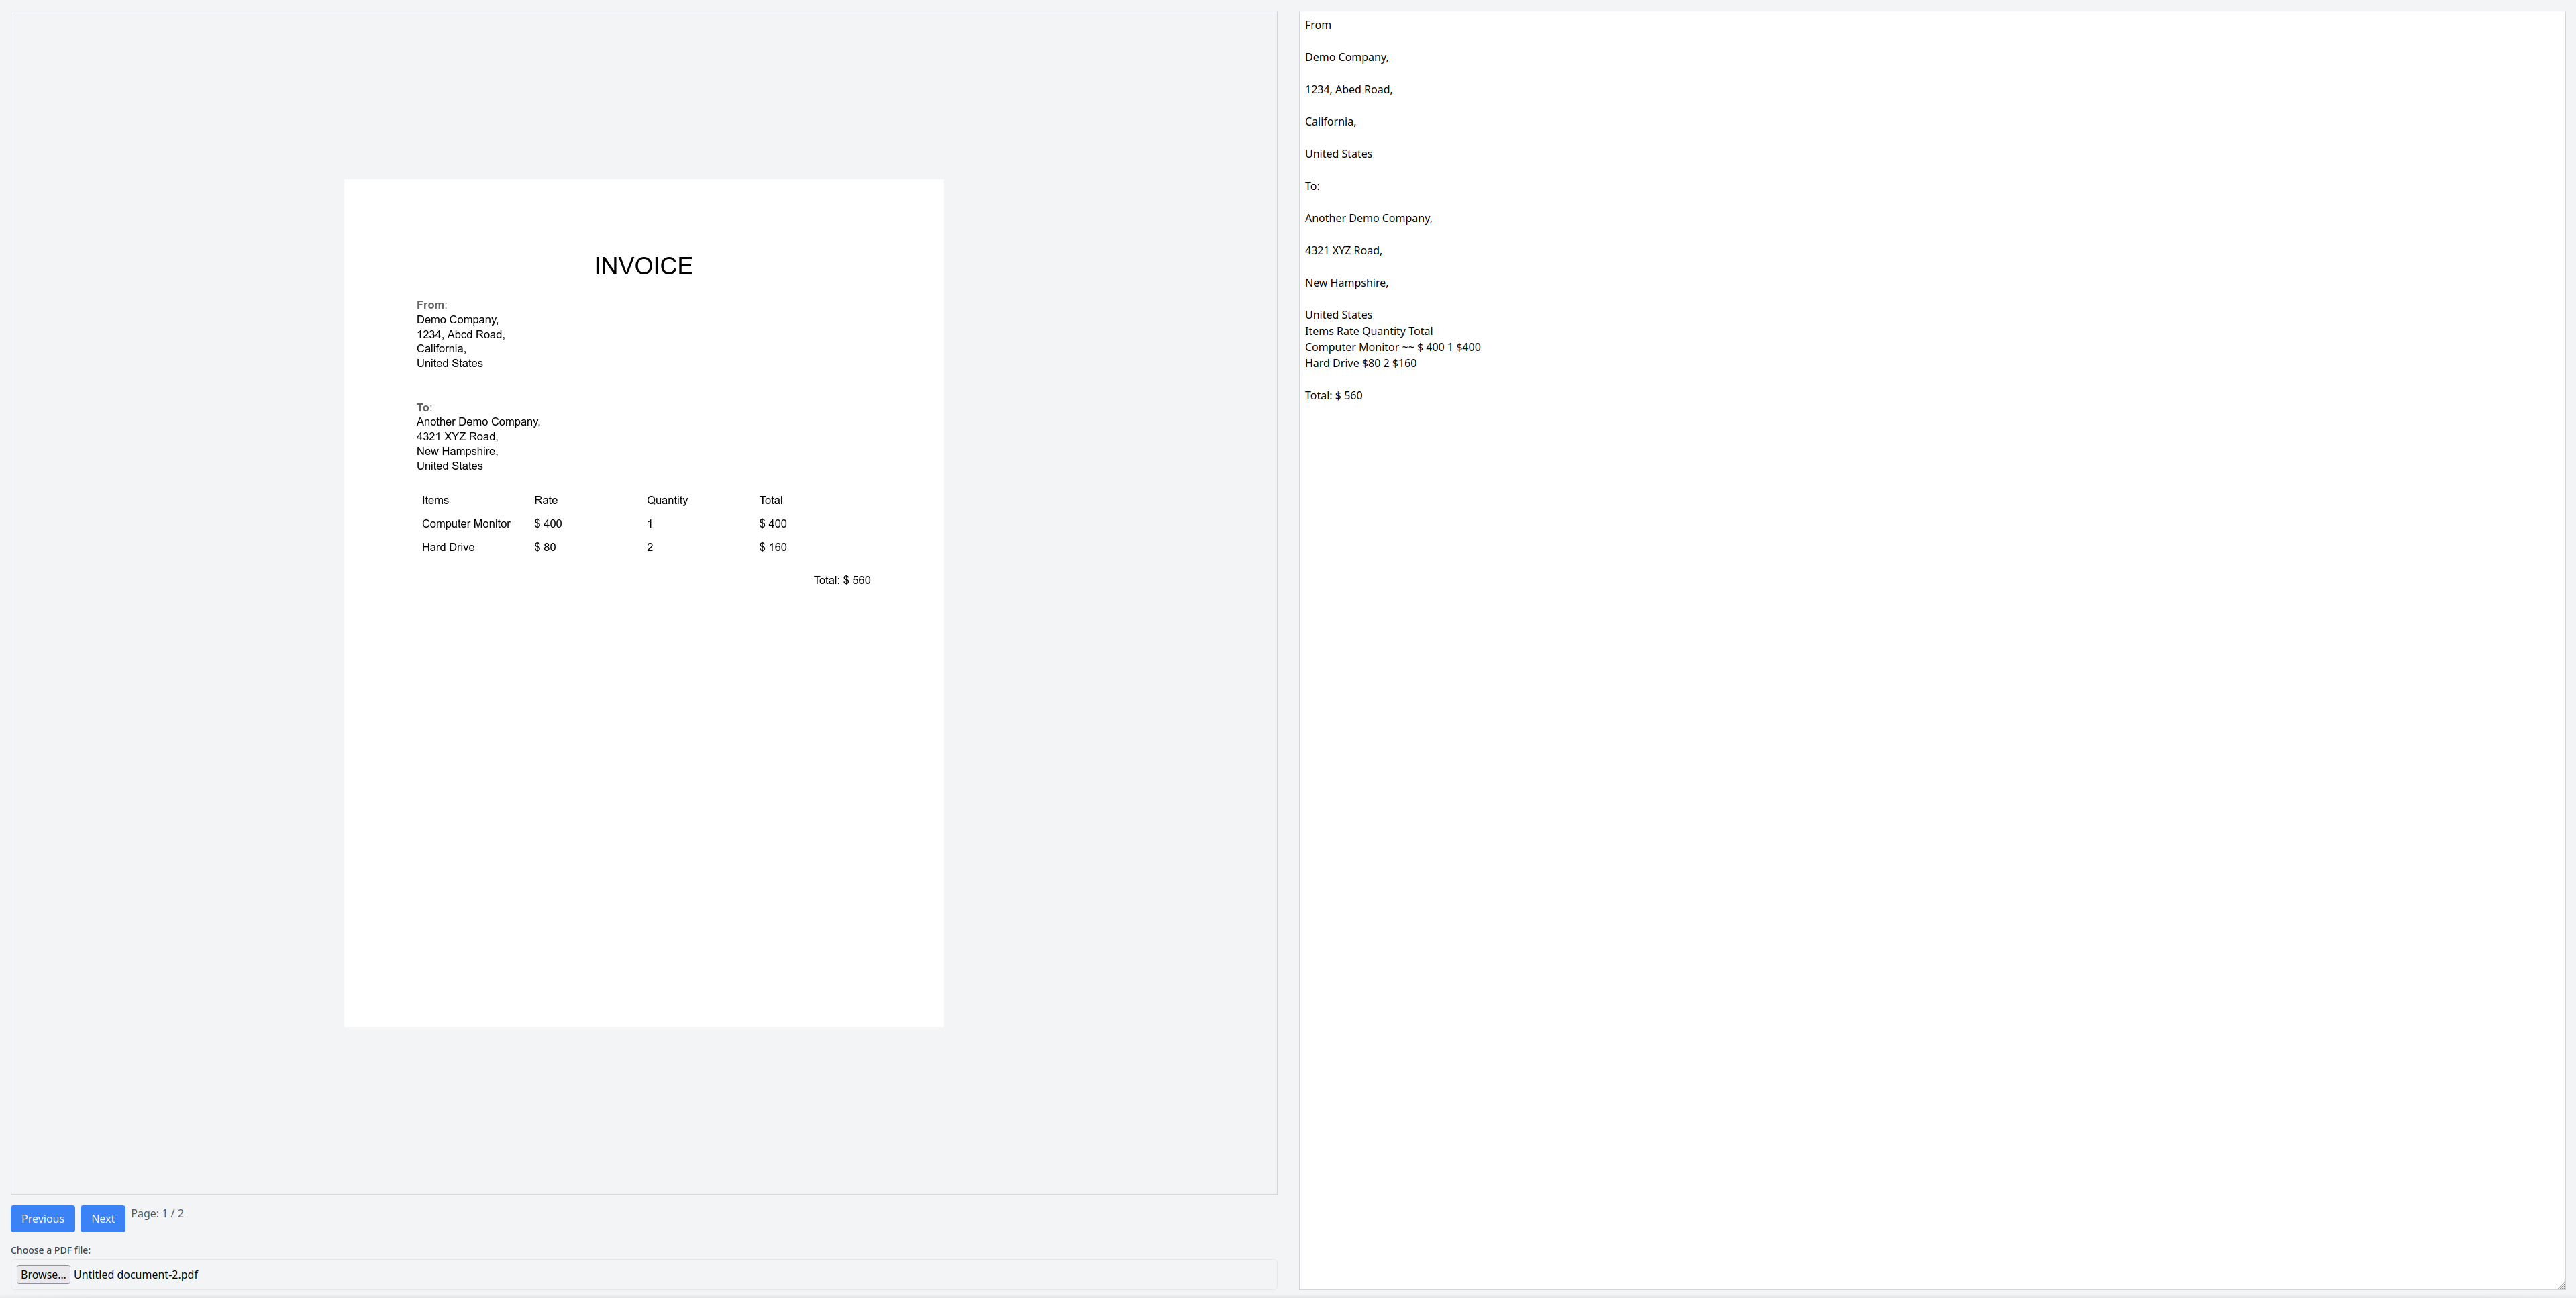
Now, it's time to test it. Reload the web page and upload the PDF file. You should see the first page on the left side and the extracted text on the right:
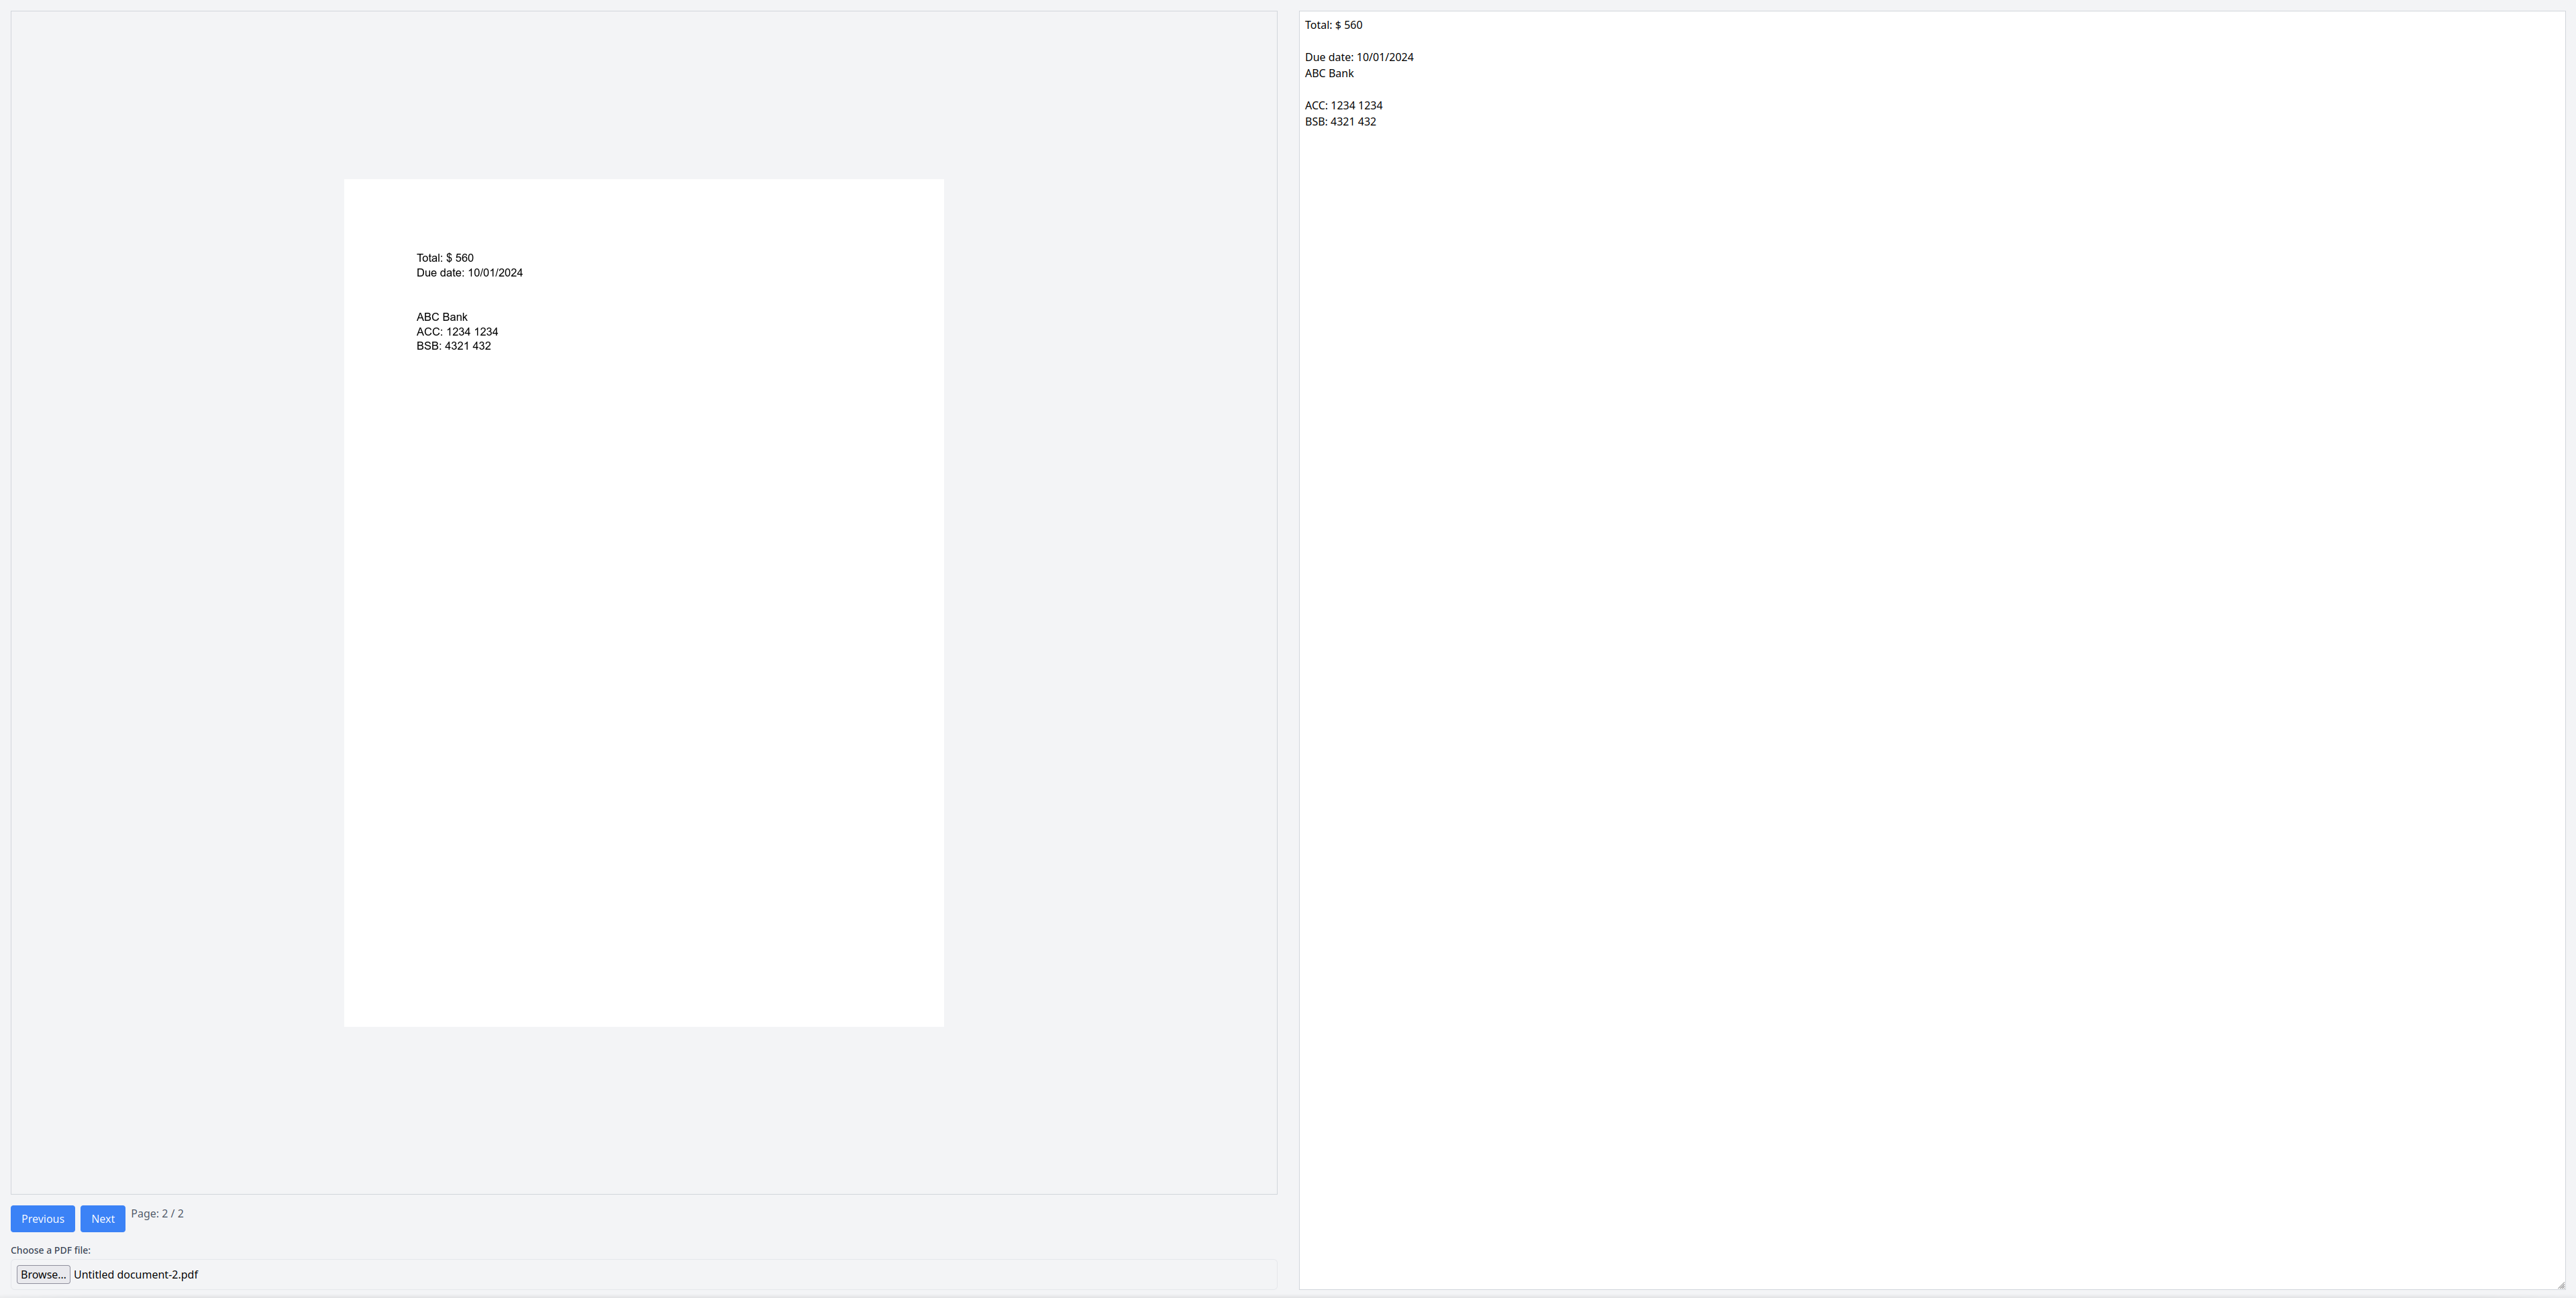
Press Next to move to the next page. The extracted text should update with the new text from the second page:
Congratulations! You have successfully performed OCR with Tesseract.js.
Conclusion
In this article, you learned how to perform OCR in JavaScript using Tesseract.js and PDF.js. You also learned how to use PDF.js to render a PDF, convert it to an image, and then use Tesseract.js to extract the text using OCR. This configuration can help extract text from simple PDFs.
You can find the complete code for this tutorial on GitHub.
When working with PDFs, you also need to figure out how to handle eSignatures. Digitally signing a document that is also legally binding and secure has always been a challenge to implement. But with Dropbox Sign, you can seamlessly integrate eSignature functionality into your applications. With document templates, automatic reminders, mobile-friendly signing, and affordable pricing, Dropbox Sign is the perfect choice for your document signing needs.
効率を維持
Thank you!
Thank you for subscribing!


