.svg)


新しい名前でも変わらぬ高品質!HelloSign の名称が Dropbox Sign になりました。
Dropbox Sign (formerly known as HelloSign) offers a flexible eSignature API that lets you embed signing functionality into your website. This means your customers never have to leave your site to complete their documentation.
Embedding an eSignature into your Angular application saves you time and money since the cost of building, improving, and maintaining an in-house system becomes prohibitive when you take into account the lifetime of the tool. Dropbox Sign also provides premium branding, which lets you fully brand all aspects of the signature experience and completely remove all mention of Dropbox Sign.
When you need to have documents like new-hire agreements, loans, NDAs, and even real estate and legal agreements signed, Dropbox Sign provides a developer-friendly API to get it done without sacrificing your customer’s experience.
In this tutorial, you’ll learn how to implement a custom-branded eSignature flow in an Angular application using Dropbox Sign.
Prerequisites to getting started
Before you begin this tutorial, you’ll need to install the following:
- Node.js 12 or greater
- npm 7 or greater
- A code editor (this tutorial uses Visual Studio Code)
Additionally, you’ll need a PDF file to attach to the document that has to be signed. The file can exist on your local computer or you can provide a link to it.
Some experience with Angular, TypeScript, and Node.js is assumed. If you want to review these tools before you begin, you can check out “Get started with TypeScript”, “Getting started with Angular”, and “Introduction to Node.js”.
Now you’re ready to get started. Feel free to follow along with the GitHub repository.
Dropbox Sign setup
In this tutorial, you’re going to build an application that requires users to sign an NDA form before they can access a service.
Before you begin, you need to create a free Dropbox Sign account and get an API key. Once you’ve signed up, you can create an API key by navigating to your account settings; then select the API tab and create an API key.
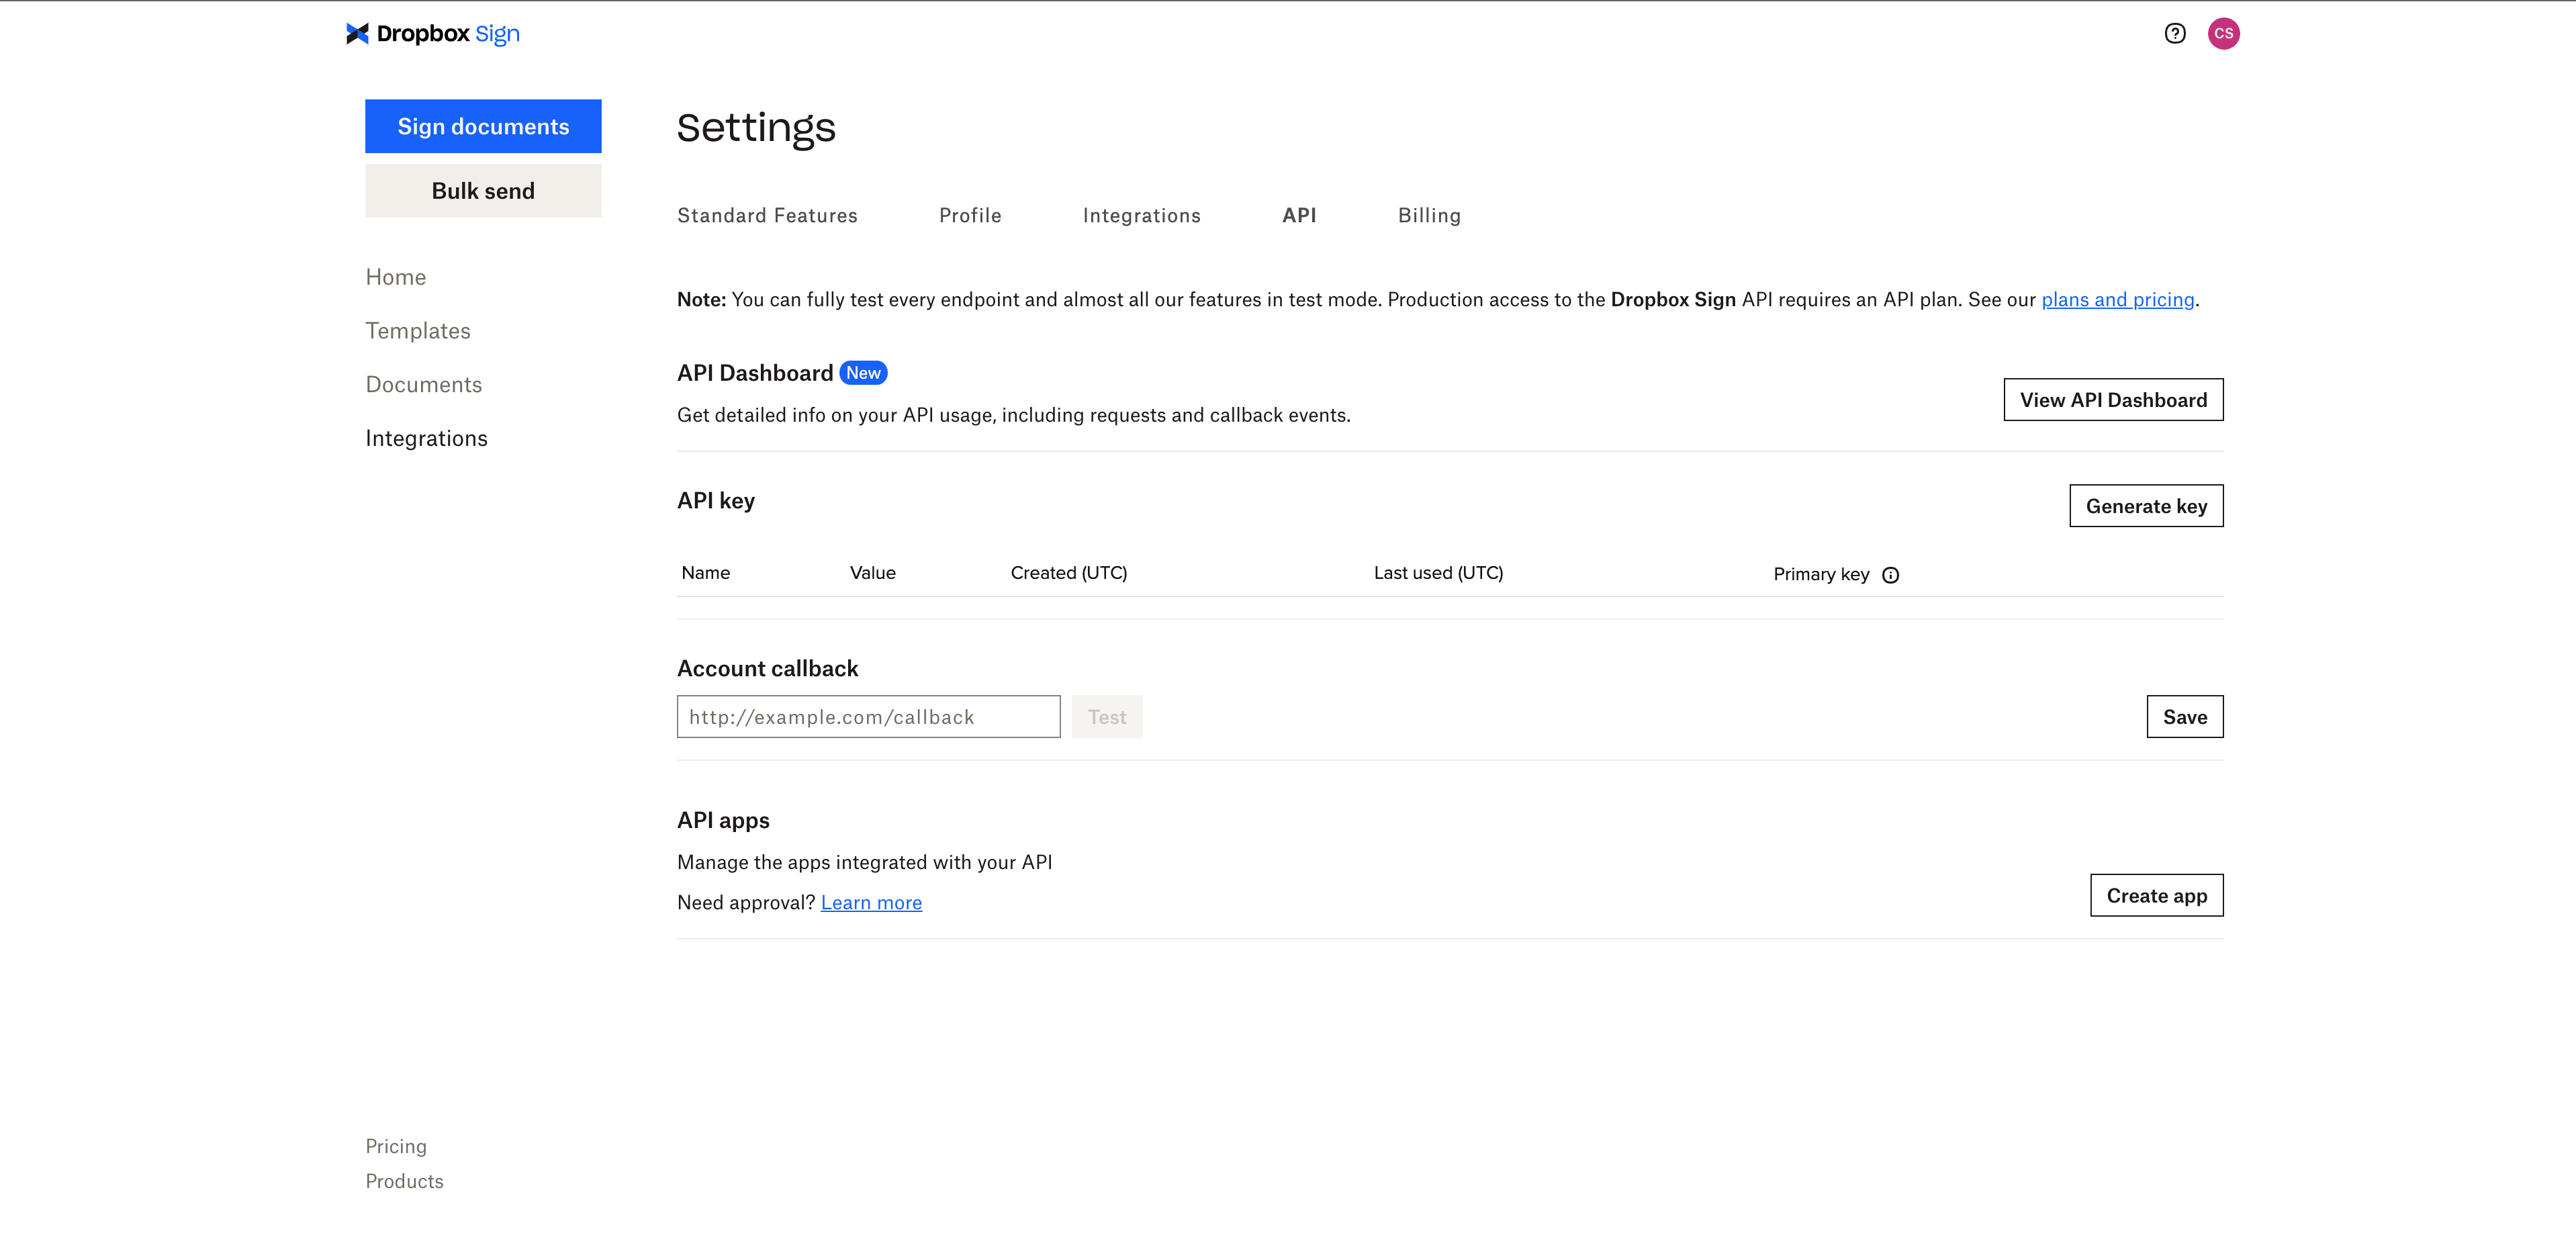
The API app gives Dropbox Sign the information on the client side that it needs to use the API. You have to create an API app and retrieve its Client ID, which is then used with the signature request to identify the API app you want to sign with.You will also use the Client ID later on to initialize the hellosign-embedded frontend library.
To obtain the Client ID, you need to create an API app from the Dropbox Sign dashboard. Navigate to the API tab, and you should find the Create button next to the API Apps section.
Since the API app is being created for test purposes, you only need to specify a name for the app and the domain. You can input any name of your choice and input “example.com” in the domain field; you can always update the fields later.
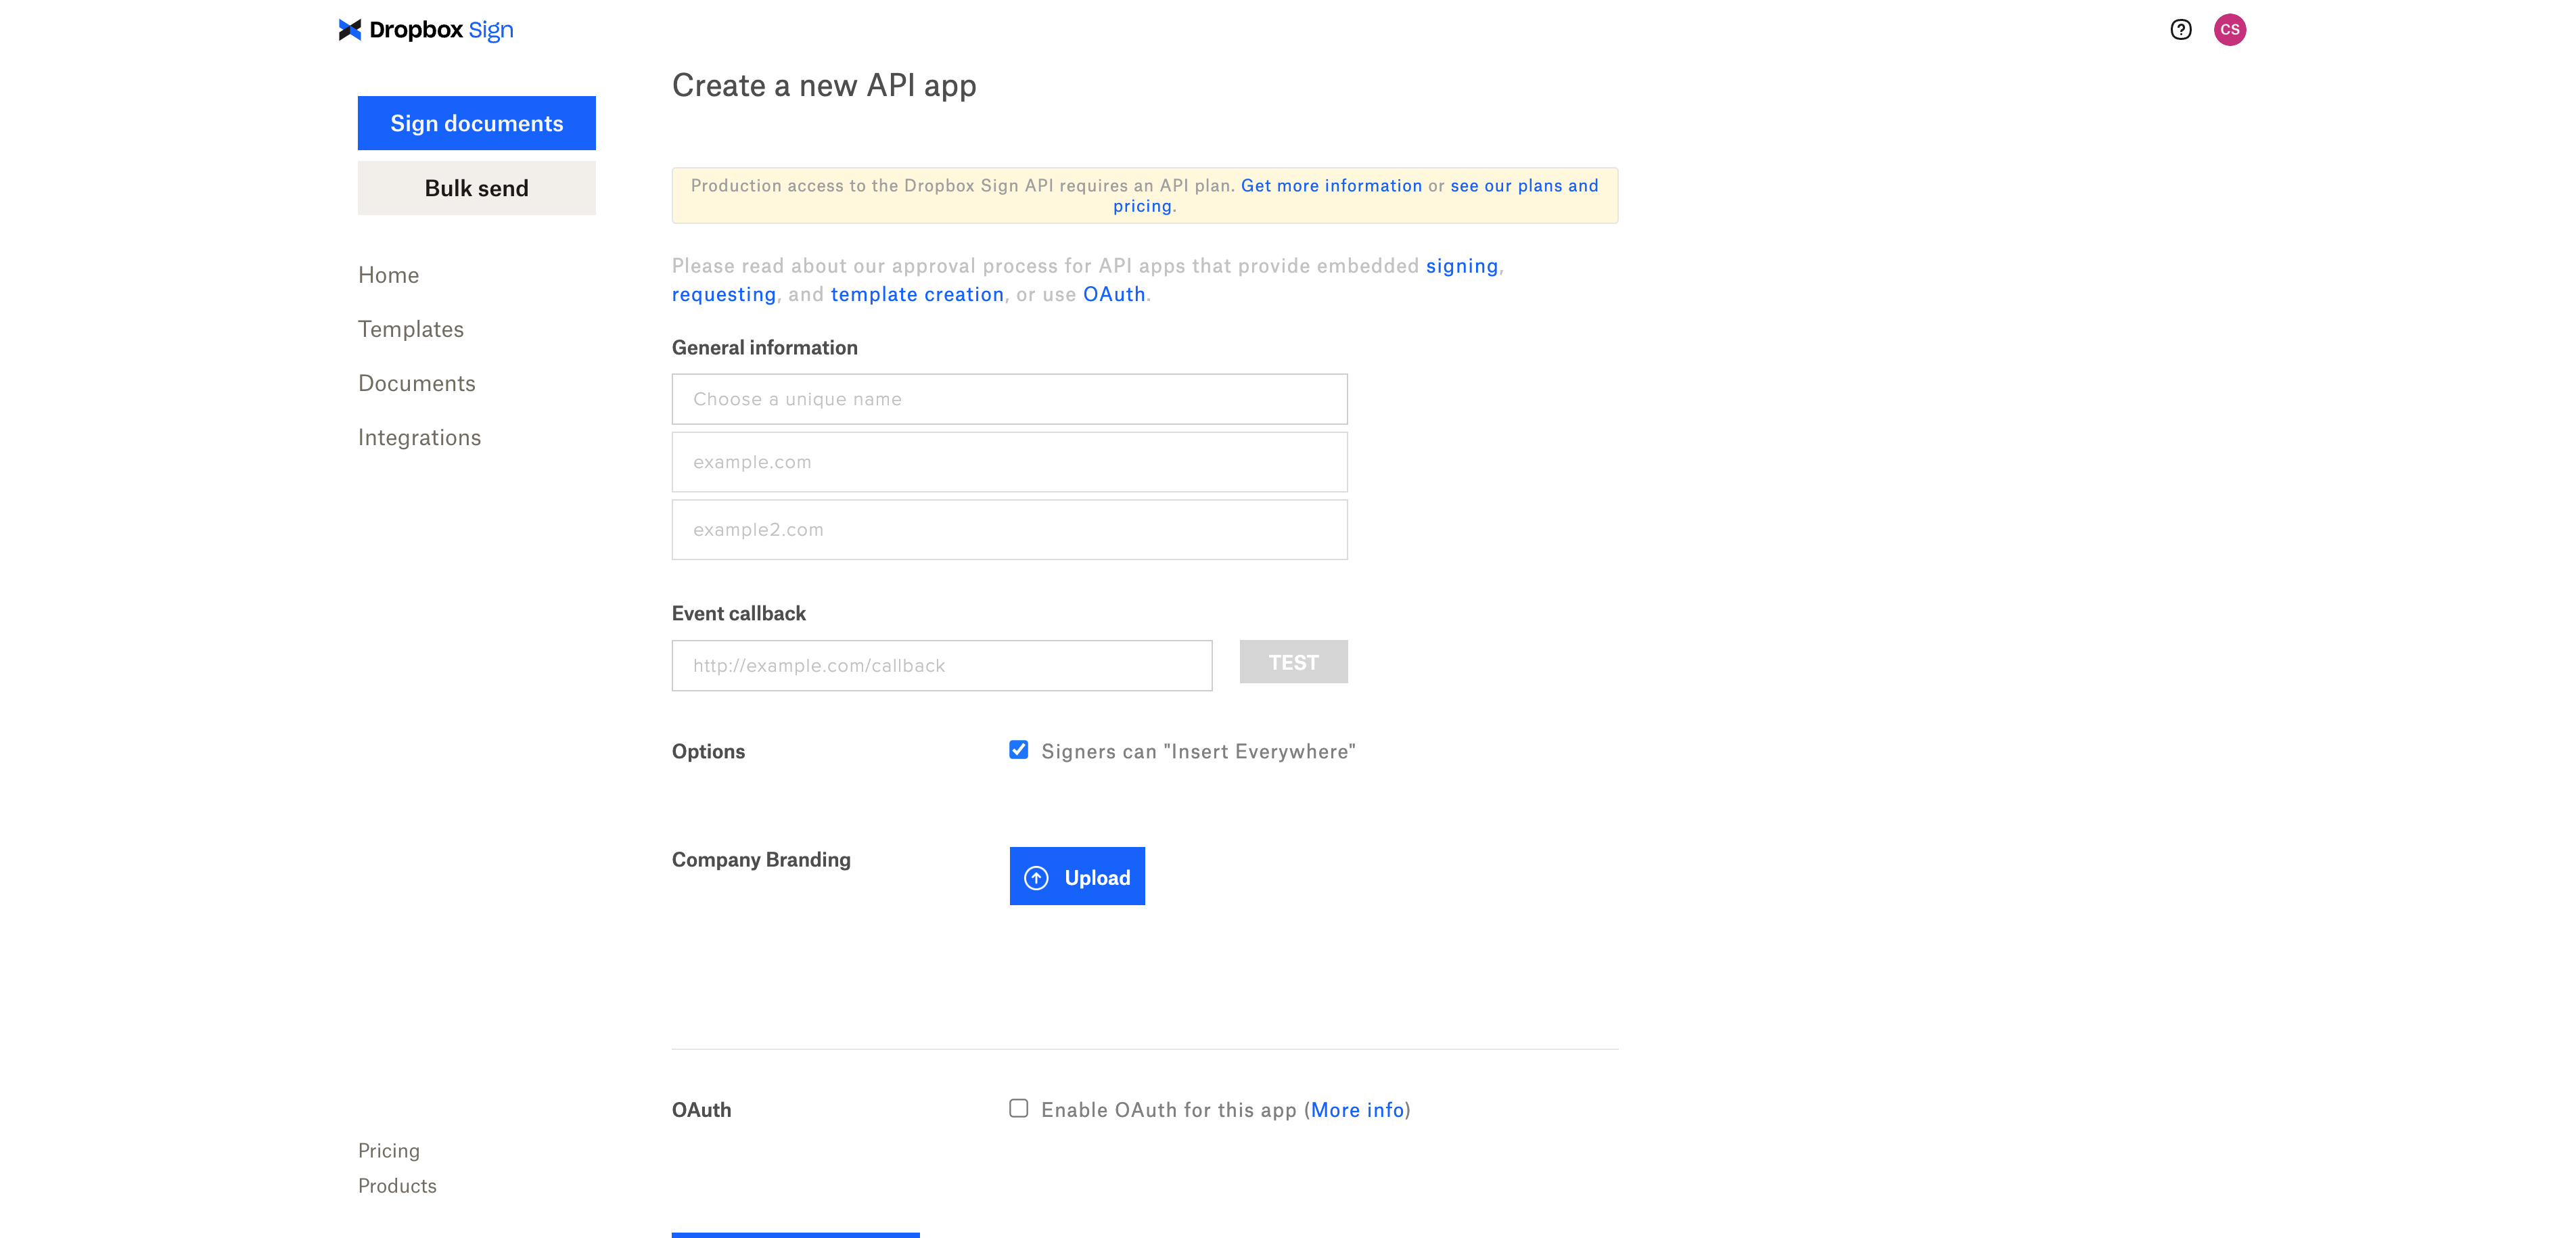
Note that the domain specified is the only domain that your Client ID will be able to access hellosign-embedded from once you move into production, so you'll want to update this to your site's domain when you are ready to go live.
Node.js application setup
In order to embed a signature, it needs to be created first. Dropbox Sign lets you do this in a number of ways. You can make an API request on the command line using curl or Postman, make an API request from your application, or use one of the official SDKs.
Although you can directly make your requests on the frontend, it’s not advisable since you would be exposing your API key and increasing your security risk. You should be making the requests from the backend with Node.js and Express for an added layer of security. Express is a minimal and flexible Node.js web application framework that provides a robust set of features for web and mobile applications.
To generate an Express application quickly and easily, use the following command:
Then install the dependencies and run the application.
Next, you need to enable CORS. Cross-origin resource sharing (CORS) is a browser mechanism that enables controlled access to resources located outside of a given domain.
You can enable CORS in various ways using the CORS package middleware for Express.
Add the package to the app:
Enable All CORS Requests by importing the CORS package and attaching it to Express for all requests in your `app.js`.
Update your app.js with the following code:
Using the Dropbox Sign Node.js SDK
Dropbox Sign provides an official Node.js SDK that you can use to communicate with their API. It’s simple to get it up and running, and you only need your API key to configure it, which you already created above.
You can find the Node.js implementation for each method in the Dropbox Sign API reference documentation.
Install the Node.js SDK in the Express app you generated:
Securing your key on the backend
A major reason for creating a backend application is to ensure security. You also need to make sure that you don’t expose your API key on the frontend. You can do this by holding your API key in an `.env` file.
dotenv is a lightweight npm package that automatically loads environment variables from an `.env` file into the `process.env` object.
To start, install the dotenv package:
Now, you need to store the `API_KEY` in the `.env` file. To do this, create an `.env` file in the root folder:
Add your variables in the format below, replacing the placeholder `your_api_key` with the one from your dashboard:
dotenv doesn’t work out of the box, so you need to configure the package in your entry file by adding it to the top of your AppJS file:
Creating the signature request
When you create an endpoint that generates an embedded signature for a user, it returns the `sign_url`. This URL can be used to embed the NDA for the user to sign on the client side.
To avoid charges for testing your application, you can include `testmode=1` on the request object. You can send as many requests as you’d like for free in test mode, but be sure to change this when you want to go live.
To begin, you need to initialize the Dropbox Sign Node.js SDK. To start, add the following code on top of your `routes/index.js` file:
Create a post route for `/sign` in `routes/index.js`:
This handler handles the `/sign` post request. The email and the name are details of the user you would be creating the signature for; these details would be obtained from the frontend.
Next, add a method to `routes/index.js` to generate the signature request:
This creates the signature request for one user at a time. You can also create the signature for several users at a time; all you need to do is add more user details to the `signers` array.
The `options` object shapes the signature request and accepts a couple of fields:
- `client_id` identifies the client application the signature is expected to be signed on.
- `title` is the title you want to assign to the `SignatureRequest`.
- `subject` is the subject of the email that will be sent to the signers of the NDA.
- `message` is the custom email message that will be sent to the signers.
- `signers:` is a list of people that will sign the document, with their name and email. In this case, it’s just one user.
- `attachments` lets you request a document from the signer, which they can upload after they have signed the document.
- `cc_email_addresses` is the list of email addresses that should receive a carbon copy.
- `file_url` tells Dropbox Sign to download the file(s) to send for a signature from the specified URL(s). You can use `file[]` to indicate the uploaded file(s) that need to be signed.
Finally, you need to retrieve the `sign_url` from the signature that’s been created. Update your code in `routes/index.js` to the following:
Each signature that you create has a unique ID that can be used to generate its `signature_url` and track its status. The `signatureId` is retrieved from the signature request that has been generated and is then sent to the `getSignUrl` method. This method returns the `sign_url`.
In the response from the API, you can find useful information, like the `sign_url` and `expires_at`. You’ll need to send the `sign_url` to the frontend of your application so the document can be embedded.
Angular client for embedded signing
Users will ultimately interact with your services from a client application. You can create this client application in Angular, which is a TypeScript-based platform for building mobile and desktop web applications.
To make the process easy, Dropbox Sign provides an npm package that lets you embed documents to sign in your own application. This tutorial uses the Dropbox Sign Embedded package on an Angular client.
If you do not already have Angular CLI on your machine, read the “CLI Overview and Command Reference” guide and install it.
To begin embedding the Dropbox Sign package, bootstrap the Angular app. When prompted, select CSS for the stylesheet and include Angular routing as part of the packages to be generated for the app.
This will generate an Angular application named “HelloSign-client.” Navigate into the project’s directory and open it in your code editor.
Creating the interface
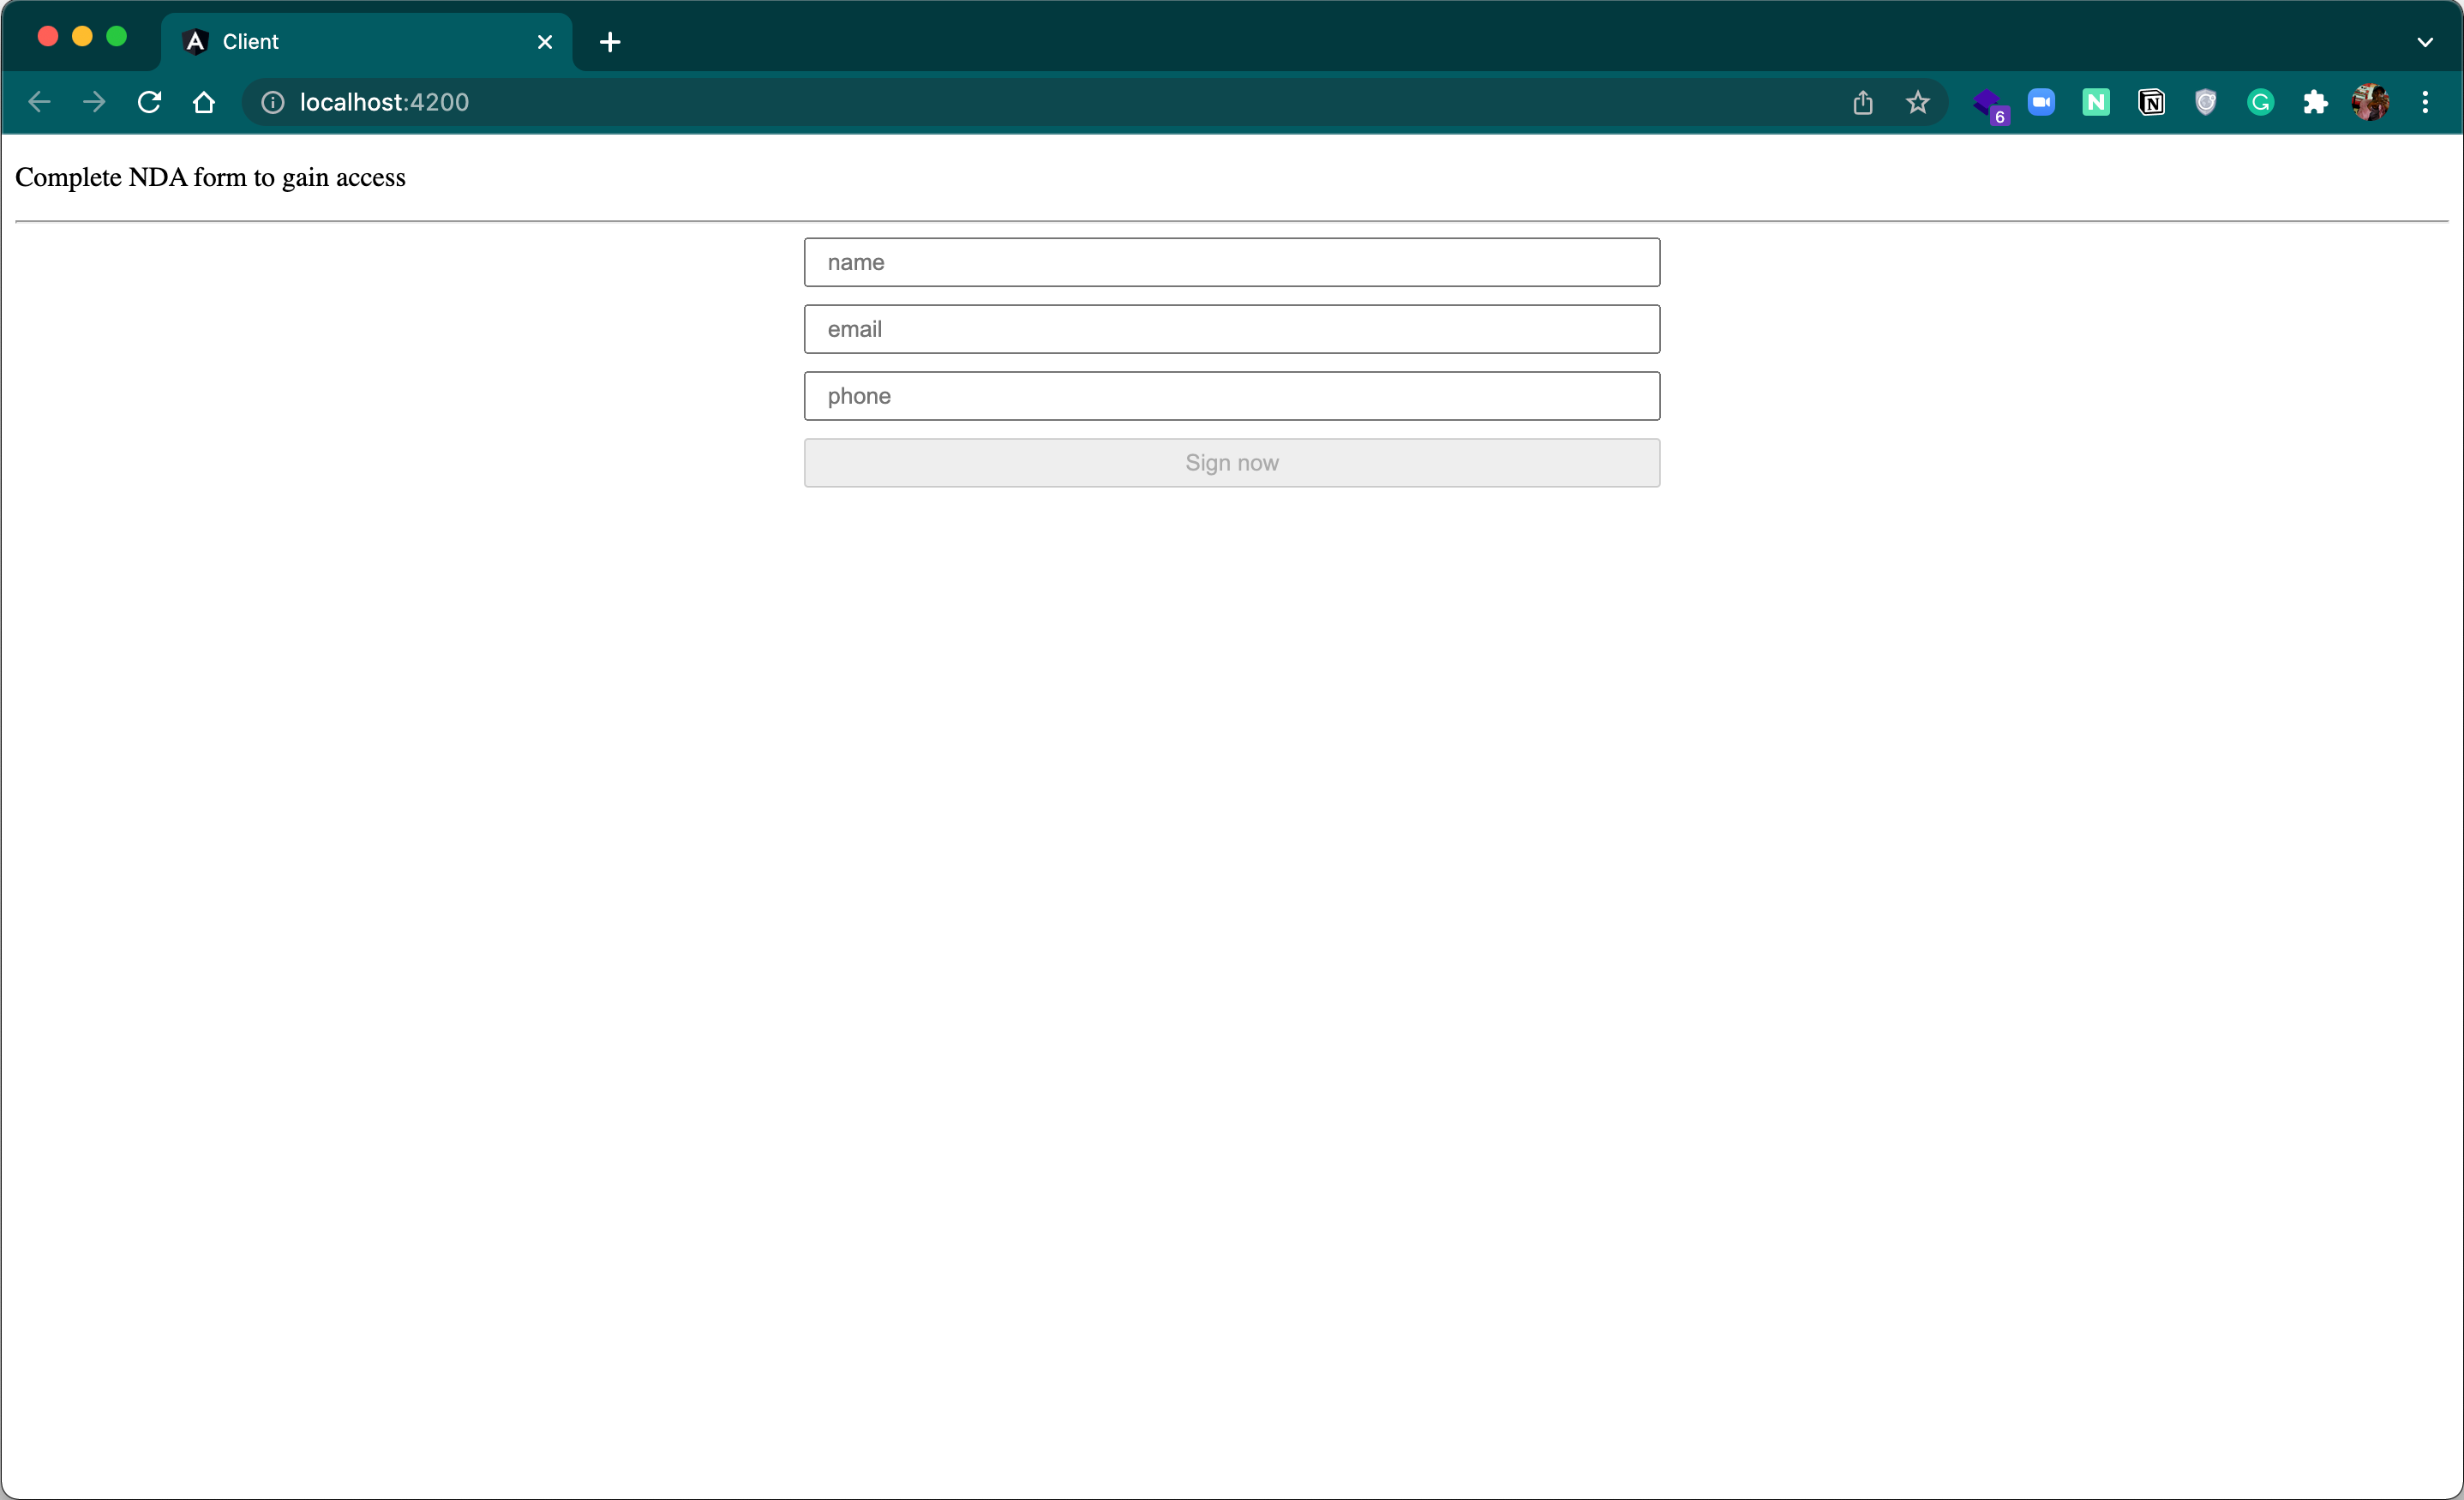
In `app.component.html`, create the form input fields, along with some validations:
This code contains a form with three input fields: name, email, and phone. This data will be sent to the backend to create the embedded request for each user filling out the form. To keep things simple, each input has some validation checks and the Submit button remains disabled if the form is invalid.
`ndaForm` is the `formGroup`. If your code doesn’t have this, it will break, so you need to create it. In `app.module.ts`, import the `ReactiveFormsModule` from `@angular/forms` and add `ReactiveFormsModule` to the imports list:
Then in the `app.component.ts` file, import the following from `@angular/forms`:
`Validators` will be used for validating inputs. The `FormBuilder` will help build the `FormGroup`, and `FormGroup` will allow the user to input their data.
Inject the `FormBuilder` in `app.component.ts` within the `AppComponent` class:
Now, use `FormBuilder` to group the form:
This initializes the `FormGroup` as `ndaForm`. The `!` sign after `ndaForm` tells TypeScript it’s not initialized with any values. You can then use the `ngOnInit` method to group the form’s values after the component mounts.
The form is ready to start making requests. But in order to make it more visually appealing, add the following code to `app.component.css`:
The code above improves the look of your code quickly, but you can also continue to customize it to achieve your desired style.
Requesting for the `Sign_url`
Now you need to make the API request with the user details collected; add the functionalities to implement this.
Add a submit event handler to the form in `app.component.html` to handle form submissions:
The `ngSubmit` event is fired when the form submits. It then calls the `onSubmit()` method, which you’ll define next.
In `app.component.ts`, add the `onSubmit()` method:
That’s all this method will do for now.
Next, you need to send the data to the backend and get the `sign_url`. In `app.module.ts`, import the `HttpClientModule` from `@angular/common/http` and add `HttpClientModule` to the imports list:
Then create a configuration service to make the HTTP requests. Run the following code in your terminal:
Open `config.service.ts` and update it to reflect the following:
The `constructor` injects the `HttpClient` used to make the API request. The `requestSign` method expects a user object with the name and email, and makes a post request to the backend at http://localhost:3000. Then it’s expected to return the `sign_url`.
Currently, TypeScript does not like your styling. To fix that, above the `@Injectable` decorator, declare a type for `User`:
Embedding the request
The last step in this process is to open the embedded signature with the Dropbox Sign Embedded package.
To install the Dropbox Sign Embedded package, run this code on the terminal:
Then, install the types for the HelloSign Embedded package:
In `app.module.ts`, initialize the package with the Client ID you created earlier:
This initializes the `hellosign-embedded` package on the client side. You can then call the open method on the client to open the embedded file.
The HelloSign Embedded package exposes other methods for use on the embedded signature, like `close()` and `of()f`. Please refer to the documentation for more context.
In order to call the request methods defined in the `ConfigService`, it first needs to be injected into the component where you would be using the method.
Inject the `ConfigService` into `app.component.ts`:
Maneuver back to the `onSubmit()` method on `app.component.ts` and update the code to reflect the following:
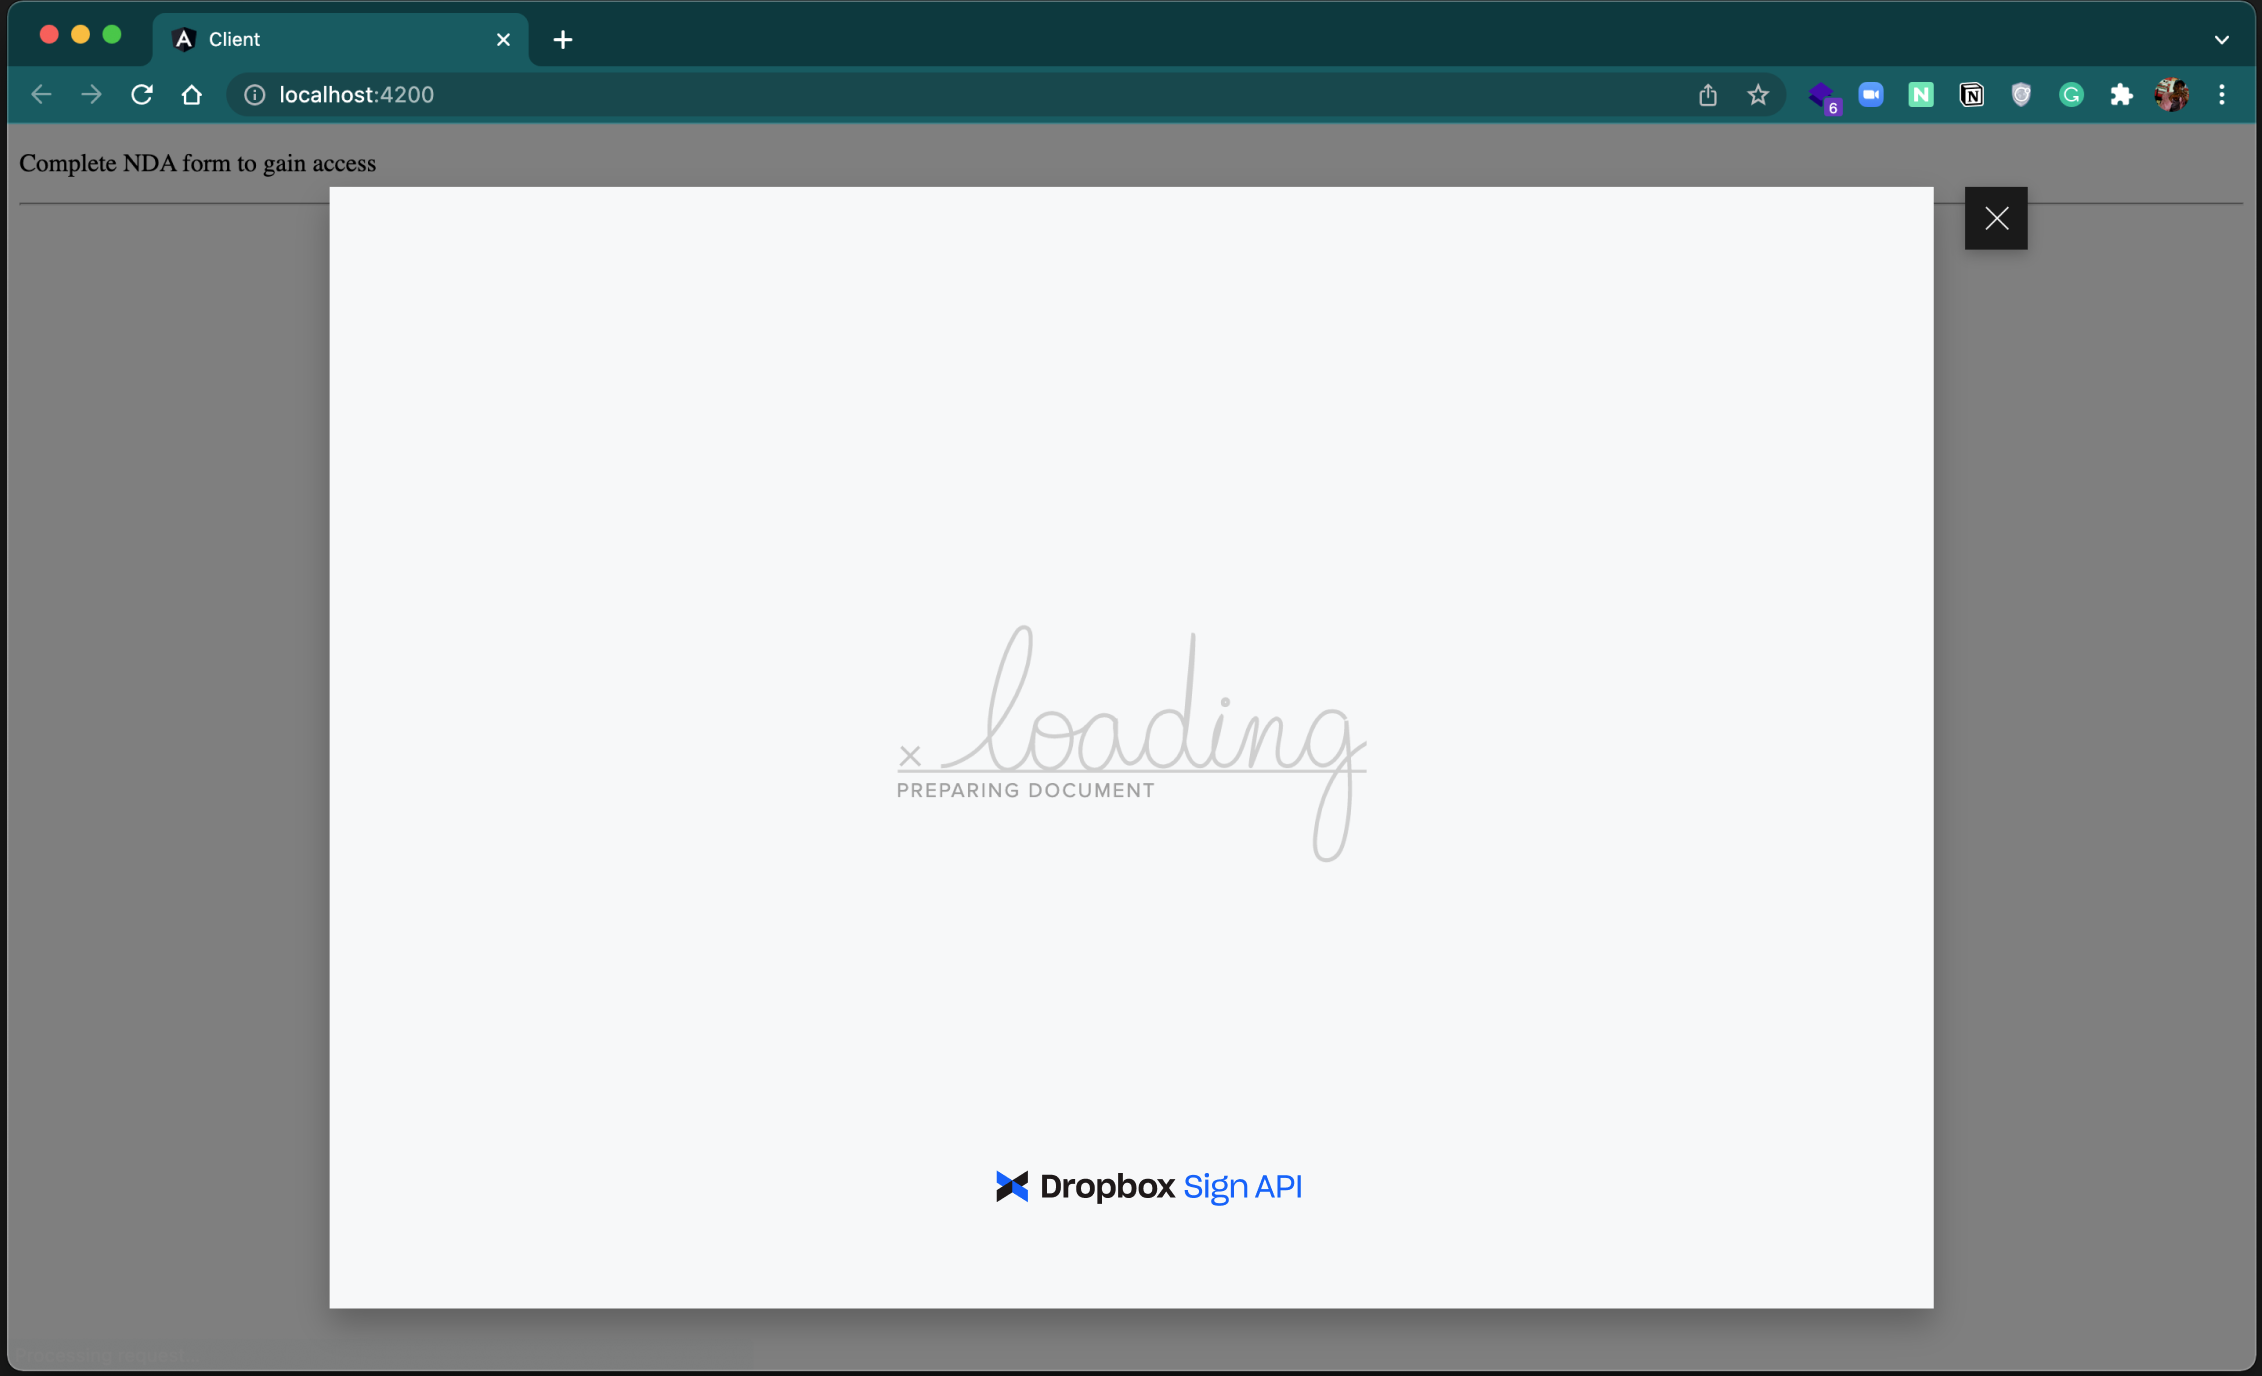
This calls the `requestSign` method of the configuration component, passing it the name and email from the form. This method makes the API request to the backend and returns the `sign_url`. The code then extracts the `sign_url` and uses it to open the embedded signature for the client.
Now you’re ready to start signing signatures right from your app.
Start the server if it’s not already running and make some requests. You should have something similar to this:
Remember, you can always find the code for this tutorial on GitHub.
Get started building an eSignature flow using Angular
Congrats on your first custom-branded eSignature flow! You now have enough knowledge to quickly and securely embed signature signing directly into your application. Dropbox Sign is incredibly easy to use and implement, and it only needs five lines of code to embed the iframe on your site.
Although this tutorial is focused on Angular on the client side and Node.js on the server side, Dropbox Sign supports more languages and frameworks. The API also provides additional services to further simplify your signing experience. You can visit the developer portal to discover and test these services for free.
効率を維持
Thank you!
Thank you for subscribing!


