Most businesses rely on documents for business workflows, like managing contracts, opening financial accounts, and tracking procurement approvals. Dropbox Sign provides legally binding eSignatures, allowing you to digitize signing processes while maintaining document integrity. The service lets you quickly upload a document for signature and share a link with signatories to sign it. However, if you already have an online platform your users access, sending them to a Dropbox Sign URL for signatures can harm the user experience. Fortunately, Dropbox Sign also offers Embedded Signing, which solves this by letting you embed the signing experience directly into your application.
Take signing lease agreements for property rentals, for example. Traditionally, this process is tedious due to multiple required signatures. Signatories typically email the document back and forth, downloading, signing, and resending it each time. A lease management system simplifies this by letting agents upload leases directly to the system. Signatories can then sign the document within the application using the Dropbox Sign Embedded Signing. This signing experience happens entirely on your application's page. There are no redirects to Dropbox Sign or need to navigate to another page in your application, thus enhancing the overall user experience.
This article will guide you through integrating Dropbox Sign Embedded Signing into a C# ASP.NET lease management system.
Implementing Dropbox Sign Embedded Signing in C#
Before you begin this tutorial, you need a paid Dropbox Sign account. If you don't have an existing account, you can sign up for a free trial, which offers all the functionality you need for this demo app.
To edit, compile, and run the application, make sure you have the following software installed:
- .NET 8 SDK to compile and run your ASP.NET application.
- Git to clone the application template from GitHub.
- Visual Studio Code (or a similar editor) to edit C# files and run the application from the terminal.
After installing the preceding dependencies, install Entity Framework Core tools for .NET by running the following command in a terminal window:
This plugin for the .NET CLI lets you create, update, delete, and apply database migrations in your ASP.NET project. You use these tools to scaffold your application's SQLite database.
Clone the starter project
For this project, you clone an existing application template instead of creating the lease agreement system from scratch. This application already has authentication and some lease management functionality, letting you focus on the Dropbox Sign integration.
Run the following command in your terminal to clone the repository:
Once cloned, open the source code directory in your preferred code editor.
Set up the database
Run the following command in your project directory:
The command creates an `app.db` in your project's directory and applies the migrations to set up the database. If you want to see the migrations that were run, you can find the migration code files in the `Data/Migrations` folder in the project folder.
Install the Dropbox Sign NuGet package
Dropbox Sign SDK for C# .NET is packaged as a NuGet package you install in the project. Ideally, you should install the latest version of the package to ensure you get the latest bug fixes and security patches. However, to follow along with this article, install the latest version at the time of writing, version 1.4.1, by running the following command in your project directory:
When the command finishes, you should see a message indicating that it restored the package in your project. Next, you create API credentials for Dropbox Sign so your application can use the SDK.
Create Dropbox Sign API credentials
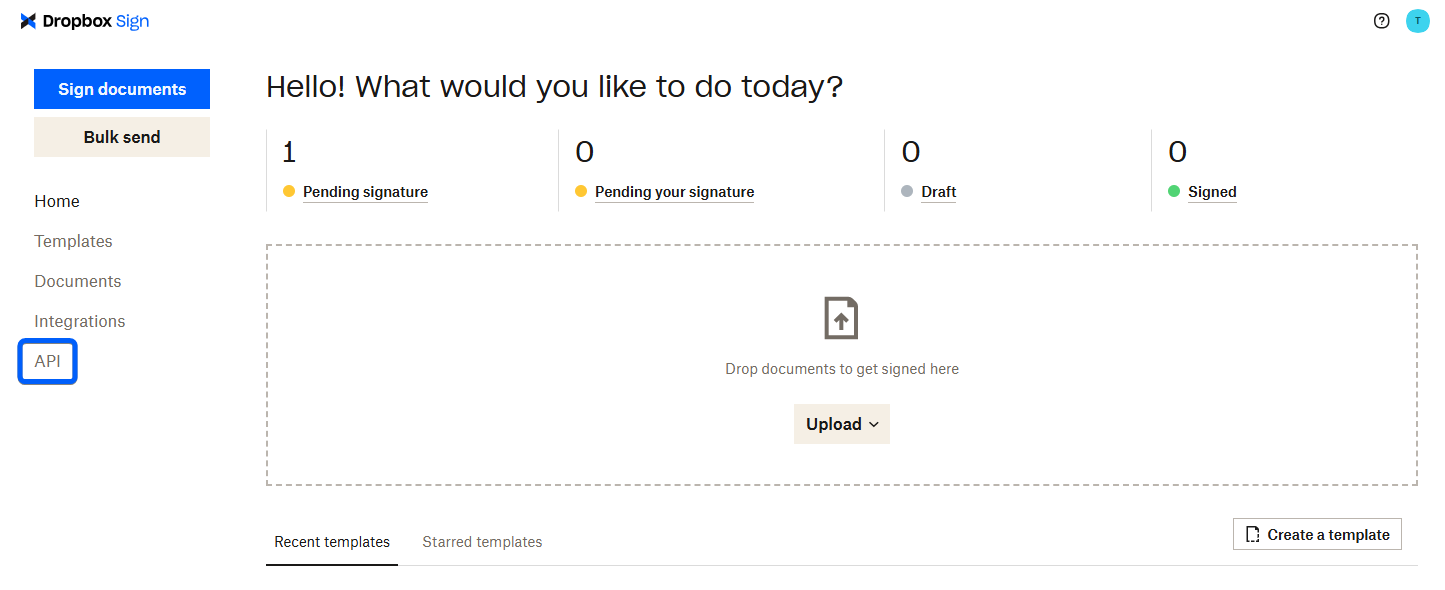
To create Dropbox Sign API credentials, log in to Dropbox Sign, open the Dropbox Sign Dashboard, and click API in the left menu:
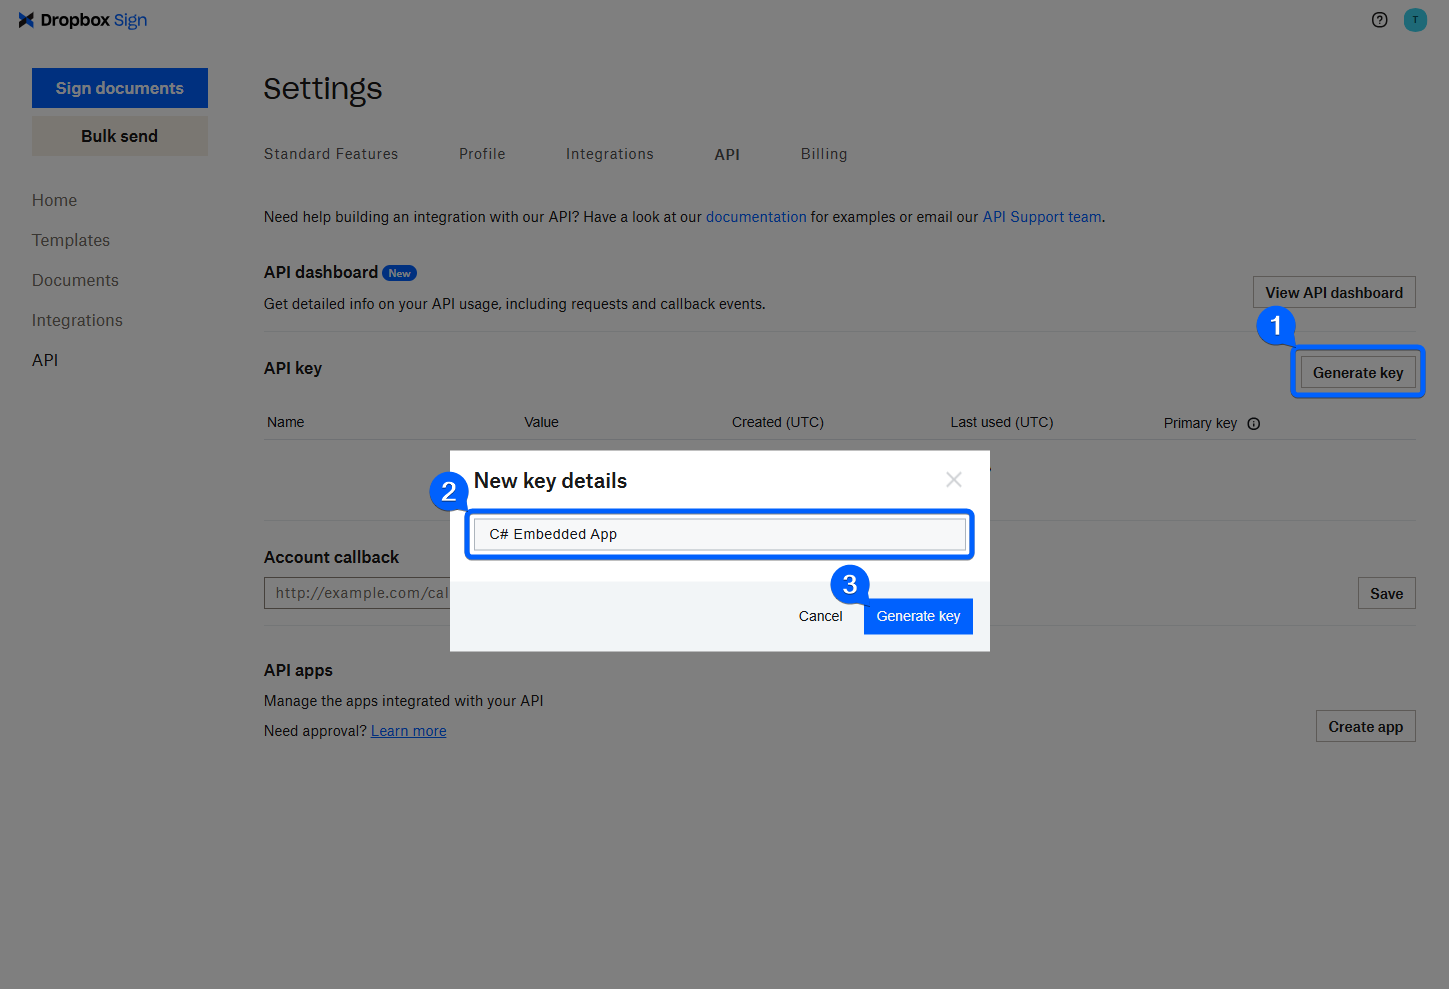
Start by generating an API key, which the application uses to authenticate with Dropbox Sign. To do so, click Generate key and give the key a meaningful name in the dialog box that appears:
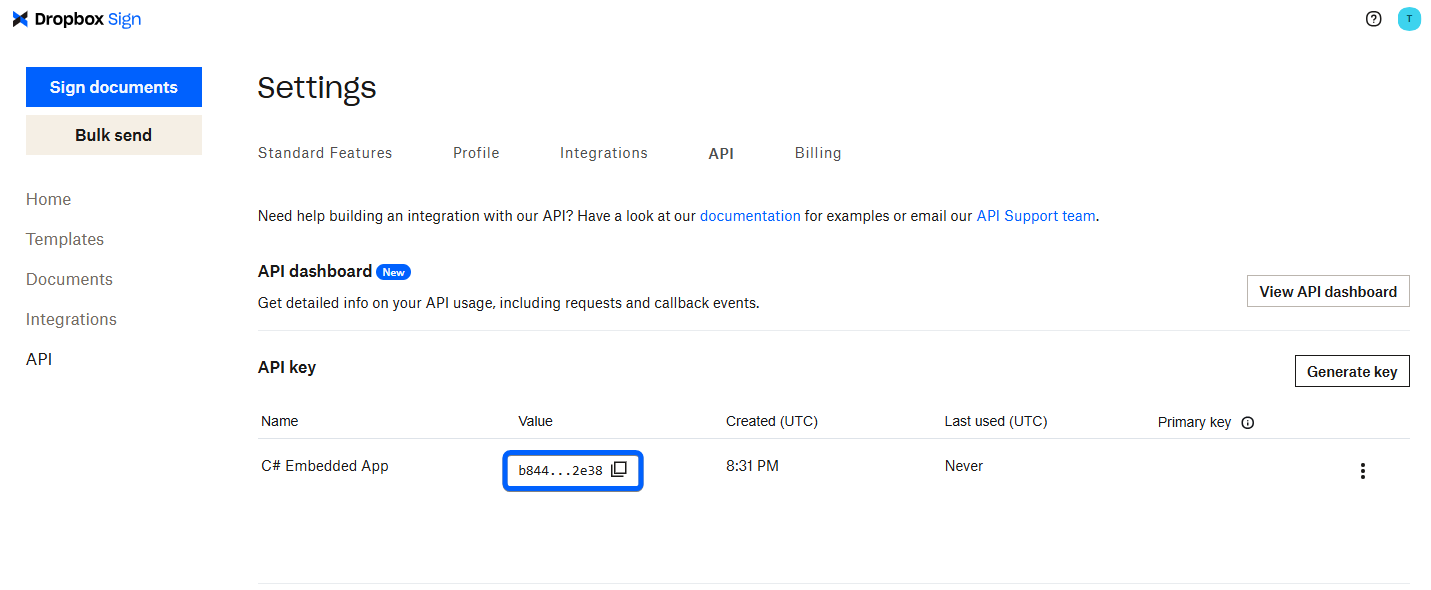
Once generated, copy the key in the table and keep it safe until the next section, where you use it to configure the application:
Next, generate a client ID by creating an API app. On the same API page, click the Create app button:
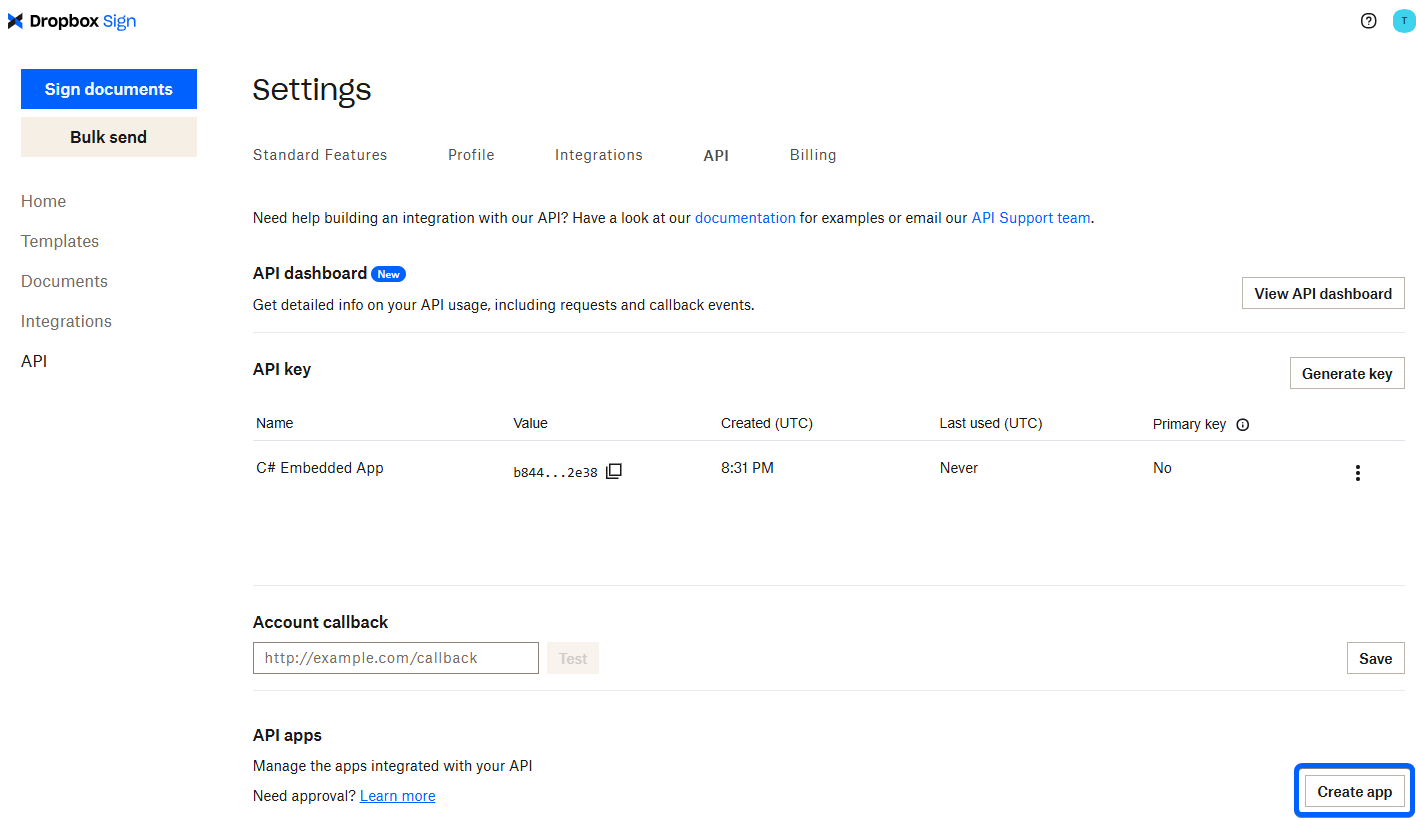
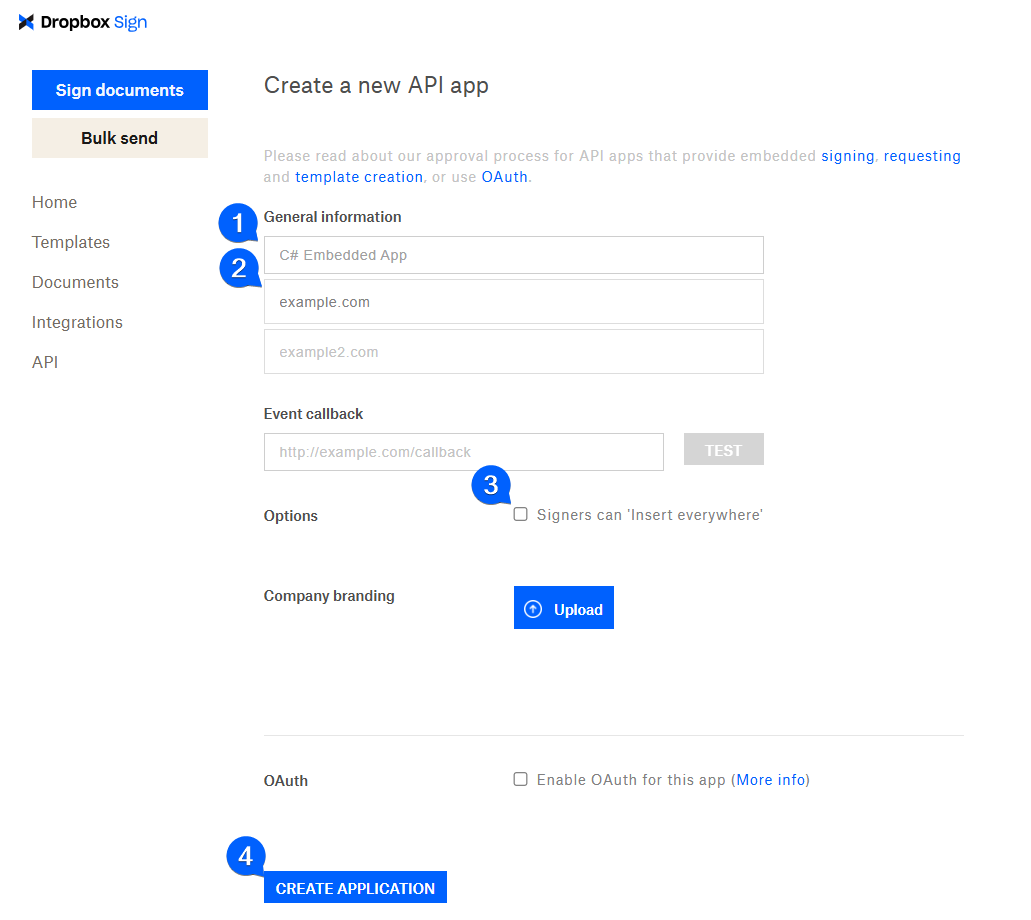
In the form that appears, enter a name for your application along with a domain for the application. Since you are using the API in test mode in this article, the domain is not verified, so enter example.com. Finally, uncheck Signers can Insert everywhere and create the application:
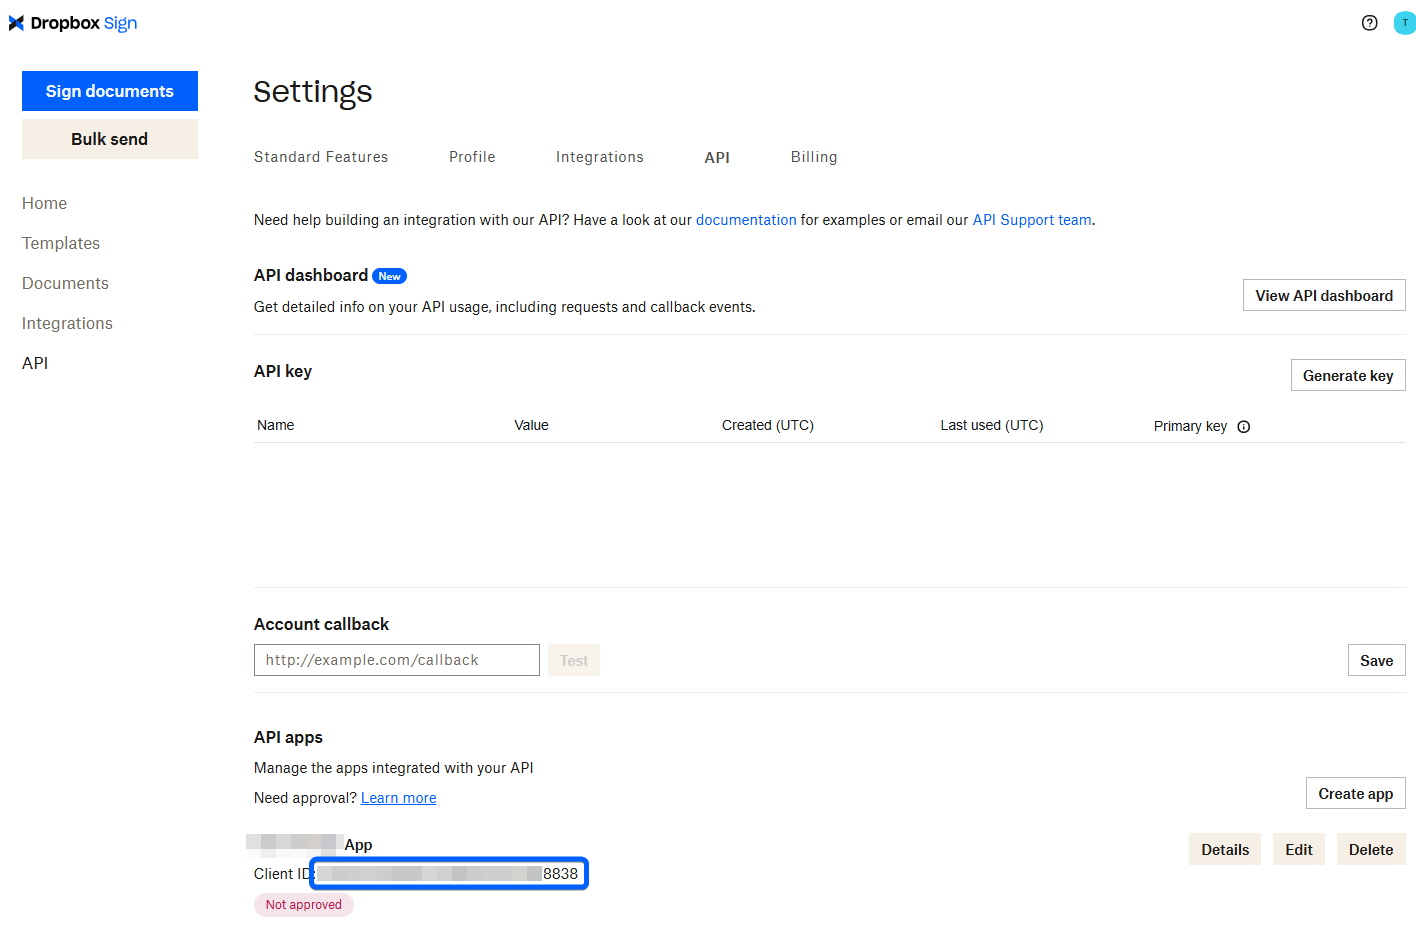
Copy the client ID from the API screen for the newly created client. This ID identifies the application when interacting with Dropbox Sign:
Add Dropbox Sign credentials to the ASP.NET project
Now that you have your Dropbox Sign client ID and API key, open the appsettings.Development.json file in your project directory and add the following JSON object:
The JSON object includes the following:
- Client ID
- API key
- Email addresses to CC in all signature requests
- An option to toggle the test mode on and off
To read this JSON object, add the following code to the Program.cs file, just below the line that adds Razor Pages:
This snippet retrieves the JSON object in the configuration file and creates a new DropboxSignConfiguration object from it. You can then inject this configuration object wherever needed.
In the following sections, you'll use these configuration values to interact with Dropbox Sign.
Create the document signature request
For signatories to sign a lease, an administrator must initially upload the lease agreement along with some details about the lease. Once uploaded, you create a signature request for the document using the Dropbox Sign SDK.
Dropbox Sign offers different options for specifying a document to sign. You can upload templates to Dropbox Sign or even create templates dynamically using the API. Then, when creating a signature request, you simply specify what template you want to use. The simplest option is to just upload a PDF file, and Dropbox Sign will add a page with signatures at the end of the document.
While uploading a PDF file when creating the signature request is the most straightforward option, and is ideal for demonstrating Dropbox Sign Embedded Signing in this article, you should carefully consider your requirements and decide which of the options above are best for your application's requirements.
In this case, you use the first option. The administrator can upload any PDF document, and Dropbox Sign adds a page with the signatures at the end of the document.
Open the /Pages/LeaseAgreements/New.cshtml.cs file. The code to accept the lease details and upload the file is in the OnPostAsync method:
There's a call to the SendToDropboxSignAsync method to upload the document to Dropbox Sign for signing. However, you'll notice the method is empty:
Replace the method with the following implementation:
At the top of the class, inject the DropboxSignConfiguration object so you can access the Dropbox Sign configuration. First, the SendTODropboxSignAsync method uses the API key you generated earlier to create a new instance of the Signature Request API. Second, you specify which signing methods signatories can use to sign the document. In this case, you enable all of them and set Draw as the default method. The following lines add all the signatories on the lease agreement to the document as signers. Last, you create the signature request object, which you then use to call the SignatureRequestCreateEmbeddedAsync method on the Signature Request API.
After sending the request to Dropbox Sign, the method saves the Signature Request ID and Signature IDs in the database. You need these values later to embed the signing experience.
Now that you can create signature requests for uploaded leases, you'll embed the signing experience into the app.
Embed the Dropbox Sign experience
Users can sign leases by signing into the application and going to the Lease Agreements page. Unlike administrators, who can see all agreements in the system, other users can see only the agreements they need to sign. The system manages this permission using an Administrator role.
The lease agreements are displayed using the following code, which you'll find in the Pages/LeaseAgreements/Index.cshtml file:
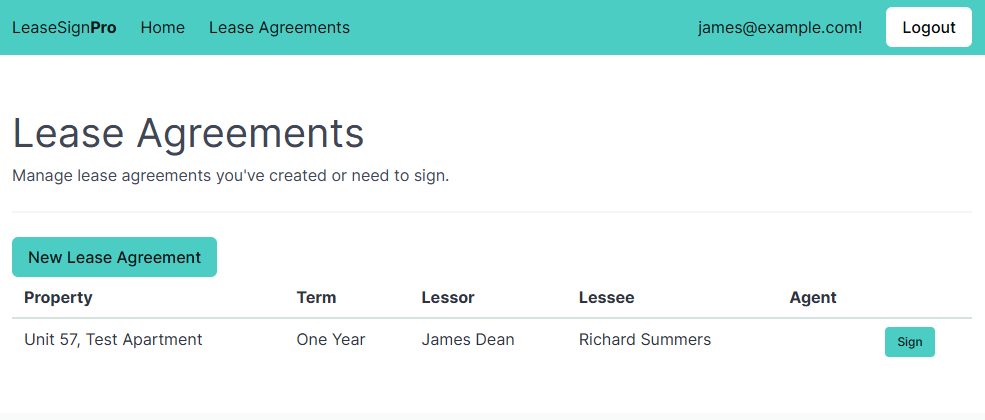
Notice how the Sign link takes the user to another page, /LeaseAgreements/Sign, where they can sign the document. You embed the signing experience on this page.
Before embedding the signing experience, you must generate a Sign URL in the backend. The Dropbox Sign JavaScript SDK uses this URL to load the signing experience for the specific signatory.
Open the Pages/LeaseAgreements/Sign.cshtml.cs file and replace the OnGetAsync method with the following snippet:
This snippet initially injects the DropboxSignConfiguration object so you can use the Dropbox Sign SDK. The method then retrieves the authenticated user and lease agreement using the lease agreement ID in the URL. The next few lines check if the current user is a signatory on the document. If they aren't, the user gets redirected back to the list of lease agreements. Otherwise, you use Dropbox Sign EmbeddedApi to generate a Sign URL for the signatory. This Sign URL is passed to the view by setting the SignUrl property.
To embed the signing experience, you need to load the Embedded Signing JavaScript library. In this article, you conveniently load the script from a content delivery network (CDN). However, you should download the production script from GitHub or include it in your application using the npm package so your application doesn't break if the CDN goes down.
Open the Pages/LeaseAgreements/Sign.cshtml page and replace the Scripts section with the following code:
Initially, the snippet loads the Embedded Sign JavaScript library from the CDN. The second script retrieves the Dropbox Sign Client ID from app settings and the Sign URL from the code-behind file. The script creates a new HelloSign JavaScript client and configures event handlers to handle success and failure events. If the user finishes signing the document, a success message is shown. Otherwise, the user is directed back to the Lease Agreements page if they cancel signing or an error occurs.
Finally, the signDocument function calls the open method on the `client` with the Sign URL and client ID. This function gets invoked on the DOMContentLoaded event so that the signing experience appears as soon as the page loads.
Test the application
At this point, you're ready to run the application and test the signing experience. Run the following command in your project directory:
A browser window opens, and you need to navigate to the home page.
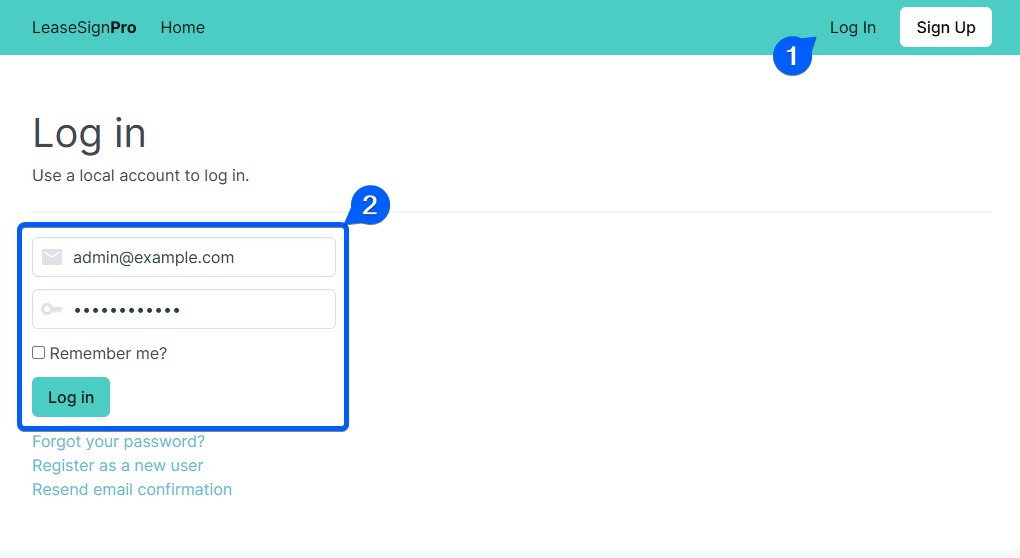
Log in as an administrator and upload a lease agreement to sign. For convenience, the application seeds an administrator with the following credentials when starting:
- Username: admin@example.com
- Password:
Password123!
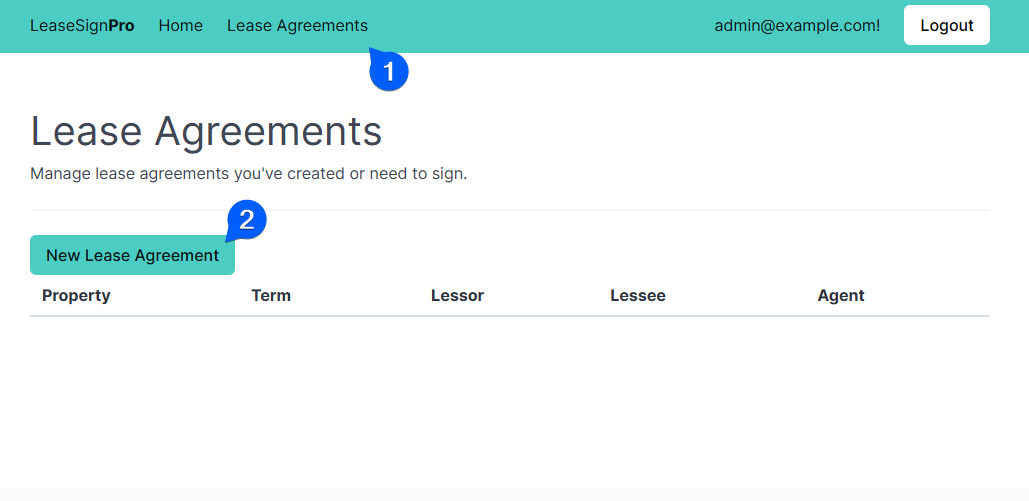
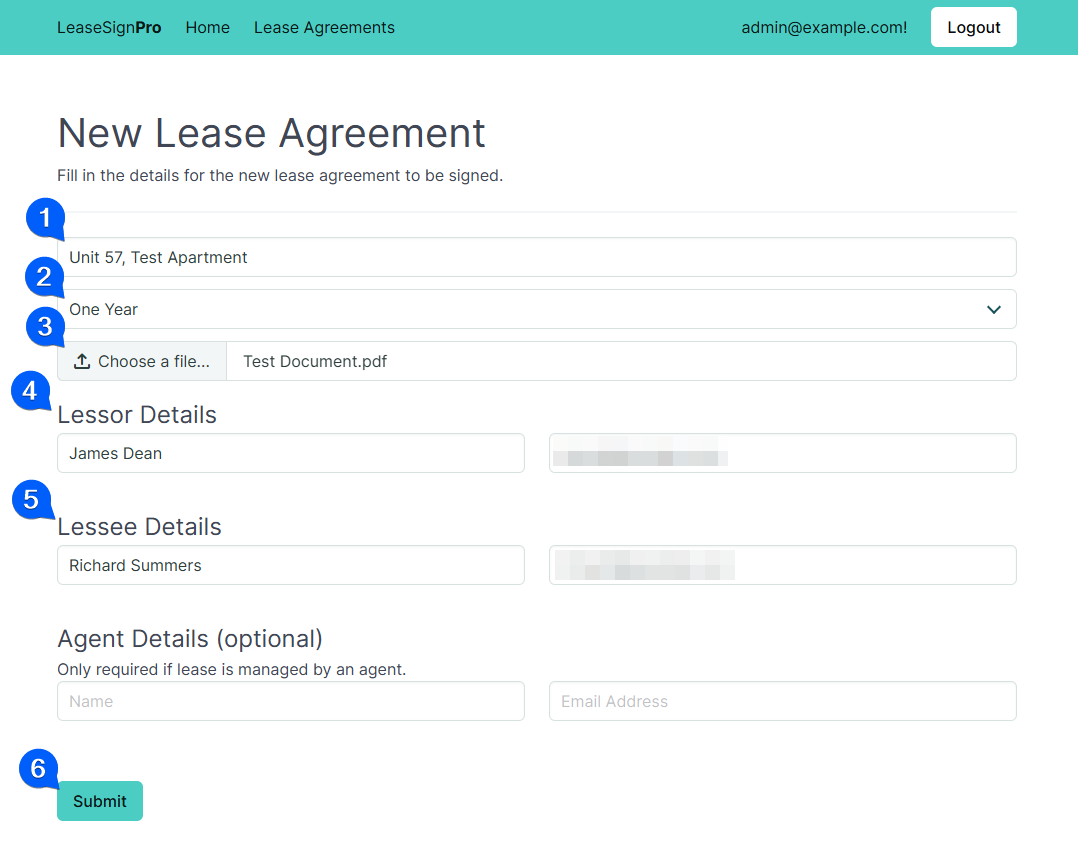
Once logged in, go to Lease Agreements and click the New Lease Agreement button:
Fill out the required fields in the form that appears. You can upload any PDF file for testing. You need to log in as the lessor, lessee, or agent to sign the document, so use an email address you can use to register an account when filling in those fields. Finally, click Submit to upload the lease and create a signature request:
Sign out and register a new account using one of the emails you submitted with the lease agreement. Once registered, go to the Lease Agreements page. You should see the lease agreement appear:
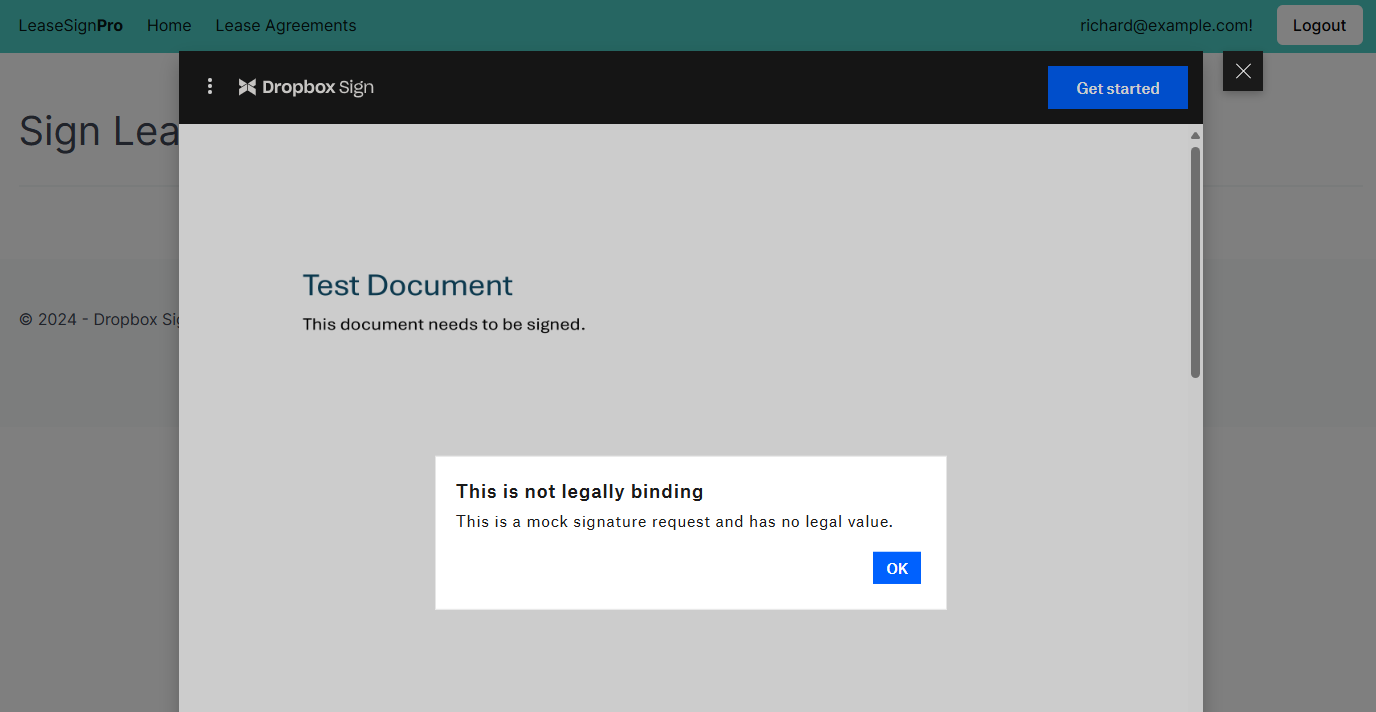
Click the Sign button. You should see the Dropbox Sign Embedded Signing experience load:
Complete the signing process. When finished, you should see a success message appear:

Make the solution production-ready
Congratulations! You've successfully embedded Dropbox Sign in your C# application. However, you must set up a few more things before implementing signing in production.
Before deploying the application to production, consider implementing additional features using the Dropbox Sign SDK. For example, you might want to check the status of a signature request when viewing all the lease agreements as an administrator. You can also use Dropbox Sign Events to get real-time updates on the signature request, meaning you don't have to ping the Dropbox Sign API continuously:
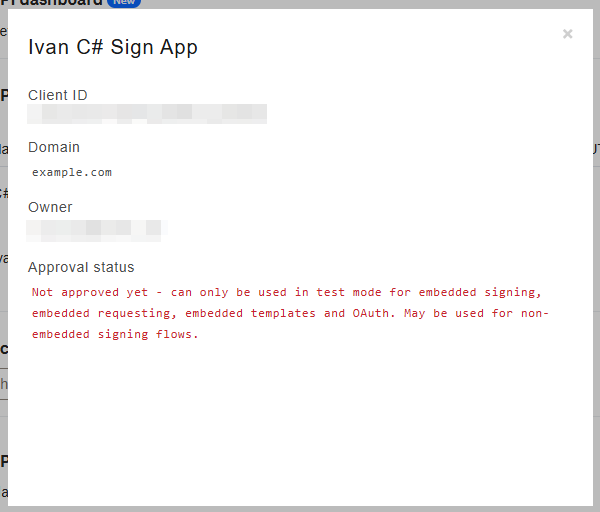
When creating a new API app in the Dropbox Dashboard, you used example.com as your domain. Before going to production, you must associate your domain name with the application. If you don't, the Dropbox Sign Embedded Signing experience won't work when you turn off test mode.
In addition to specifying the correct domain name, you also need Dropbox to approve your application. You can still test your application without approval, but it won't work in production when test mode is disabled.
Conclusion
In this article, you learned how Dropbox Sign Embedded Signing can enhance your business processes by letting users sign documents digitally with legally binding signatures.
First, you created a new signing request in C# using the Dropbox Sign SDK for a lease signing application. Second, you used the Dropbox Sign Embedded JavaScript library to embed the signing experience in your application, letting users sign documents directly in your application.
Last, you reviewed some tips before embedding Dropbox Sign in your production application.
You can find the final application's source code on GitHub.
The lease signing application is just one potential use case. Financial services and insurance companies can also use it to let new clients sign contracts within their online portal. Legal services can streamline signatures on documents by embedding the signing experience into their portal. Using Dropbox Sign Embedded Signing in a CRM system lets sales teams easily manage signing contracts and agreements in a single platform. Dropbox Sign is even HIPAA compliant, meaning you can integrate embedded signing into your patient portal so that patients can quickly sign intake and consent forms in one place.
If you'd like to learn more about Dropbox Sign and how you can integrate it into your application, look at the Dropbox Sign documentation. Dropbox Sign offers a generous free trial that lets you test some of its premium features before paying, which you can access on its Pricing page.
Restez informé
Thank you!
Thank you for subscribing!


