Using eSignature software, clients can sign important documents from anywhere without needing a pen or paper. These applications ensure the documents are legally sound and streamline their exchange between users and businesses.
A well-built eSignature product should:
- work across operating systems and devices
- encrypt and secure the transfer of documents between the sender and the receiver
- track the document and notify users of their options, such as signing, reviewing, or downloading the document
- integrate with third-party software used for document creation and storage
For example, Dropbox Sign allows businesses of all sizes to send, receive, and manage legally binding signatures on documents such as sales or employee contracts, rental agreements, insurance forms, and more. In addition to pre-built integrations, Dropbox Sign offers an API with a variety of features that your business can use to embed eSignature functionality directly into your website or app.
To get familiar with Dropbox Sign, you’re going to use embedded signing in a Spring Boot Java application. (Note: the completed code sample is available in this repo).
What Is Dropbox Sign embedded signing?
Embedded signing, a feature in the Dropbox Sign API, allows customers to sign documents directly on your website by using a secure iFrame. The process is seamless for end users, and they don’t need a Dropbox Sign account to sign. The embedded signature request can be created using a local file or a pre-built template you’ve created (from either the web app or API). For instance, if you run an employment agency that requires new hires to sign an employment agreement, you can display that agreement in your application or website instead of sending them to a different tool to attach and verify their signatures.
You could also use embedded requesting so users can create and send signature requests from your application, for instance, if your HR team needs to send contracts to potential employees or clients. Or you could give HR the ability to modify templates from your app using embedded templates.
This article focuses on embedded signing. The embedded signing walkthrough from Dropbox Sign may be a helpful resource to reference for help when following along with this article.
Let's integrate embedded signing into a Java Spring Boot application. Notes and helpful tips will be written in italics.
Implementing embedded signing
Pretend you’re developing for an employment agency requires that candidates sign an NDA to view available work opportunities. You’re going to embed the eSigning functionality into the agency website by using Dropbox Sign. Let’s go through a few things before we begin.
Prerequisites
You’ll need the following tools to follow along:
- Dropbox Sign account: Create a free account from Dropbox Sign’s API pricing page. You can test everything from a free account by using test_mode (test_mode = true) in your calls.
- Java: Java version 8 and above is recommended. This tutorial uses version 8. Note that if version 9 or above is used, you’ll need additional JAXB API dependencies.
- Build tool: Maven or Gradle (This example uses Maven).
- Spring Boot: a microservice based web framework (suggest Spring Boot Getting Started if this is your first time using it).
- Ngrok or another tunneling service: To receive event notifications from Dropbox Sign, you will be implementing webhooks (Dropbox Sign calls theirs callbacks), which require a publicly accessible URL. For testing purposes, you can use Ngrok, which is a tunneling tool that allows a user to publicly expose local servers. This allows the public to interact with services or demos that might not be deployed to the internet.
Creating the Spring Boot application
You’ll need a project directory to organize your work while following along with this article.
- Create a sample Spring Boot application using the Spring Boot starter with these dependencies: Spring Web and Spring Boot DevTools.
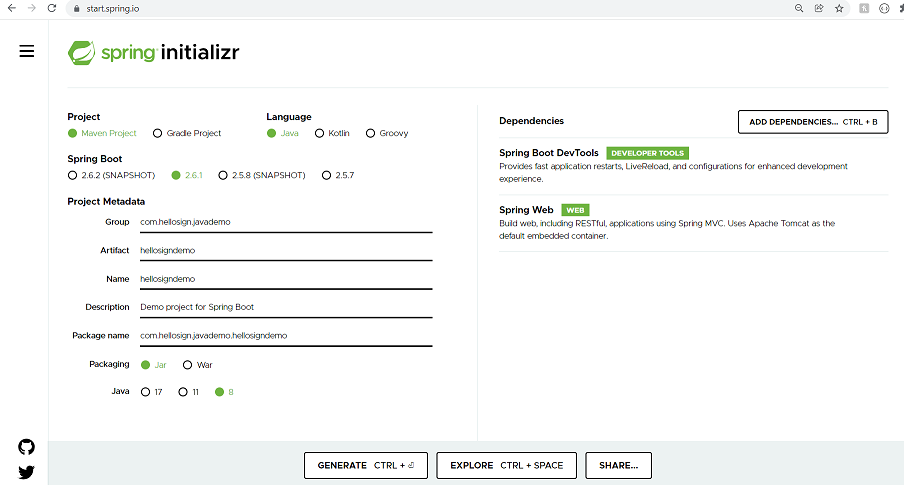
- Generate the project and extract the application from the zip folder.
- Open the project in your IDE of choice.
- Add the HelloSign Java SDK jar dependency in the dependencies tag in the pom.xml file.
Note: for a Gradle project, the dependency is:
Using a application.properties file for external variables
Important: don’t skip this step!
This sample uses variables in an application.properties file. This approach lets you define your values in one place, keeps you from hard coding them in, and lowers the risk of you pushing up sensitive information.
- Create a /src/main/resources/applications.properties file.
- If you cloned the repo, you can rename the example-application.properties file and use that.
- Use the format below. Add the `SIGNER_NAME` and `SIGNER_EMAIL` now, then replace the other values as you work through this article.
Getting your Dropbox Sign credentials
You’ll need an API key and client ID from Dropbox Sign to run the sample code.
Generate an API key:
- After logging in to Dropbox Sign, select Integrations and click the API tab.
- From the API Settings page, click Create Key to generate an API key for your account.
- Save the API key in application.properties: `HS_API_KEY=your_hs_api_key`.

Create an Api App
Dropbox Sign requires an Api App to use embedded features. You’ll need to create one to get a client ID to use in the sample. This sample also uses Api App webhooks, which you’ll set up at a later step.
- From the API Settings page, click the Create button next to Api Apps.
- Name the app and set the url to example.com. You’ll add the ‘Event callback’ url later for webhooks.
- Click Create Application.
- Save the client ID in application.properties: `HS_CLIENT_ID=your_hs_client_id`.
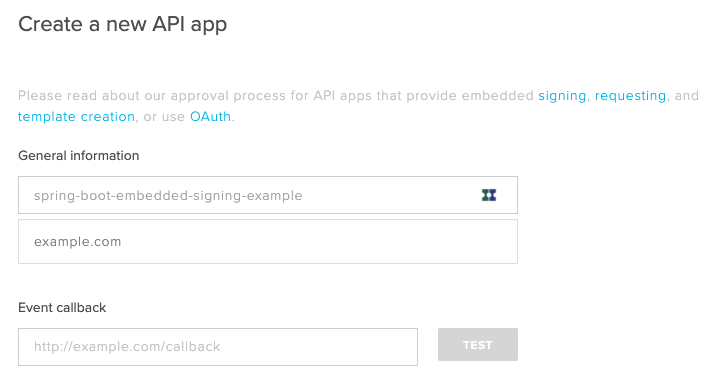
Note: you’ll need to edit the configuration of your Api App as we progress through this article.
Creating a Dropbox Sign template
Next you’ll create a template to use for the signature request by following the steps below.
- From the Dropbox Sign home screen (when you’re logged in), click on the Templates tab, then click Create a Template.
- Upload the file you want to turn into a template and click Next.
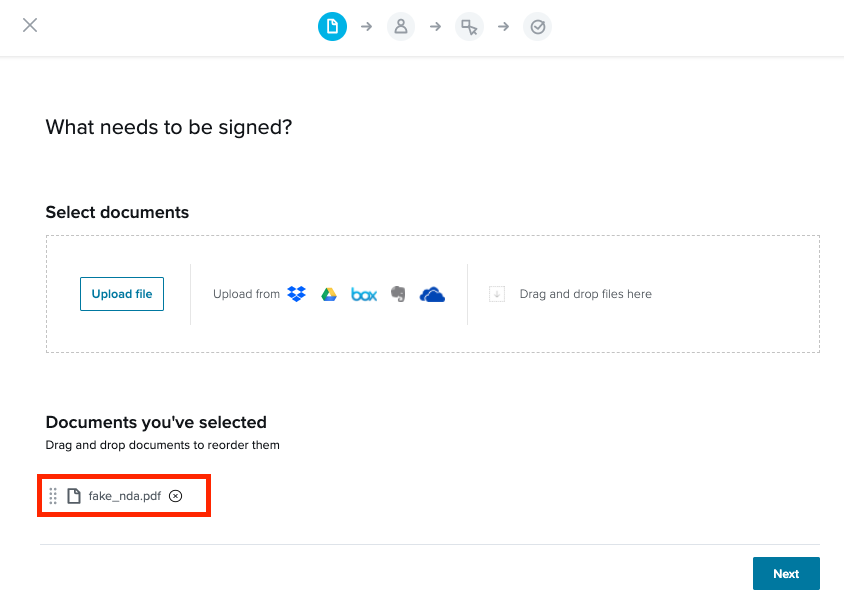
- Add the “Signer roles” to the template.
- Save the signer role in application.properties: `SIGNER_ROLE=signer_role_in_HS_template`.
- Click Next.
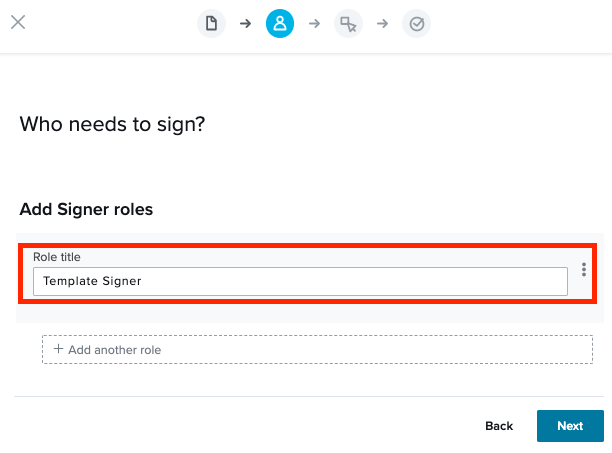
Place the fields where you want them in the document and click Next.
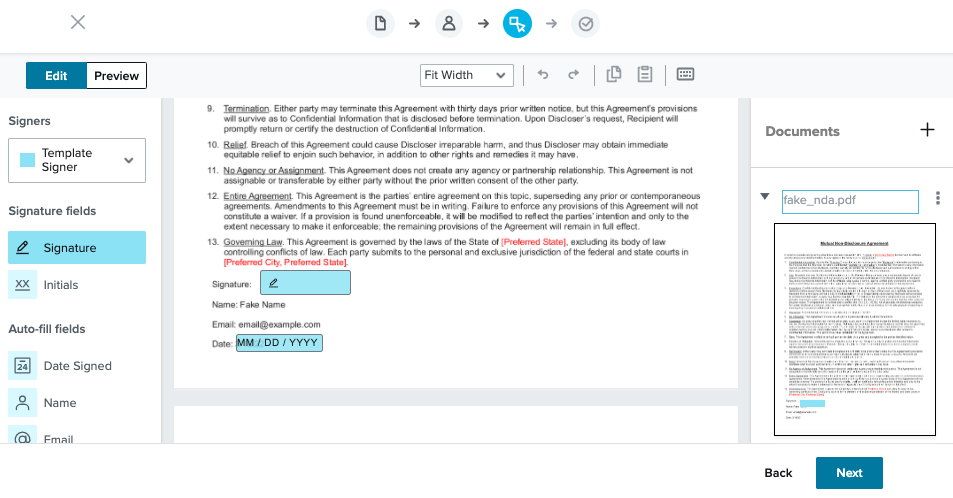
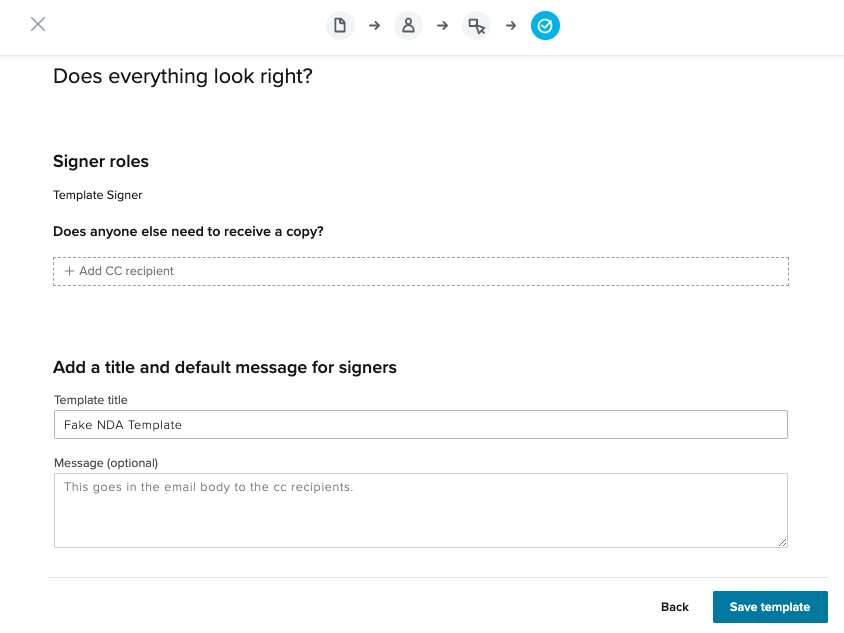
- Give the template a title, add any CC recipients, and include a message for the email body that goes out with the signed document. For embedded signing flows, emails to signers are muted and CC recipients are the only ones that are emailed.
- Click Save when you’re ready to save the template.
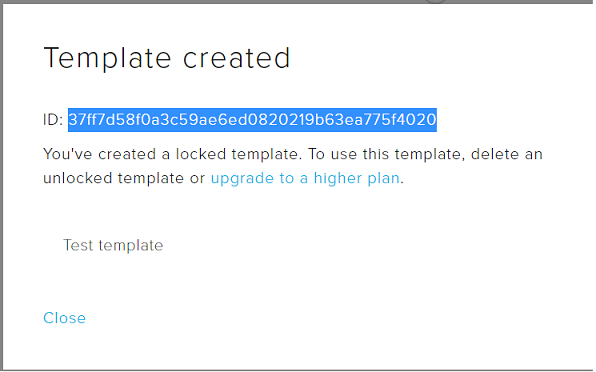
Upon saving, you’ll see a template ID, which you’ll need to run the sample code.
- Save the template ID in application.properties: `HS_TEMPLATE_ID=your_hs_template_id`.
You can also get the template ID later by selecting a template from the template page in Dropbox Sign and clicking more info (or you call the /template/list endpoint).
Creating a controller and service
Next we’re going to create the controller and service in our code base.
- Create a package named “controller” and create Dropbox SignDemoController.java in it. The controller will redirect incoming requests like the embedded signature request with a template to the appropriate service. It will also handle the event payloads from the Dropbox Sign API, which we’ll add later in this article.
- Create a package named “service” and create Dropbox SignDemoService.java in it. You’ll add the logic for this later in the article.
You can view the completed controller (HelloSignDemoController.java) and service (HelloSignDemoService.java) in the sample code repo.
Adding a webhook handler to your controller
In this section you’ll add webhook handling logic to your controller, use Ngrok to expose your localhost, and set callback url for your Api App in Dropbox Sign.
Dropbox Sign offers webhooks (aka Events and Callbacks), or real-time notifications of events, to notify your app or website about changes to signature requests as they occur. The sample code in this article uses webhooks to process Dropbox Sign events related to your embedded signature request. Note: the sample code only logs events, but in a production application you could also use that information to trigger specific actions like download signed documents or automating something.
- Add the code below to HelloSignDemoController.java. The code includes:
- A logger to see inside events.
- Environment variables to access your Dropbox Sign API Key (used to verify the event for security). These are being pulled in from your application.properties file.
- A POST endpoint mapping of `/hellosign/webhook` with webhook handling logic.
- With the webhook handler written, you need to start the server so it can send Dropbox Sign a response of "Dropbox API Event Received" for events, which is required for setting a callback url in your Api App.
- Run your Spring Boot application: mvn spring-boot:run. Make sure you can see your app running before proceeding to next step.

Note: you can see the completed controller (HelloSignDemoController.java) in the sample code repo.
Creating a callback URL for your API app
Your Spring Boot app is running and ready to handle Dropbox Sign events, but your Api App in Dropbox Sign doesn’t know where to send them yet. In this section, you’ll expose your localhost, construct a callback url, test it, and save it to your Api App.
To publicly expose the Spring Boot app running on your localhost, you need to use an http tunneling service. The example below uses Ngrok (grab it now if you didn’t in the Prerequisites section).
Expose localhost
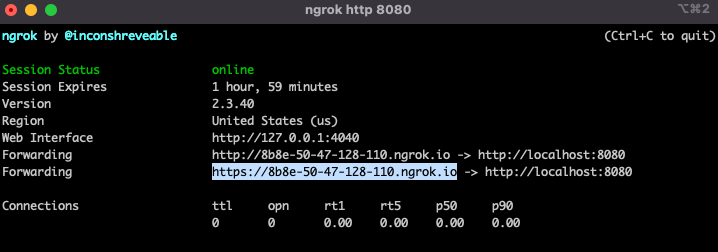
- Start Ngrok in your local shell environment with `ngrok http 8080`. Note: Ngrok must match your the port for your localhost. The Spring Boot port defaults to 8080.
Construct public url to webhook endpoint
- Take the https url from Ngrok and append the webhook handling endpoint from your controller (`/api/hellosign/webhook`). That’s the public address to your webhook handler.
- Mine looks like this: `https://8b8e-50-47-128-110.ngrok.io/api/hellosign/webhook`.
- This url will be used as the callback url for your Api App in Dropbox Sign.
Save callback url to API app
- Go to your API Settings page in Dropbox Sign (Integrations → API if you need to log into Dropbox Sign again).
- Click the Details button for the Api App you created earlier. (This must be the same app referenced by the `HS_CLIENT_ID` in your application.properties file).
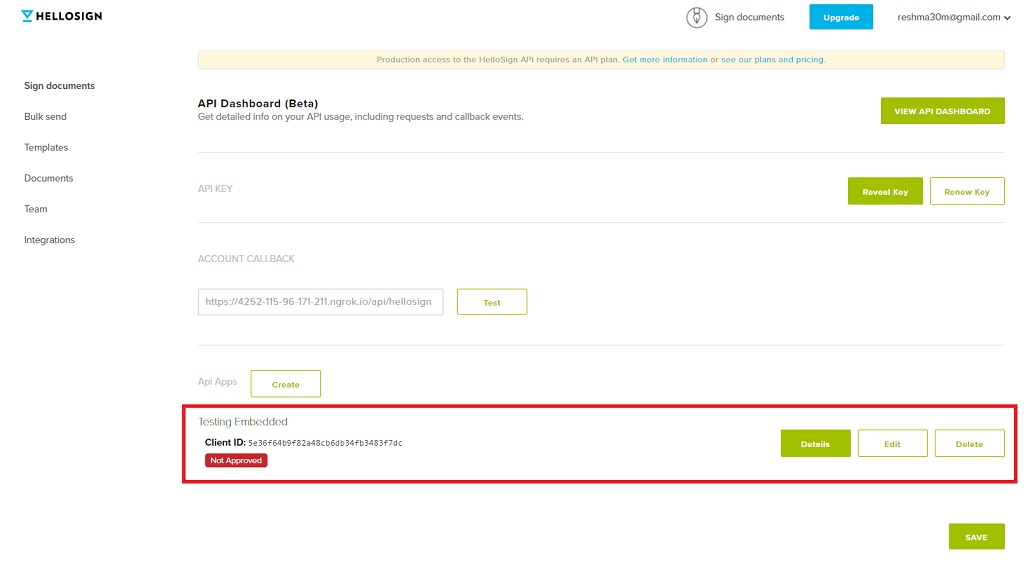
- Paste the public url to your webhook into the ‘Event callback’ field of your app settings and click Test.
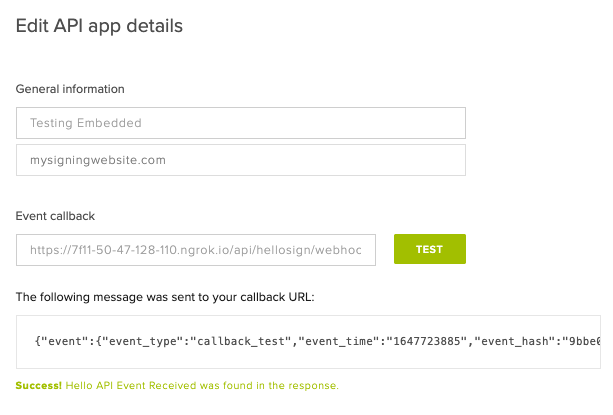
You can tell if it worked from the Success! message in the app settings. You can also see the event inside your Spring Boot’s console:

- Click Save if the test is successful. You’re ready for the next section.
If your test failed, verify the following:
- Your Spring Boot app is running and responding with "Hello API Event Received".
- Your Api App’s callback url matches your Ngrok url appended with the webhook endpoint. (i.e. ngrok_url/api/hellosign/webhook.)
Note that any time Ngrok is restarted you will need to update your app’s callback url. You can leave Ngrok running while restarting your Spring Boot app.
Inspect events from the API Dashboard
Sometimes it’s helpful to peak into the events being sent by Dropbox Sign. You can do that from the API Dashboard.
- From a fresh login to Dropbox Sign, you can navigate there by clicking Integrations → API → API Dashboard → App Callbacks. This can be a good way to inspect event payloads when you want to grab some specific field.
- Switch the toggle button to Test Mode (on the top left below the logo) to see your app’s events.
Below is the output from the test event callback we just sent:
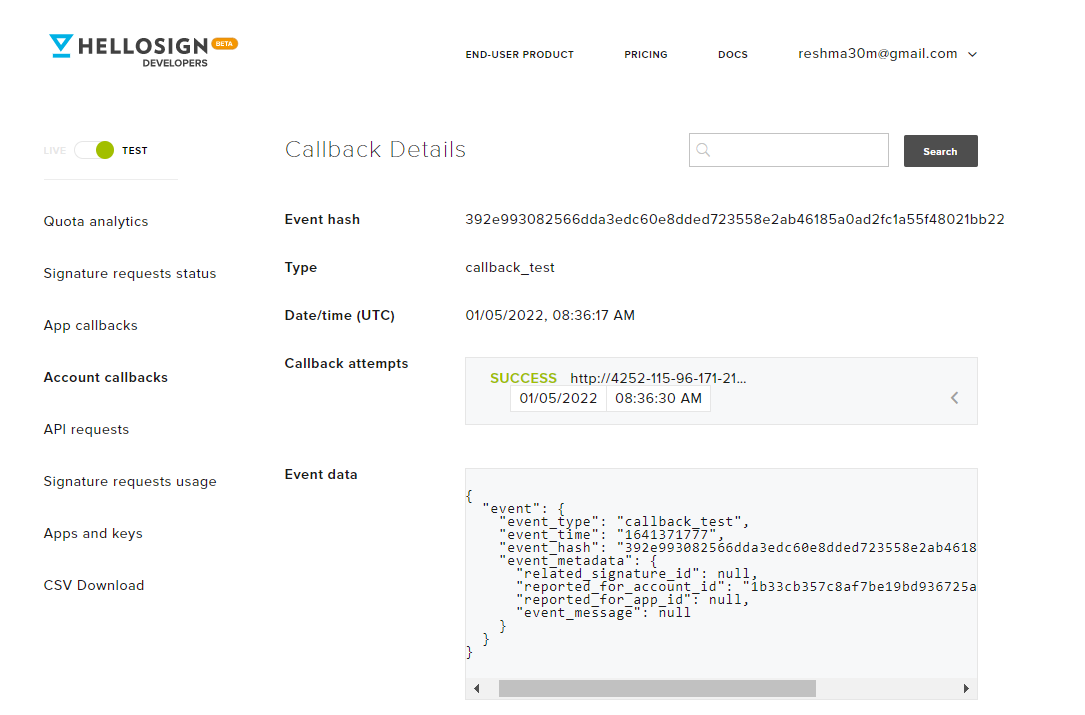
Now that you’ve confirmed the callback url is set up correctly, your app is ready to receive event payloads from Dropbox Sign. This will help you follow along with the embedded signing flow. Keep an eye out for specific events that you might want to trigger another action in a production implementation.
Adding signature request logic to your service
With the controller and webhook handling set up, you’re ready to add logic for sending the embedded signature request to HelloSignDemoService.java. Once your service is updated, you’ll need to connect it to your controller in the next section.
According to Dropbox Sign’s embedded signing walkthrough, two subsequent steps need to happen here:
- Create the embedded signing request.
- Create the sign url to embed in an iFrame.
Let’s get started.
In the service you created earlier:
- Bring in environment variables with `@Autowired`.
- Create a new method called `sendEmbeddedSignatureRequest()`.
- Grab the values you added to application.properties from the environment.
- Inside the new method method, construct an `EmbeddedRequest` object using your `hsTemplateId`, `signerRole`, `signerEmail`, and `signerName`. Note: you defined these values in application.properties during previous steps.
- Next, instantiate a Dropbox Sign client using your API key and send a `createEmbeddedRequest()` call to Dropbox Sign.
Each signature request contains a `signers` array. Inside that array each respective signer has their own `signature_id`. That value is used to generate a link (`sign_url`), which can be embedded into an iFrame for the user to sign.
- Grab the `signatureId` from the response using the `getSignature()` and `getId()`.
- Pass the `signatureId` to `getEmbeddedSignUrl()` and return the `signUrl` so we can call this method from the controller.
You can view the completed service (HelloSignDemoService.java) in the sample code repo.
Note: this sample handles a single signer flow. For embedded signing flows with multiple signers, you would need to generate a sign url for each respective signer. For example, consider an employment contract that must be signed by a candidate and prospective employer. You want them both to sign the document on your agency’s website (via embedded signing), but they won’t be signing (or even logging in) at the same time. Embedded signing always has to happen on a per-signer basis.
Mapping the signature request to your controller
Now that your service can return an embeddable sign url, you need to add the `sendEmbeddedSignatureRequest()` method in your controller (HelloSignDemoController.java) and add an endpoint to call it.
- Inject HelloSignDemoService using `@Autowired`.
- Add a `@PostMapping for` `/hellosign/embeddedsign` and connect the `sendEmbeddedSignatureRequest()` method.
You can view the completed controller (HelloSignDemoController.java) in the sample code repo.
Integrating with a frontend app
For this example, we’re going to skip building a front end and jump straight into the signing experience using Dropbox Sign’s Embedded Testing Tool. The end user’s signing experience is the same, but the sign url is being embedded into an iFrame on a Dropbox Sign page instead of one you’ve built as part of your front end.
You can add your own front end at this step if you’d like. In order to do that, you’d use hellosign-embedded, which is a client-side library built and maintained by Dropbox Sign to enable embedded functionality. You can read more about how to do that in the “Client Side” section of Dropbox Sign’s embedded signing walkthrough.
The next section will cover testing the sample app through the entire signature flow.
Testing this sample using CURL and the embedded testing tool
At this stage you’ve completed the following steps:
- Completed the prerequisite section (like creating a free Dropbox Sign account).
- Created a new Spring Boot app.
- Filled out an application.properties file.
- Created an API Key, Api App, and Template in Dropbox Sign.
- Built a controller (HelloSignDemoController.java) a service (HelloSignDemoService.java).
- Tested your webhook handler.
Now it’s time to test this sample app and demo the embedded signing experience from an end user’s perspective. The examples below are in curl, but you can also test using Postman or your preferred HTTP client. Perform the following checks before you start testing:
- Restart your Spring Boot app so the new method is available (Leave Ngrok running or you’ll need to set a new callback url in Dropbox Sign when you start it again).
- Double check the application.properties file to make sure you’ve added information for the signer (`SIGNER_NAME` , `SIGNER_EMAIL`) as well as your Dropbox Sign credentials.
Now you’re ready for testing. Follow along with the steps below.
- Combine your Ngrok url with the new endpoint that creates a signature request (`/api/hellosign/embeddedsign`). We’re going to use that url to make a POST request in curl. Mine looks like this: `https://201b-50-47-128-110.ngrok.io/api/hellosign/embeddedsign`
- Create an embedded signature request and generate a sign url by sending a POST request to your endpoint using curl:
`curl -X POST https://322b-50-47-128-110.ngrok.io/api/hellosign/embeddedsign`
- Copy the `sign_url` from the response:

- Add your information to the testing page, but wait to click Launch Embedded until the following step or it won’t work.
- For security, Dropbox Sign verifies that the signing page is being embedded on a website that matches the website configured in your Api App. You’ll need to turn that off before trying to embed using the testing tool.
- Open the Embedded Testing Tool page.
- Paste the sign url from the curl response into the Embedded URL field.
- Copy over the Client ID for the Api App that you used to send the request.
- Click Show advanced options.
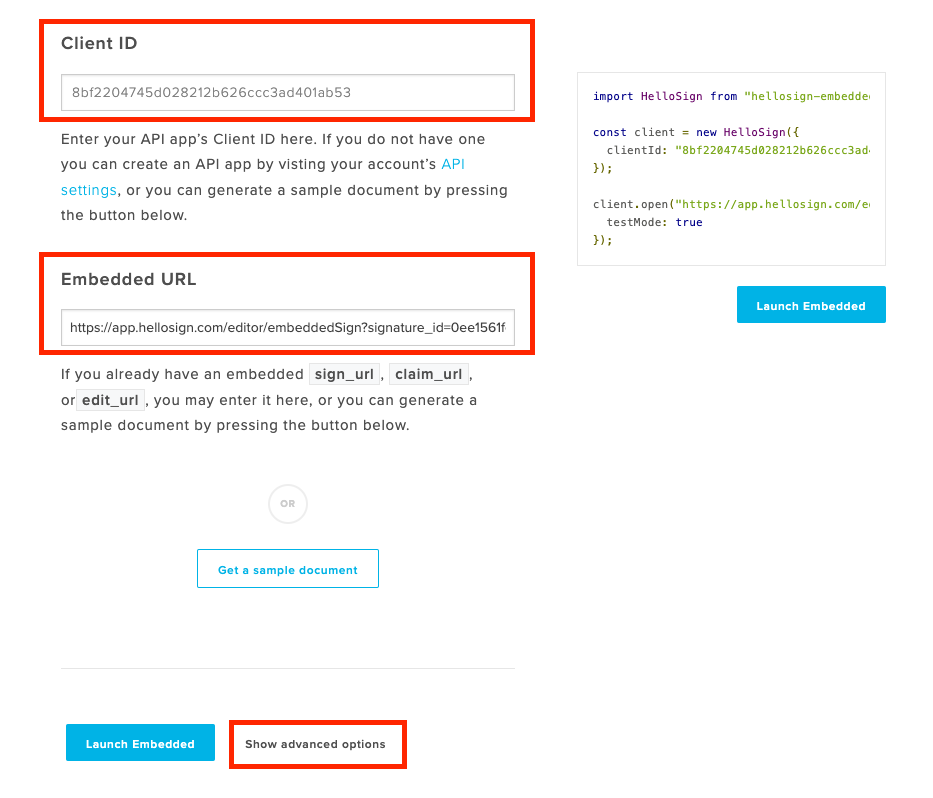
- Turn on Test Mode in the advanced options.
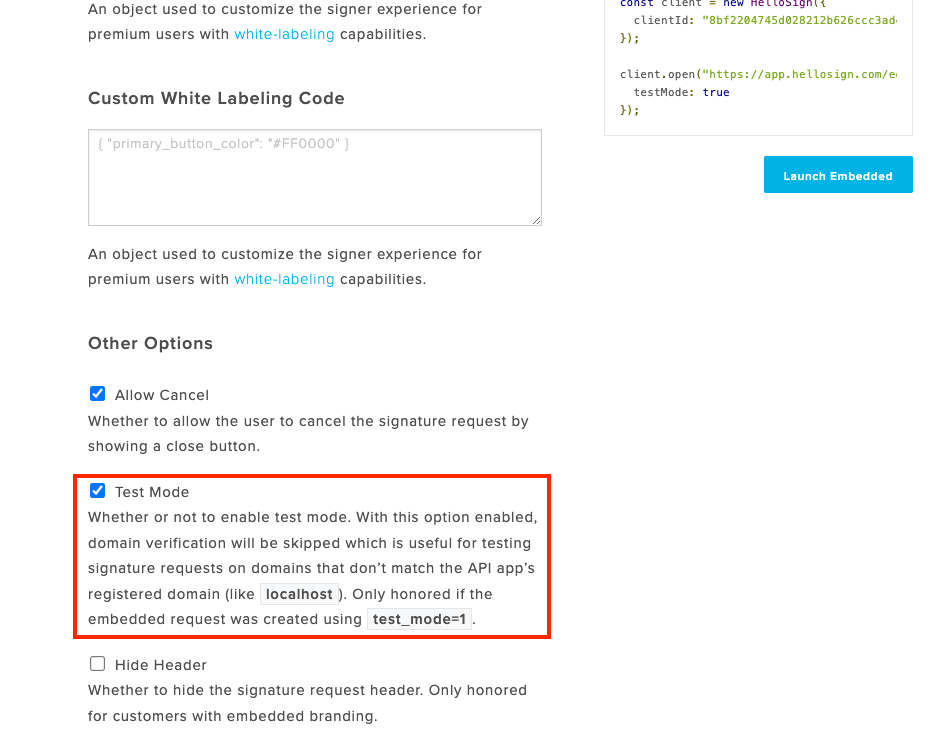
- Click Launch Embedded. This will open an iFrame with the document to be signed. Pressing Click to Sign opens up a frame with signing options. The user can follow the flow and insert their signature, then close the frame when they’re done.

- Review the event logs in your Spring Boot app to see the webhook events and inspect the completed document in Dropbox Sign.
Great job! You’ve completed an embedded signing flow all the way through!
Troubleshooting
If you are receiving errors when sending your POST requests, you may need to add JAXB API dependencies. If that is the issue then add the following to your pom.xml file under the dependencies section:
Conclusion
To see the entire code for this tutorial, check the GitHub repository. Please feel free to clone and run the sample if that approach works better for you than following along with this article.
As you’ve seen from this article, the Dropbox Sign API is a great way to integrate embedded signatures into your Java Spring Boot app. This feature allows your users to sign important documents without ever having to leave your app. Try using this feature with white labeling for a truly seamless signing experience.
Dropbox Sign provides a variety of other useful features for your software as well as hands-on API support. You can also embed other useful features to give your users the ability to create templates or signature requests from inside your app. When you’re ready, explore the walkthroughs and documentation at the Dropbox Sign website or sign up for a free trial and start building.
Håll er uppdaterade
Thank you!
Thank you for subscribing!


