.svg)


外观全新但功能同样出色的产品!HelloSign 现为 Dropbox Sign。
概述
It’s common practice to ask developers contributing to an open source project to sign a Contributors License Agreement or CLA. A CLA lays out simple rules to ensure the contributor has the rights to use the code being incorporated as well as adherence to particular style or policies.
This tutorial shows one of the multiple ways to facilitate this process by implementing a CLA signing flow embedded in a webpage using the developer’s GitHub identity and the embedded signing capability of the Dropbox Sign API. More specifically, we will implement a minimalist Web Server using Node.JS and Express that will kick off an OAuth authorization flow with GitHub; It will first authenticate the user, then request authorization for our application to access the email of the contributor. With this information, we will directly present to the user a signing page containing the CLA document using the Dropbox Sign API. Additionally, the document to sign is created from a template and we will pre-fill it with the username and email pulled via the GitHub API.
Here is a screen capture of the flow we will implement:
One important thing about this flow, is that we first validate the signers identity. We delegate this task to GitHub as ultimately this is the identity required to make code contributions. This is a critical element before embedding the Dropbox Sign signing experience directly in your application as identity validation is left to the developer in an embedded scenario where Dropbox Sign is not responsible for sending emails to the signers.
This project will use the following tech stack:
- Node.js and Express for the Web server. The minimum version required for Node.JS is 8.2.1
- The HelloSign NodeJS SDK to make server API calls into Dropbox Sign
- The hellosign-embedded client-side library, allowing to embed the signing experience within a web page
Running the code
If you simply want to run the code, follow the steps below, otherwise, follow the tutorial for a step by step.
Preparing the server
Make sure Node.JS is installed on your machine, if that is not the case, go to Nodejs.org and get the latest version. At the time of building this sample code, we have used version 15.5.1. The minimum version required to support this sample code is 8.2.1.
To start your project, simply create a folder, navigate to it and initialize your project with a minimal package.json file
We will now install the following important dependencies:
- express as the Web application framework
- morgan that will give us Http login and enable us to see server activity in the terminal
- hbs which is is the handlebars view engine used by Express. The view engine allows express to create dynamic HTML content using templates stored inside the /views folder.
- dotenv used to load environment variables from an .env file
Run the following command to install the above libraries
Now create an index.js file and add the following code to initialize those libraries:
index.js
Keeping sensitive information safe
There is sensitive information that should not be hardcoded like application keys and secrets. There are also items that should be configured for a local test vs server production such as the redirectURL of the OAuth flow. The dotenv library loaded in the previous section will help us keep sensitive or environment specific information separate in an .env file. It is important to make sure you don’t commit this file to any repository. For a git repository, add it to the .gitignore file.
As a next step, create a .env file and add the following values which you will be replacing in the next sections.
.env
Configuring the GitHub app
In order to request access to private information such as the user’s email, you need to register an OAuth application using your personal GitHub account. In this process, you will need to specify an Auth Callback URL which is the URL that GitHub will redirect to when the authorization is complete. In the GitHub app registration process enter the following value:
GitHub Authorization Callback URL
Once registered, you will be able to retrieve from the GitHub app configuration page the Client ID and the Client Secret. In the .env file replace the first three variables with the values from GitHub like shown below
.env
Implementing GitHub OAuth
With GitHub configuration in place, we can implement the OAuth authorization flow which will not only authenticate the user, but it will also give us access to the contributors email after proper authorization. Here’s a diagram that shows the sequence of events on that flow.
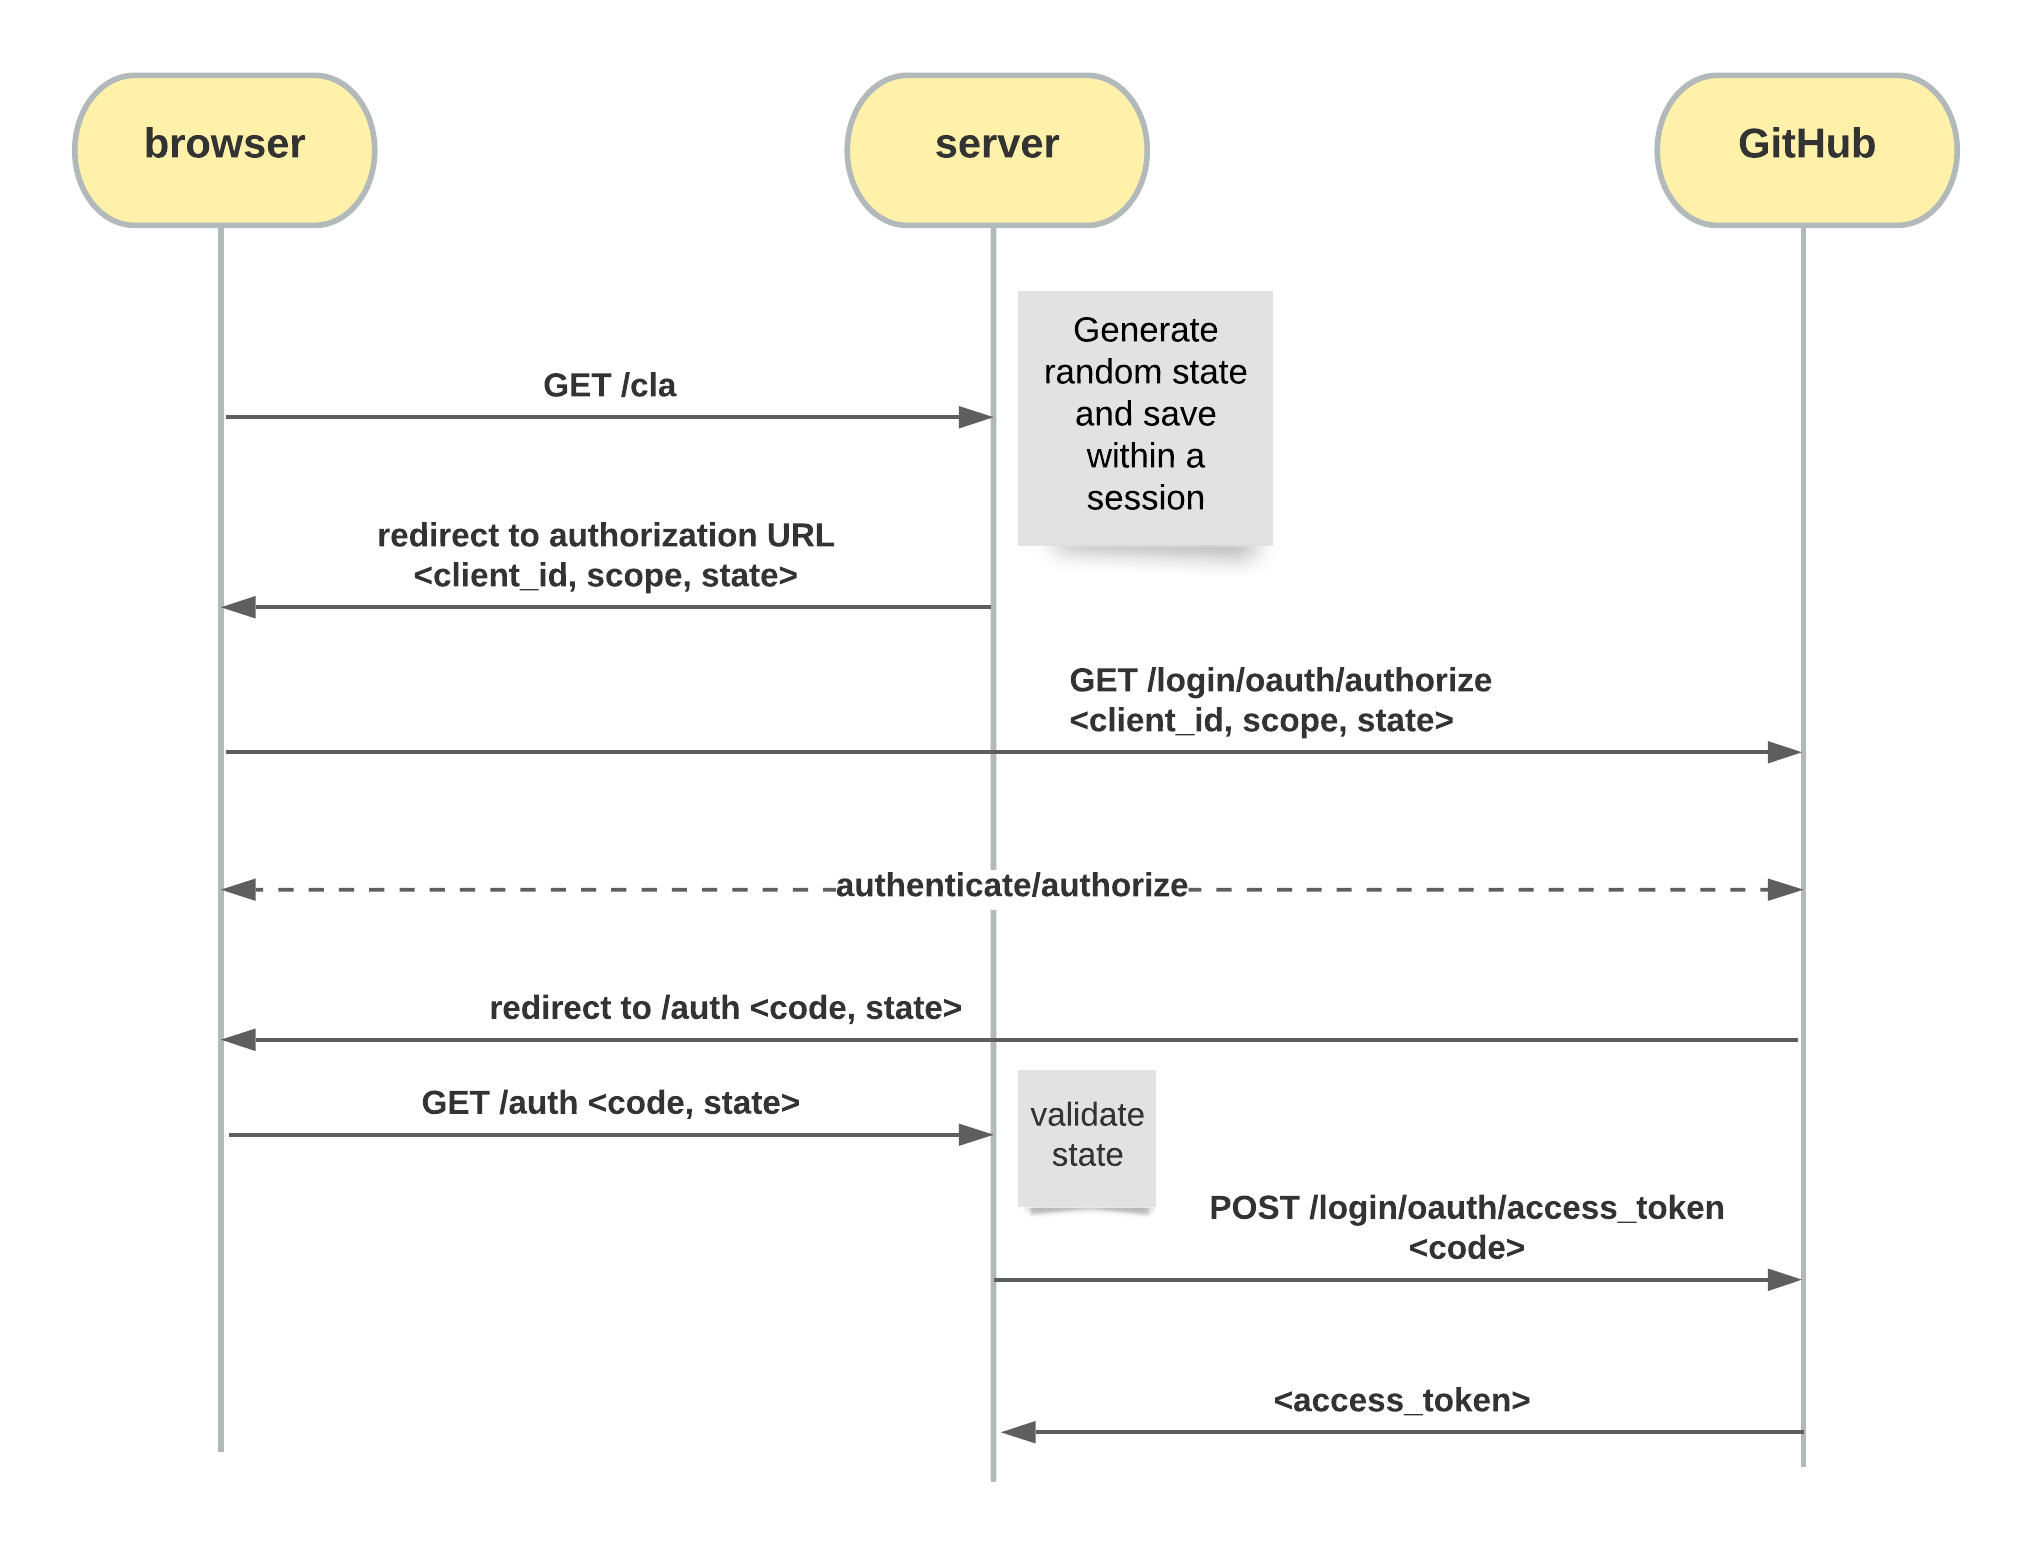
With a valid authorization token we can now retrieve the primary email and the GitHub username. We will save both values in the current session, so if we receive another call from the same user, we don’t need to authorize the app again as long as the session is valid. So to complete the loop, we will check first if the user has an email and username in the existing session and if not, we will kick start the OAuth flow.
Let us first install all the libraries required for the OAuth implementation
And then, create a github.js file with the following code
github.js
Now let’s add the session initialization and the two routes in the index.js file: the /cla route to kick off OAuth, and the /auth route GitHub will redirect to after this has been completed. For this, add the following lines to the index.js file right after the port definition.
index.js
and add the routes piece right after the line where the server is started
index.js
Make sure to add any random value to the session secret in the .env file. Remember that for testing purposes we use local storage. For a production setup, please review the express-session documentation.
.env
Configuring Dropbox Sign API app
To present the embedded signature page we will be making server calls to the Dropbox Sign API and also using a client-side library to display the signing experience in the browser. In order to use these two elements, you will need a Dropbox Sign API app configured. This API provides a Test mode which allows users to make non-legally binding signature requests for testing purposes for free and without having to enter a credit card. Making valid signature request calls requires a paid plan. For more information visit the Dropbox Sign API website.
To configure the Dropbox Sign API app:
- Create an account if you don't already have one and retrieve your API Key from the settings page. Copy this value into the .env file
- Create an API app (login required). You will need to enter a domain. If you don’t have a domain, just enter any sample domain like example.com as we are only going to be using Test mode and bypassing domain validation. Note that a production app requires this validation to be successful and client library will only work on a registered domain.
After creating the app, you'll be presented a Client ID. Copy the value into the .env file and with this, you should have now these two values in the .env file
.env
Using Dropbox Sign Templates
One important element for this example is the ability to automatically pull a templated contract and pre-fill it with information about the user obtained from the authentication with GitHub. While the information we fill automatically into the contract such as GitHub username and email should not be allowed to be changed, we can also provide some fields to be filled by the signer at signature execution time. To learn more about templates, visit the template documentation page.
- Login to Dropbox Sign and click on the create a template option. Even if you don’t have a paid plan, you can create templates to try the API in Test mode
- Upload a document and click on Next at the top
- You will need to enter a signer role, this is important as you will need to specify it in the API calls. In this case, we will call the signer Contributor and will add it to the .env file
Now you need to prepare the template with some special considerations as described below

In general, what you will do is dragging fields from the left, place them on the document and configure them on the right. Each time you place a field, you can assign an owner and specify if it is required or not, a solid filling indicates that a field is required.
We will add two text boxes, one for username and another one for email. These are particular because we want to pre-fill them and we don’t want them to be editable as we are retrieving this information from GitHub ensuring that we can trace this contract to the user making a contribution. To accomplish this, you will need to assign them to the Sender role (which is added by default) as shown in the image (which is why they appear in purple color). Additionally, you need to give them a reference name that you can use with the API, in this interface is called the Merge Field. So, for the Merge Field we will use the following values: github_email and github_username. These will be referenced later in the source code.
Finally when you are saving your template, you can specify an email that will receive copies of signed documents and give your template a name, resulting in a message with a template id which you will also add to your .env file, completing the project configuration.
.env
Embedding the signing experience
Part of the magic of the Dropbox Sign API is allowing to embed the signature experience directly in a website. This saves a back and forth of emails as we will send the user directly to the signature page once the authentication is complete on GitHub.
Embedding the page is accomplished in three steps:
Note: To know more about embedded singing, visit the Dropbox Sign API documentation
To accomplish the first two steps, we will add a new file called hellosign.js which will be responsible for making backend API calls. To make things simpler, we will use the Dropbox Sign NodeJS SDK.
Add the following code to the new file
hellosign.js
Now we need to implement the client part of the embedding process. For this example we will use a minimalistic approach using handlebars as the view engine but you can use any framework you want. We will create a views folder and put there an .hbs file that will contain HTML code and inline JavaScript which will load the library. When the server calls a view to be passed onto the client, we can dynamically replace values contained in a handlebar expression, which is a value contained within a {{ and a }}.
so create a /views/index.hbs file with the following content
/views/index.hbs
A few things to notice:
To complete the code, we will make a small modification to the routing sections in the index.js file. The modified code will work like this:
- When we receive a call to the /cla route, we check if we have an email stored in the session
- If no, we will get it from GitHub via OAuth, store it in the session and redirect to /cla
- Once we have the email and username in the session, we retrieve it and make a call to our HelloSign function to obtain the URL to embed
- We load the hbs file passing both the client id and the embed url. This will create and respond an HTML file that contains the JavaScript code that loads the client.
Modify the /cla route in the index.js by adding a require line referencing the hellosign.js file we created above and then replacing the /cla routing code with the one below.
index.js
License
Apache 2.0
What to do from here
This code sample is intended for test and API exploration purposes, If you want to build upon this code sample, here’s a list of important considerations for you to make:
- Dropbox Sign API apps that use embedded flows require going through an app approval process. More information in the Dropbox Sign API Embedded Signing guide.
- For session management, we use local storage. In a production environment you want to use a proper database.
- A good way to build upon this sample is to allow the signer to download to the signed document. For this you can directly fetch the document after it has been signed using the Get Files endpoint.
Other resources
Dropbox Sign API Getting Started guide
Dropbox Sign API Code Samples in GitHub
Tips On Finding the Best Integration Model for Dropbox Sign API
保持更新
Thank you!
Thank you for subscribing!


