.svg)


外观全新但功能同样出色的产品!HelloSign 现为 Dropbox Sign。
If you are providing a service that requires signed contracts from users, managing those contracts can get increasingly complex as your offerings scale and grow. Using HelloSign in a React app can allow you to easily handle contracts for many users by updating your app automatically when eSignatures are received.
An online art gallery, for example, might need contracts for exhibition and commission terms, a time-consuming process to manage manually. The gallery manager can radically simplify contract management with HelloSign, even allowing automatic updates to the artist’s “showcase” when an eSignature is received.
In this article, we’ll show you how to include HelloSign in the React app for your fictional art gallery. You’ll embed the entire signing process in your web application, allowing artists to sign without going to another site. To get started, you can visit the HelloSign Developer Portal and start testing for free (no credit card required).
Install the HelloSign SDK in Your Application’s Back End
Before you begin setting up HelloSign in your application, you’ll need to sign up for a free account and get an API key. You can find your API key under the API tab on your account Settings. In order to embed the signing experience into your own website, you will also need to create an API App in the same place where you got your key. Your API App will need a name and a domain, the last one is only used when your app is in production for verification purposes.
Front end React integration with HelloSign can work with a range of back end frameworks. HelloSign offers SDKs for Python, Ruby, Java, PHP, NodeJS and C#/.Net. You will want to handle all API calls to HelloSign from the backend, so install the correct version for your backend SDK and save the API key and Client ID in your .env file.
You will also want to save your client ID in an .env file for your front end React app. To do this, you need to add the REACT_APP prefix, so it would look like this:
Set Up Your Application for Embedded Signing
When using the HelloSign API, you have two options for adding eSignature functionality to your application. The first option is to initiate the signing process through your platform, and then have users directed to HelloSign to prepare, send and request documents for signature. The second option is embedding the end-to-end signing workflow directly in your own application, keeping users on your site for a seamless experience. With the Embedded Signing feature, you will start a signature request process in your server and obtain a URL that can be embedded as an <iFrame> in your HTML code.
On the front end, the HelloSign Embedded package is a JavaScript library available through NPM. A React front end offers the flexibility to still include Embedded Signing, even if you are not using JavaScript for your back end. Since the only stages of the eSignature process that rely on the embedded options are front end processes, you can install the Node package directly in your React app.
For an embedded flow, you want to make sure that the API calls to HelloSign API happen in the back end so the API Key is kept out of view.
Associate Users and SignatureRequests In Your Back End & Display in React
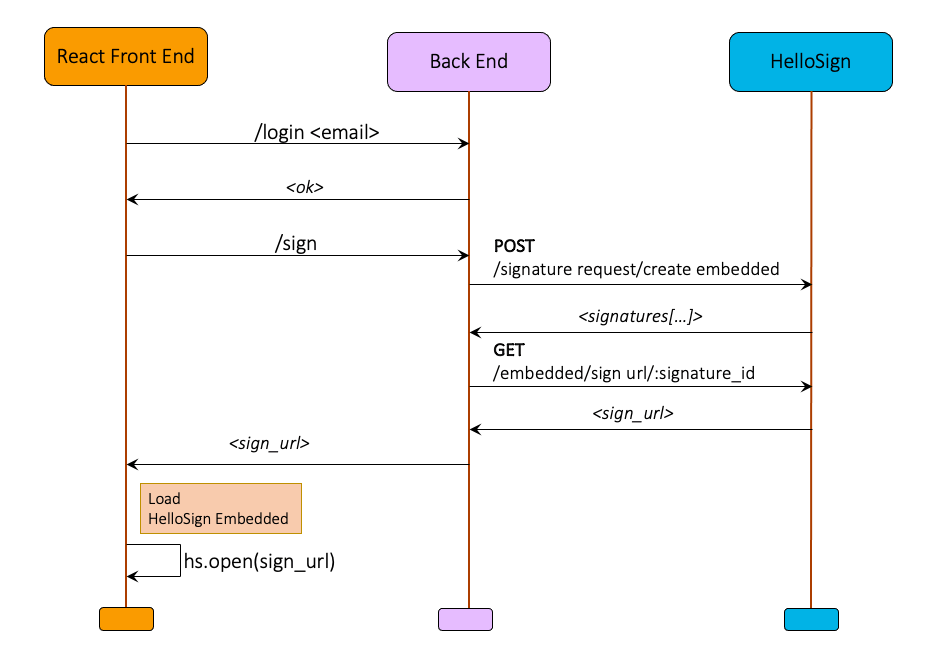
After being triggered by the front end, the backend will initiate the signing process by creating a new Embedded Signature Request. The response will contain a signature_id for each person that needs to sign, which you will use to get the sign_url that you will embed on the React frontend using the HelloSign Embedded library. The diagram below shows the sequence of steps. For more details visit the Embedded Signing walkthrough.
It is important for your application to validate the identity of the user before presenting the embedded signing experience. You can do this via any login/singing mechanism.
For our art gallery, we only want artists to sign if they do not have a current contract. Let’s assume that the Profile page for an authenticated user is a class component. That component can then track the signature status of any required contracts for that User, and route them to the Contract page only when necessary:
In this case, artists will automatically be directed to sign a new contract annually. The ContractPage component can call a backend method to generate a new Embedded Signature Request.
Set Up A Template and Use React to embed the signing experience
HelloSign can be used to send Signature Requests to any user meeting a certain condition, as above, or you can send Signature Requests to individual users. For our gallery, where many artists will have to sign the same forms, we want to do as much automatically as we can, so using HelloSign’s templates is a good option. The gallery manager creates templates manually online. Users are directed to the appropriate template for any given need, and can sign the appropriate forms right there on the gallery site, using embedded signing.
Again, you will want the call to the API to generate the Signature Request to happen in your backend in order to keep your API key protected, so the template ID can be associated with the Signature Request and then displayed in React using a call to your backend. The template ID in this example could be retrieved from a list of possible templates in the backend, or the template ID association could happen entirely in the backend routing methods.
In the code above, when the artist clicks to open the form, an Embedded Signature Request with Template API call is performed in the back end returning a SignatureRequest object. You could choose to record the whole object in your database, or, as is done above, just record the signature_request_id. That ID will allow you to call the HelloSign API later to get whatever information you need about the SignatureRequest.
Display Embedded SignatureRequests to Users
The embedded signing experience for the User happens entirely on your site. Use the HelloSign Embedded Node package in your client-side React app. When you created the HelloSign API App, you got a Client ID. Save that ID in your .env file, and use that to make the request from your front end application. Pass in the sign_url from your SignatureRequest object to open the embedded <iFrame>:
While you are still in testing, you can skip domain verification; this is only necessary for production applications. Note that the sign_url will only be valid for 60 minutes after it is opened, but that a new URL can be generated by simply accessing the signature_request_id from the HelloSign API again.
Update App Automatically When Documents Are Signed
For our purposes, the information that is most important is when the contract is signed by the artist, since that is a requirement to continue showing their work on the site. The admin side of the application uses the created_at property of the SignatureRequest object to filter a list of SignatureRequests, in this case returning just those from the previous day.
Once the list of all recent SignatureRequests has been returned, it is sent to another React component for review. It could also be sent directly into a function to update your User profile, as it is below in the displayOnSigned function.
Triggering the call to the HelloSign API with an event listener inside a React component gives the gallery manager an opportunity to review all new contracts and reduces the number of API calls, compared to checking each contract individually.
In the code above, the getSignatureRequestList function would trigger the server to make an API call to list_signature_requests. This request would have to come from the backend, as it requires the API key.
Once the admin user calls HelloSign to verify contract status, any artist accounts with updated contracts can be set to display artwork right away:
Use Premium Branded For A Fully Integrated Experience
Whether you choose an Embedded front end or not, HelloSign allows you to customize the appearance of your SignatureRequest with the premium_branding_options object. HelloSign’s Premium Branding process allows you to customize the color of many elements within the <iFrame>, and even helps ensure accessibility by verifying that your custom colors have appropriate contrast levels.
The app update POST request only needs to be made once to set your Premium Branding options, so you will want to locate it separately from any methods that are called frequently, and you may even want to do it with a cURL request. Once you have passed the Premium Branding options to your HelloSign app, those options will be preserved until you overwrite them with another update to your app. Each time users visit your site, their SignatureRequests will reflect your site’s visual themes, making for a more integrated experience.
Using HelloSign with React makes it possible to handle documents flexibly and responsively, creating an experience that feels modern, smooth and on-brand, while still meeting your complex document signing needs. To see what else you can do with the API, be sure to check the Developer Portal.
保持更新
谢谢!
感谢您的订阅!


